To Adjusting Your Camera on a Mac use the built-in camera, adjust lighting conditions, explore third-party applications, or even connect an external webcam.
Have you ever struggled with
grainy, poorly lit images on your MacBook’s camera? Despite being equipped with high-quality cameras, MacBooks
lack built-in settings to
tweak for optimal results.
This
comprehensive guide is here to navigate you through Adjusting Your Camera on a Mac like a pro. Dive into this treasure trove of tips and tricks, ensuring
crisp visuals in every video call or digital snap!
Quick Summary
- Adjusting the camera settings on a MacBook is easy, but Apple doesn’t provide many customizable options for the built-in camera.
- To optimize your MacBook’s camera settings, adjust lighting conditions, explore third-party applications for advanced adjustments, or consider using an external webcam.
- Proper lighting and environmental adjustments significantly capture high-quality photos and videos with your MacBook’s camera.
- Third-party applications like CamTwist, ManyCam, OBS Studio, and iGlasses offer additional features to fine-tune your camera settings on a Mac.
- An external webcam can provide better image quality and more advanced functionalities than built-in cameras. Check compatibility before purchasing one.
- You can improve the quality of your MacBook’s camera by adjusting image quality settings within individual apps that use the camera.
- Troubleshoot common camera problems by checking for physical obstructions, restarting your Macbook, updating macOS and apps, resetting privacy settings, etc.
- Mastering Macbook Camera Settings is essential for optimizing performance and capturing high-quality visuals. Explore different adjustments to achieve professional results.
How to Adjusting Your Camera on a Mac
Adjusting the camera settings on a MacBook is easy – you can use the built-in camera, adjust lighting conditions, explore third-party applications, or even connect an external webcam for more flexibility.
Using the built-in camera on Mac
Activating the
built-in camera on a Mac is pretty straightforward. However, it’s crucial to remember that Apple doesn’t provide a heap of customizable settings for the webcam.
Here are some steps to use and optimize your MacBook’s built-in camera:
- Open an app or website that uses the webcam, such as FaceTime or Safari.
- Your Mac should automatically activate the built-in camera when needed.
- To adjust lighting for better image quality, ensure you’re in a well-lit setting.
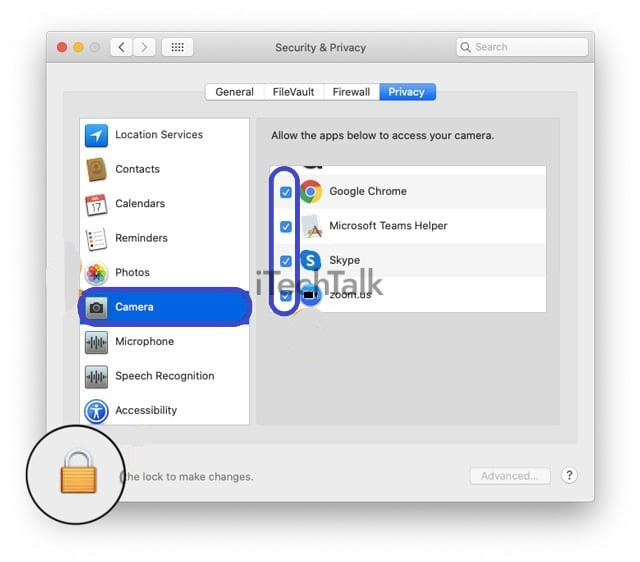
- If your MacBook’s camera isn’t working as expected, navigate to System Preferences, then Privacy & Security, and select Camera.
- In this section, see a list of all apps accessing your camera; familiarize yourself with them and make sure the necessary ones have access.
- Always keep your MacOS updated for optimal hardware performance, including the camera.
- Use third-party software if you desire advanced adjustments beyond what Apple offers natively on its devices.
- Consider using the Photo Booth application for basic video manipulations like flipping images or applying filters.
Adjusting lighting and other environmental conditions
Adjusting the lighting and other environmental conditions to achieve the best results with your MacBook camera is essential.
Here are some tips to help you optimize your camera settings:
- Position yourself in a well-lit area: Find a location with ample natural or artificial lighting. Avoid backlighting, as it can create shadows on your face or the captured object.
- Avoid direct sunlight: Direct sunlight can cause overexposure and washed-out images. If you’re using your MacBook camera outdoors, position yourself in a shaded area or use a diffuser to soften the light.
- Use additional lighting sources: If the existing lighting is insufficient, consider adding external light sources like desk lamps or ring lights to illuminate your subject evenly.
- Adjust brightness and exposure: In your camera settings, experiment with adjusting the brightness and exposure levels until you achieve the desired image quality. Increase the brightness for darker environments and decrease it if the image appears too bright.
- Enable automatic white balance: The white balance setting helps ensure accurate color representation in different lighting conditions. Enable the automatic white balance feature to let your MacBook adjust colours according to the surrounding environment.
- Reduce background noise: If there is excessive noise or distractions in the background, try to minimize them by decluttering or using virtual backgrounds available in video conferencing apps.
- Consider using third-party software: Although Apple doesn’t have built-in camera settings, you can enhance your webcam settings on a Mac by utilizing third-party applications like Camtasia, ManyCam, or OBS Studio. These apps offer additional features for adjusting lighting, color balance, and other parameters.
Utilizing third-party applications
To further enhance the camera settings on your MacBook, you can utilize
third-party applications specifically designed for webcam adjustments.
These applications offer
advanced features and customization options that may not be available with the built-in camera settings on your Mac.
By installing these apps, you can fine-tune various aspects of your camera, such as
image quality, exposure, white balance, and more.
Some popular third-party applications for Mac webcam adjustments include CamTwist, ManyCam, OBS Studio, and iGlasses.
These tools allow you to experiment with different
filters, effects, and overlays to add a personal touch to your video calls or recordings.
With their user-friendly interfaces and extensive functionality offerings, these third-party applications give you greater control over your MacBook’s camera settings and ensure you capture superior visuals every time.
Using an external webcam
To further enhance your camera experience on a MacBook, you can also consider
using an external webcam.

Here’s how to make the most out of this option:
- Connect your external webcam to your MacBook using the appropriate USB or Thunderbolt cable.
- Ensure that your MacBook properly recognizes the webcam. You can do this by checking the System Preferences and selecting the “Camera” section. Your external webcam should be listed as one of the available options.
- Select your external webcam as the default camera for your MacBook. This can be done in Zoom or FaceTime by accessing the video settings and choosing your external webcam from the dropdown menu.
- Adjust the settings on your external webcam if necessary. Many webcams come with their own software or control panel where you can customize various aspects such as brightness, contrast, and resolution.
- Test your external webcam to make sure it’s working correctly. Open an application that utilizes a camera (e.g., Photo Booth) and check if the feed is coming from your external webcam.
Tips for Improving Camera Quality on MacBook
Improve the quality of your MacBook camera with these expert tips. From adjusting image quality settings to troubleshooting common problems, this section will help you capture stunning photos and videos.
Read on to discover the secrets behind mastering your MacBook’s camera capabilities.
Adjusting image quality settings
To ensure the best possible image quality on your MacBook camera, you can adjust the following settings:
- Access the camera settings: Open the Camera app or any other application that uses the camera on your MacBook.
- Click on the “Camera” menu: In the menu bar at the top of your screen, click on “Camera.” A drop-down menu will appear.
- Select “Video Device”: From the dropdown menu, select “Video Device.” This will open a submenu with additional camera options.
- Adjust image quality: In the submenu, you will find options to adjust various image quality settings. These may include brightness, contrast, saturation, and sharpness. Slide these sliders to increase or decrease the respective attributes according to your preference.
- Enable high definition (HD): If available, check for an option called “HD” or “High Definition.” Enabling this option will enhance your videos and pictures’ overall resolution and clarity.
- Turn on “Touch up my appearance“: Some applications offer a feature called “Touch up my appearance.” It automatically applies subtle enhancements to your face during video calls or recordings when enabled.
- Experiment with different settings: Feel free to experiment with different combinations of settings to find what works best for you. Remember that certain adjustments may suit specific lighting conditions or environments.
Troubleshooting camera problems
Is your MacBook camera acting up? Don’t worry; we’ve got you covered!
Here are some troubleshooting tips to help you fix common camera problems:
- Check for physical obstructions: Ensure no objects are blocking the camera lens or covering the webcam. Sometimes, a small piece of debris can cause issues with image quality.
- Restart your MacBook: A simple restart can often resolve software glitches affecting your camera’s performance.
- Update macOS and apps: Ensure you have the latest version installed on your MacBook and any relevant app updates. Outdated software can cause compatibility issues with the camera.
- Reset privacy settings: If you’re experiencing issues with certain apps not recognizing or accessing your camera, go to System Preferences > Security & Privacy > Privacy > Camera. From there, uncheck and re-check the apps that should have access to the camera.
- Check permissions for Safari: If you’re having trouble using your camera in Safari, verify that the browser can access it by going to Safari Preferences > Websites > Camera.
- Disable ambient light correction: If your camera image is too dark or too bright in certain lighting conditions, try turning off ambient light correction in Photo Booth preferences or other third-party applications.
- Reset SMC and NVRAM/PRAM: Sometimes resetting these system management controllers can resolve hardware-related issues. Consult Apple’s support site for instructions specific to your MacBook model.
- Contact Apple Support: If none of the above troubleshooting steps work, contact Apple Support or schedule an appointment at an Apple Store Genius Bar near you.
Recording and Taking Photos with MacBook Camera
Learn how to fully utilize your MacBook camera by exploring the various recording and photo-taking features. From using QuickTake to controlling Zoom, this section will show you how to make the most out of your MacBook camera capabilities.
Don’t miss out on capturing stunning visuals – read more now!
Using the QuickTake feature
To simplify capturing quick photos and videos, you can use the
QuickTake feature on your MacBook camera. With QuickTake, you can
press and hold the shutter button to
start recording a video without switching modes.
This allows
seamless transitions between capturing photos and videos with a single click. It’s ideal for those
spontaneous moments you don’t want to miss out on documenting.
So whether it’s a breathtaking sunset or an impromptu dance performance, the QuickTake feature on your MacBook camera ensures you’re always ready to capture those memorable moments effortlessly.
Controlling zoom
To control the zoom on your MacBook camera, follow these steps:
- Launch the camera application or open the video conferencing platform you’re using.
- Look for a zoom icon or option within the app’s interface.
- Click on the zoom icon or locate the zoom adjustment slider.
- Drag the slider to adjust the zoom level according to your preference.
- Alternatively, use keyboard shortcuts if available. Many apps allow you to zoom in and out by pressing “Command +” and “Command -” on your keyboard.
Additional camera controls
In addition to adjusting the basic camera settings on your MacBook, you can utilise several additional controls to enhance your photography and video recording experience. These controls provide more flexibility and options when using the camera on your Mac.
Here are some of the additional camera controls available:
- Exposure: Adjusting the exposure allows you to control the light entering the camera sensor. Increasing the exposure brightens the image while decreasing it darkens the image.
- White Balance: This control helps you adjust the color temperature of your photos or videos. You can choose from predefined white balance settings like Auto, Daylight, Cloudy, Tungsten, and Fluorescent, or manually adjust it to match your lighting conditions.
- Focus: The focus control lets you determine what appears sharp in your photos or videos. You can choose an automatic focus for convenience or a manual focus for precise control over what’s in focus.
- Shutter Speed: This control determines how long the shutter remains open when capturing an image or recording a video. Adjusting the shutter speed affects motion blur and low-light performance.
- ISO: ISO is a measure of sensitivity to light. Increasing the ISO allows you to capture brighter images in low-light situations but may introduce noise/graininess in your photos or videos.
- Aperture (if applicable): If you’re using an external webcam with an adjustable aperture, this control lets you change the size of the lens opening, affecting depth of field and light intake.
Conclusion
In conclusion, mastering Macbook camera settings is essential for optimizing your camera’s performance and
capturing high-quality photos and videos.
By
adjusting lighting conditions,
utilizing third-party applications, and
exploring additional camera controls, you can enhance your visual content creation experience on a Mac.
With the
comprehensive guide provided in this article, you’ll be well-equipped to customize your camera settings and unlock the full potential of your MacBook’s built-in or external webcam. Start experimenting with different adjustments to achieve professional-looking results today!
FAQs
1. How can I adjust the camera settings on my Macbook?
To adjust the camera settings on your Macbook, go to the “System Preferences” menu and select the “Camera” option. From there, you can adjust various settings such as exposure, focus, white balance, and resolution.
2. Can I manually control the exposure of my MacBook’s camera?
Yes, you can manually control the exposure of your MacBook’s camera by adjusting the exposure slider in the camera settings menu. This allows you to make your images brighter or darker based on your preference.
3. What is white balance, and how does it affect my photos?
White balance refers to how your camera interprets colors under different lighting conditions. It ensures that whites appear truly white in a photo. Adjusting the white balance setting on your Macbook’s camera ensures that colors are accurate and true to life in your photos.
4. Can I change the resolution of my MacBook’s camera?
Yes, you can change the resolution of your MacBook’s camera by selecting a different resolution option in the camera settings menu. Higher resolutions result in larger file sizes but offer more detail in photos or videos captured with your device’s built-in camera.