Apple only lets you technically lock your keyboard by locking your screen. You can quickly lock your screen with the keyboard shortcut: Control + Comand + Q.
It’s happened to all of us – you’re powering up your Macbook, you get up to make some coffee, and off in the distance, you hear that dreaded sound: a keystroke. What was once a private session has now been interrupted by an unknown intruder! You know what needs to be done; it’s time to learn how to lock your Macbook keyboard.
There are some upsides and downsides when it comes to locking your Macbook keyboard. I will cover all of this below, plus offer a few third-party apps to make your life even easier.
Related
Lock Your Macbook Keyboard By Locking Your Screen
Unlike a Microsoft Laptop, Apple doesn’t let you traditionally lock your keyboard in the traditional way. With a Macbook, you will have to lock your
screen to lock your keyboard. It’s not exactly the same thing, but this is Apple’s solution.
By taking this simple step, you can ensure that unwanted keystrokes will not be entered into your system – an easy but effective way to safeguard it from potential harm.
There are many ways to lock your screen easily and quickly:
Lock Your Screen/Keyboard Manually
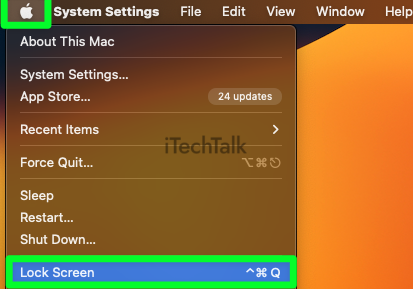
You can lock your screen with just two clicks. Click on the
Apple Logo, then select
Lock Screen. This will lock both the screen and keyboard instantly.
Use The Keyboard Shortcut
If you don’t want to use your mouse to lock your screen, you can use
the keyboard shortcut:
Control + Command + Q.
Lock Your Screen/Keyboard With Hot Corners
The Hot Corners macOS feature takes just a few minutes to set up and, once configured, lets you lock your Mac literally with a whiff of your hand. To set this feature up:
- Start by clicking the Apple Logo, then selecting System Settings.
- Select Desktop & Dock in the Side Menu.
- Scroll all the way down and click on Hot Corners.

- Decide which one of the four corners you want to assign this task to.
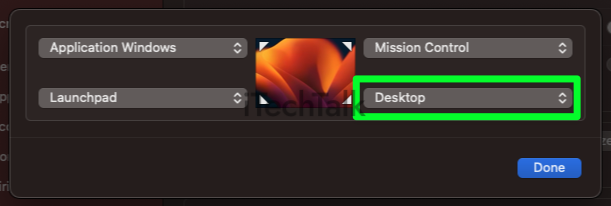
- Select Lock Screen from the dropdown menu.

Now to lock your screen/keyboard, you simply have to send your mouse to your chosen corner.
This trick is obviously best used in a corner you don’t normally visit. Otherwise, it could quickly turn into irritation.
Lock Your Screen/Keyboard With The Touch Bar
If you happen to have a Macbook Pro with a Touch Bar, locking your screen can be as easy as a swipe on your touch bar.
To lock your MacBook Pro with the Touch Bar, you must create a dedicated icon. Creating this icon is easy:
- Click on the Apple Logo, then select System Settings.
- Click Keyboard.
- Select the Customize Touch Bar option.
- Drag the Screen Lock button to the Touch Bar options. Click Done to confirm.
How To Enable/Disable Scroll Lock On Your Mac
You may not be able to lock your keyboard natively on your Macbook, but if you’re just looking for a way to scroll lock your keyboard, then I have good news.
Macbooks have a Scroll Lock feature that can be enabled and disabled by pressing the
Fn + Shift + F12 keys. To disable Scroll Lock, press the same combination again.
Third-Party Applications To Lock Your Keyboard
Sadly, there aren’t many apps out there that let you lock your keyboard quickly. However, there are a few apps out there.
Here are the two best third-party apps that allow you to lock your Macbook keyboard:
Keyboard Clean Tool
With
KeyboardClean Tool, all Keyboard and TouchBar inputs are blocked.
The application’s interface is easy to understand, and you can have it up and running in no time.
All you need to do is set the duration for how long the Keyboard or TouchBar will be locked, then hit
Lock.
It’s just that simple. You can also add a password to ensure nobody else can unlock the device.
This is a simple tool that is free to use. You can pick up this handy tool at the
official website.

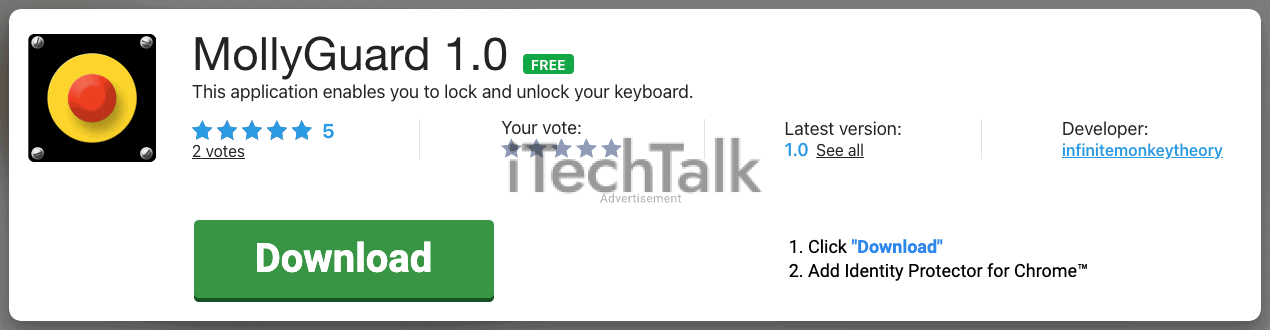
MollyGuard
With MollyGuard, you can lock your keyboard, mouse, or trackpad quickly and securely with just one hotkey combination from the menu bar.
With this feature activated, input will be accepted only from that combination of hotkeys. This keeps your Mac safe and secure, preventing unauthorized users from typing in any commands or wiping out files.
- First, download this tool from the official website.
- Launch the MollyGuard app.
- You’ll see a screen that lets you customize the hotkey combination for locking your keyboard. From there, press the desired combination, and you’ll be ready to go.
When it comes time to unlock your Mac, press the hotkey combo again and enter a password if one is set up. This makes it even more secure since only authorized users will have access to your machine.
I hope this article was helpful in teaching you how to lock your keyboard on your Macbook.
Please share this article with anyone else struggling with this problem.