Are you tired of pesky background noises ruining your iPhone videos? Or perhaps you want to share your video with friends without revealing private conversations. Whatever the reason, removing audio from an iPhone video can be a game-changer.
In this blog post, we’ll explore different methods how to Remove Audio From iPhone videos, including using the Photos app and iMovie, as well as third-party apps that make it a breeze to mute those distractions.
Quick Summary
- Removing audio from an iPhone video can address privacy concerns, eliminate background noise, and allow for creative purposes.
- There are three methods to remove audio from iPhone videos: using the Photos app, using iMovie, or using third-party apps.
- Choosing the right tool/app for your needs is important; keep a copy of the original video before editing. Maintain video quality by exporting in high resolution and consider adding new music or sound effects to enhance the edited video.
- Restoring audio to an iPhone video is as easy with these tools/apps.
Why Remove Audio From iPhone Video?
Removing audio from an iPhone video can be useful for addressing privacy concerns, eliminating background noise, and allowing for creative purposes.
To Address Privacy Concerns
One of the main reasons people choose to
remove audio from iPhone videos is to
address privacy concerns.
In the age of information and social media sharing, we constantly capture video content that may inadvertently include
personal or sensitive information in the
background audio.
For example, imagine recording a cute moment between your child and their pet without realizing a private conversation was in progress nearby.
Removing this audio becomes essential before posting online to ensure everyone’s privacy is respected while still capturing and sharing that special moment.
To Eliminate Background Noise
Removing audio from an iPhone video is also a great way to eliminate unwanted background noise. Sometimes, there may be background sounds you didn’t notice while recording the video, but they become apparent when you play them back.
Removing the audio can help eliminate these noises and make the video enjoyable without distractions.
For example, if you recorded a video at a busy street market, removing the audio will eliminate any unnecessary noise from people talking or cars honking in the background and allow viewers to focus on the visuals of your video instead.
For Creative Purposes
As a creative, you may want to remove the audio from your iPhone videos to add a new dimension of storytelling.
Removing audio can help you
create a more immersive experience by adding voice-overs, sound effects, or music that better suits the mood and theme of your video.
For instance, when making a travel vlog showing beautiful scenery footage, removing the original background noise could be beneficial as it allows you to add peaceful music instead.
Being able to manipulate audio in this way opens up endless possibilities for creativity within your content creation process.
Methods To Remove Audio From iPhone Videos
You can remove audio from iPhone videos: using the Photos app, iMovie, or third-party apps.
Using The Photos App
One of the easiest methods to remove audio from an iPhone video is to use the
built-in Photos app.
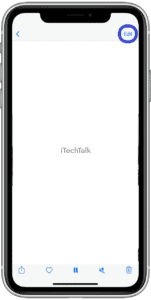
Here are the steps to follow:
- Open the Photos app and locate the video you want to edit.
- Tap on the video to open it, then select “Edit” in the upper-right corner.
- Look for the yellow speaker icon at the bottom of the screen and tap on it.
- This will completely remove audio from your video.
- To save the changes, tap “Done” and “Save Video.”
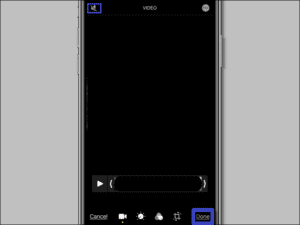
This method lets you quickly remove unwanted audio from your iPhone videos without downloading third-party apps or software.
Remember that this method permanently removes audio from the video, so be sure to make a backup copy of the original if you want to preserve it with sound.
Using iMovie
If you prefer a more sophisticated video editing software, iMovie is a great option.
Here’s how to remove audio from an iPhone video
using iMovie:
- Open iMovie on your iPhone and select the project that contains the video you want to edit.
- Tap on the timeline at the bottom of the screen to ensure the video is selected.
- Please tap on the audio icon at the bottom of the screen, which looks like a music note with a line through it.
- Slide the volume slider to zero to mute or remove all audio from the video.
- You can adjust each audio track by tapping on and adjusting their volume or muting them individually.
Using iMovie gives you more control over your editing and offers additional features like adding new background music or sound effects, trimming clips, and more.
Remember that this app may best suit users who want more advanced editing beyond removing audio from videos.
Using Third-party Apps
Third-party apps can be a great alternative to the built-in Photos app or iMovie if you want to remove audio from an iPhone video.
Here are some popular third-party apps for removing audio from iPhone videos:
- InShot: This user-friendly app allows you to mute the audio on any video with just a few taps. You can add new music or sounds to your video and adjust the volume levels.
- Adobe Premiere Rush: If you’re looking for more advanced editing features, Adobe Premiere Rush is a great option. In addition to removing audio, you can trim clips, add transitions and effects, and adjust color and brightness settings.
- Video Mute: As its name suggests, it removes audio from videos. It’s simple to use – select the video from your camera roll, tap the “Mute” button, and save the edited version.
- Silent Film Director: This app is designed to create silent movies but can also remove audio from existing videos. You can choose from various filters and effects to give your video a vintage look.
Remember that not all third-party apps are created equal – read reviews and research before downloading an app to ensure that it meets your needs.
Tips And Tricks For Removing Audio From iPhone Videos
Choose the right app or tool for the best results, keep a copy of the original video before editing, maintain video quality by exporting in high resolution, and consider
adding new audio or music to enhance your edited video.
Choosing The Right App Or Tool
Choosing the right app or tool is crucial when removing audio from iPhone videos. While the Photos app and iMovie are great options for basic editing needs on iOS, third-party apps like InShot or Adobe Premiere Rush offer more advanced features.
Another important factor in choosing the right app is its compatibility with your iPhone model and software version. For example, some apps may not be fully compatible with older iPhones or newer versions of iOS.
Ultimately, the best way to choose a tool for removing audio from iPhone videos is by testing different options and determining which one suits your needs best.
Keeping A Copy Of The Original Video
Keeping a copy of the original video before removing its audio is always important. Restoring the sound can be challenging once you remove it to its original state.
By keeping a backup of the original video, you can revert to it if needed and edit it again without losing any quality or data.
I always advise my clients and friends who work with iPhone videos to create a separate folder for their raw footage and duplicate the files they plan on editing.
This way, they have multiple copies of their videos if something goes wrong during editing or if they want to make different versions later.
Maintaining Video Quality
As an experienced SEO and high-end copywriter, I know
maintaining video quality is crucial when removing audio from iPhone videos. Some methods can
compromise the resolution and pixel density of your footage.
For instance, using some third-party apps may decrease the overall quality of your video and make it blurry or grainy.
In my experience, using
iMovie to remove audio from iPhone videos gives you more control over the editing timeline while
preserving the original resolution.
Additionally,
keeping a copy of the original video before making any changes will allow you to revert quickly.
Adding New Audio Or Music
I love
adding new music or sound effects to my edited videos, and removing audio from an iPhone video provides the perfect opportunity to do so.
Once you’ve removed the original audio using any methods described above, you can add new tracks to enhance your video’s creative appeal.
One popular app for doing this is iMovie, which has a comprehensive library of royalty-free sounds and music clips that can be added seamlessly to your edited footage.
Another thing I like about adding new audio is how it helps me elicit different emotions in viewers based on the mood I’m trying to set in the video scene.
For instance, I might choose a mellow instrumental track when creating a calm and relaxing atmosphere or opt for upbeat pop music if I want a more energetic vibe.
How To Restore Audio To An iPhone Video
Restoring audio to an iPhone video is just as easy with the Photos app or iMovie – keep reading to discover how.
Using The Photos App
I often use the
Photos app on my iPhone to
remove audio from videos.
Here are the steps to follow:
- Open the Photos app and select the video you want to edit.
- Tap on Edit in the upper-right corner of the screen.
- Tap on the yellow speaker icon in your screen’s bottom left-hand corner.
- This will completely remove the audio from your video, and a line through a speaker icon will appear on the video preview.
- Once you’ve finished editing, tap Done in the top right-hand corner of your screen to save your changes.
It’s important to note that removing audio using this method is irreversible, so be sure you want to proceed with this before tapping on that speaker icon!
Using iMovie
To remove audio from iPhone videos, another option is to use iMovie.
Here are the steps to follow:
- Open iMovie on your iPhone and select the video you want to edit.
- Tap the video timeline at the bottom of the screen to bring up editing options.
- Tap on the audio icon in the screen’s lower-left corner.
- In the pop-up menu, select “Detach.” This will separate the audio from the video clip.
- Using your finger, swipe left on the detached audio clip and tap the “Delete” button to remove it completely.
- Finally, tap “Done” to save your changes.
Remember that iMovie has additional video editing features, like adding new music or sound effects, adding filters and effects, trimming clips, and more.
Conclusion
Removing audio from iPhone videos can be useful for many reasons, whether addressing privacy concerns, eliminating background noise, or adding new music or sound effects.
With the help of the Photos app and third-party apps like iMovie, you can easily remove audio from your videos. Remember to choose the right tool and maintain video quality throughout editing.