Welcome to the world of
streamlined multitasking on your iPad, thanks to Stage Manager!
This powerful tool revolutionizes how you
manage multiple apps simultaneously with a
user-friendly interface that allows for
increased productivity and efficiency.
Take control of your digital stage by exploring this blog post on how to use Stage Manager iPad features effectively for everything from theatre productions to day-to-day life.
Quick Summary
- Stage Manager iPad app allows for multitasking and management of multiple apps at once on your device.
- Customizing settings and preferences such as window display, cue lists, timecodes, scripts, and live editing are essential for effective usage of the app.
- Understanding how to use the app’s cue lists and timecode features is crucial for successful stage productions that run like clockwork.
- Stage Manager revolutionizes how you manage multiple apps simultaneously with a user-friendly interface that allows for increased productivity and efficiency.
Understanding The Stage Manager iPad App
The
Stage Manager iPad app is a powerful tool that offers features such as cue lists, timecode management, live editing, and customization settings.
Features And Capabilities
As a seasoned stage manager, I can attest to the impressive features and capabilities of the Stage Manager
iPad app.
These include:
- Multiple app management: Stage Manager allows users to open various apps simultaneously on their iPad.
- Organized app display: The app organizes applications into a strip on the left side of the screen for easy access.
- Flexible app grouping: Users can group apps in Stage Manager according to their preferences or needs.
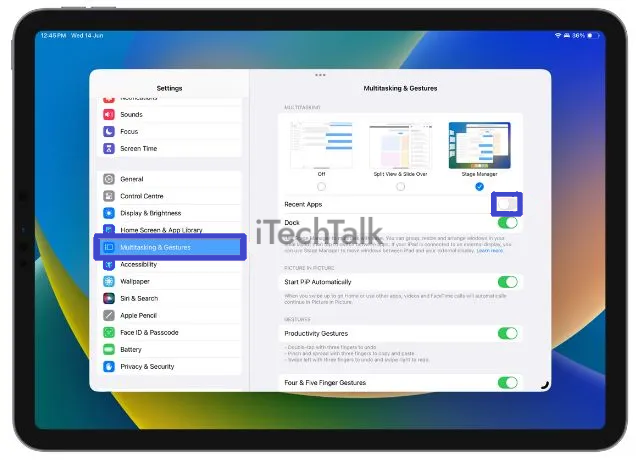
- Customizable settings: Users can select “Home Screen & Multitasking” within the Settings app to toggle the Stage Manager feature on or off.
- Floating window display: Each app opens in a floating window with a placeholder icon rather than occupying the full screen, optimizing space utilization and productivity.
- Quick access control: Swipe down from the top right corner of your iPad’s screen to access Stage Manager.
- Compatible with various iPad models: The app works seamlessly on devices running iPadOS 16, including iPad Pro and iPad Mini models.
These features make the Stage Manager an invaluable tool for those working in theatre production or anyone seeking enhanced productivity with their iPads.
Advantages Of Using The App
As a stage manager, the Stage Manager iPad app can be a lifesaver when organizing and controlling your shows.
Perhaps its most significant advantage is the ability to run multiple apps simultaneously without switching between them constantly, thanks to the Stage Manager’s
multitasking feature.
Another great thing about using the Stage Manager app on an iPad is that it gives you greater control over your production than ever before.
You won’t have to rely solely on paper notes or calling out cues; instead, you’ll be able to use
digital playback features like timecode syncing and live editing so that every performance runs smoothly and seamlessly.
Downloading And Installing The App
You must download and install the app before using Stage Manager on your iPad for your next event.
Here’s how to do it:
- Open the App Store on your iPad.
- Search for “Stage Manager” in the search bar at the top of the screen.
- Click on the Stage Manager app icon, which should appear at or near the top of your search results.
- Tap “Get” or “Download,” depending on whether you’ve installed this app before.
- Enter your Apple ID password if prompted.
- Wait a few moments for the app to download and install onto your iPad.
- Once installation is complete, you should see the Stage Manager app icon on your home screen.
That’s it! You’re ready to start using Stage Manager to help manage cues, scripts, playback, and other aspects of any event production where precise timing is crucial.
Getting Started With Stage Manager On iPad
To start with Stage Manager on iPad for your event, you must set up the app properly and create and organize cues and scripts as needed.

Setting Up The App For Your Event
To get started with the Stage Manager iPad app, follow the steps below:
- Download and install the app from the App Store.
- Launch the app on your iPad.
- Create a new event by clicking on the “+” button in the top left corner of the screen.
- Enter details for your event, including its name and date.
- Customize settings for your event, such as time zone and show length.
- Add a venue by entering its name and address or selecting it from a list of previous venues.
- Please set up your team by adding crew members, assigning them roles, or selecting them from a list of previous team members.
- Create cues and scripts by adding them to your event timeline or importing them from other sources.
- Organize your cues and scripts by grouping them according to their purpose or category.
With these steps complete, you can start using Stage Manager on your iPad to manage your next production!
Creating And Organizing Cues And Scripts
As a stage manager using the Stage Manager iPad app, creating and organizing cues and scripts is made simple with these steps:
- Add a new cue by tapping the “+” icon in the Cue List section.
- Customize the cue name, type, and timecode.
- Assign actions to the cue (e.g., lighting cues, sound cues) by selecting an action from the drop-down menu.
- Add notes or instructions to each cue by tapping it in the Cue List section and entering text in the Notes field.
- Organize cues into groups by going to Settings > Cue Group Management and creating a new group.
- Drag and drop individual cues into their groups for easy access during show control.
- To create a script in Stage Manager, go to Scripts > New Script and customize its title and description.
- Add actions from the Cue List section to your script by selecting them and dragging them to the Script Editor.
- Order your script’s actions as desired, add notes for each action as needed, and save your script for future use.
In summary, with Stage Manager on iPad, managing your event’s cues and scripts is made easy through easy customization of cues, grouping them for easier access during show control, and allowing you to create custom scripts that are efficient enough for future use.
Navigating The Interface
Navigating the Stage Manager iPad app interface is straightforward and intuitive. Once you have successfully set up the app for your event, you can easily create and organize cues and scripts to ensure a seamless production.
Furthermore,
customizing settings and preferences could be necessary to efficiently use the Stage Manager app on an iPad.
You can manage multiple events and teams efficiently by grouping apps in Stage Manager or using it with external monitors if needed.
Use Stage Manager iPad For Show Control
Using Stage Manager on iPad for show control is easy and intuitive, with features for programming and playback, creating
cue lists and timecodes, live editing and adjustments, and customization of settings and preferences.
Programming And Playback
As a stage manager using the Stage Manager iPad app, programming and playback are essential features that enable me to
control each element of the show’s production.
Here are some of the ways I use these features:
- Creating cues and scripts: Using the Stage Manager app, I can create cues and scripts for each element of the show’s production. This feature makes it easy for me to keep track of everything that needs to happen during the show.
- Navigating cue lists and timecodes: With cue lists, I can navigate from one cue to another seamlessly. Timecode allows me to synchronize audio, lighting and video effects with music or dialogue.
- Live editing and adjustments: The ability to make live edits and adjustments is essential during a performance. I can modify cues in real-time with the Stage Manager iPad app as needed.
- Customizing settings and preferences: Every stage manager has different preferences when running a show. The Stage Manager iPad app allows me to customize settings such as text size, timers, colours, etc., so everything works according to my liking.
By utilizing programming and playback features on the Stage Manager iPad app, I can execute quality shows flawlessly without missing any details.
Cue Lists And Timecode
As a stage manager, cue lists and timecodes are two essential features of the Stage Manager iPad app that you must master. Creating and organizing cue lists is a breeze with the app’s easy-to-use interface.
One of the most powerful tools in Stage Manager is its built-in timecode feature. Timecode allows for precise synchronization of all cues and events during your show production.
Whether using pre-recorded audio tracks or visual effects sequences with intricate timing requirements, Stage Manager will keep everything running smoothly with accurate time measurement capabilities.
Understanding how to use cue lists and timecodes within the Stage Manager app is crucial for successful stage productions that run like clockwork!
Live Editing And Adjustments
When
multitasking on the iPad with Stage Manager, it is easy to live edit and adjust the active apps without interrupting your workflow.
Here are some tips for live editing and adjusting:
- To adjust the app window’s size, drag the floating window’s border.
- To close an app, swipe up on the floating window or tap and hold on its placeholder icon in Stage Manager.
- To move an app around in Stage Manager, tap and hold on to its placeholder icon and drag it to a new position.
- Swipe left or right with four fingers on your screen to quickly switch between open apps without returning to Stage Manager.
By using these live editing and adjustment features in Stage Manager, you can keep your
workflow streamlined and efficient while still making necessary changes as needed.
Customizing Settings And Preferences
As someone who likes personalizing my iPad experience, it’s great that I can customize the settings and preferences of Stage Manager to suit my style.
Here are the different tweaks I’ve made:
- Changing the Stage Manager toggle: In the Settings app, I set up various options to toggle Stage Manager on or off with ease.
- Window Display: I love viewing multiple apps simultaneously, but sometimes it can be too much – especially when working in a darker environment. So, I adjusted the window display option to reduce the brightness of all active windows.
- External Monitor Compatibility: When working with an external monitor, this option allows me to control which apps appear on the external monitor and which stay on my iPad.
- App Management: I can handpick which apps appear in Stage Manager by choosing from a list of installed apps.
- Screen Management: Since multitasking can get overwhelming with too many open windows cluttering my screen, I opted to enable a screen management setting that automatically hides inactive app windows.
Customizing these settings has made it easier for me to use Stage Manager effectively and efficiently during events and shows.
Troubleshooting Tips And Tricks For Using Stage Manager On iPad
If you encounter issues while using Stage Manager on your iPad, don’t worry, we’ve got you covered! In this section, we’ll share some useful tips and tricks to help you troubleshoot common problems and improve your experience with the app.
Common Issues And Solutions
Using Stage Manager on iPad frequently, I have encountered common issues and solutions that could aid a seamless experience.
Here are some of them:
- Missing App Window: Sometimes, an app window may appear missing from the left strip in Stage Manager. To solve this issue, tap the “Show More” button at the bottom of the strip to locate the missing app.
- Inability to Expand App Window: Occasionally, users may find it impossible to expand an app window in Stage Manager. To fix this issue, try tapping and holding down on the window’s title bar and dragging it to your desired size.
- Stacked App Windows: When using too many apps simultaneously on Stage Manager, they can become stacked upon each other. Tap and hold on to any of the app windows to reveal all open apps arranged as stacks.
- Random App Crashes: Sometimes, some apps crash randomly when used with Stage Manager. You can try updating each app or restarting your iPad device.
- Broken Notifications: When you receive notifications while using apps under Stage Manager mode, they may not display properly or might be hidden by other apps’ Windows overlays. If this happens, swipe from your screen to access your Notification Center.
- Slow Performance: With multiple apps running concurrently on your iPad via Stage Manager, there is a chance that overall system performance might slow down a bit due to memory usage saturation or other factors, such as background activities running concurrently. Try closing non-essential applications or restarting your device for improved performance.
- Accessibility Issues: Certain accessibility features, such as VoiceOver mode, may not function correctly when used with Stage Manager; if so, try disabling these features temporarily or updating them if possible.
Remember that these are just a few common issues you might encounter when using Stage Manager on an iPad—there are certainly more out there depending on the user and their setup.
However, with these solutions in mind, you should better understand how to troubleshoot any problems you might encounter while using Stage Manager on an iPad.
Managing Multiple Events And Teams
As a stage manager, I often juggle multiple events and teams simultaneously. Fortunately, Stage Manager on iPad makes managing everything in one place much easier.
One of my favourite features is the ability to group related apps in Stage Manager for even quicker access.
For example, I can group all the scheduling and communication apps for one event together so they’re easy to find when needed.
Using Stage Manager With External Monitors
As a stage manager, I often need a clear view of all the cues and scripts during production. That’s why using Stage Manager on iPad with external monitors helpful.
Here are some tips for
using Stage Manager with external monitors:
- Connect your iPad to an external monitor using HDMI or VGA cables.
- Open Stage Manager and navigate to the settings menu.
- Tap on “External Display” and select the preferred display option.
- Choose how you want Stage Manager to appear on the external monitor: either as a mirror image of your iPad screen or as a separate display.
- Once connected, you can navigate between apps on both screens simultaneously for better multitasking.
- Use the external monitor as a dedicated cue or prompt screen while keeping other apps open on your iPad.
- Adjust the size and position of windows in both the iPad and external monitor displays according to your preference.
Using Stage Manager with an external monitor adds flexibility and convenience to your workflow, providing more real estate for viewing important cues, scripts, and notes during productions.
Conclusion
Using Stage Manager on the iPad is a game-changer for stage managers and event organizers. With its
advanced multitasking features,
customizable settings, and
intuitive interface, it offers an unparalleled level of control and convenience.
Whether managing multiple events or controlling complex cue lists, Stage Manager makes it easy to stay organized and efficient.