AirPods have quickly become a must-have audio accessory, offering
wireless convenience and impressive sound quality.
With features like
noise reduction and
voice commands via Siri, understanding how and where is the Microphone On Airpods can make all the difference in your user experience.
Quick Summary
- The microphone on AirPods is located on the stem below the control panel and is essential for making phone calls and interacting with Siri.
- Users can change their AirPods settings to set the microphone to the left, right, or automatic based on personal preferences and needs.
- Regular maintenance, such as cleaning microphone ports, can help ensure optimal performance from your AirPods’ microphones.
- Troubleshooting tips include checking for dirt or debris around the microphone port, testing microphone quality using Voice Memos app on iPhone or iPad, resetting AirPods if necessary, and contacting Apple Support for further assistance.
Understanding AirPods And Microphones
AirPods are wireless earbuds designed by Apple that deliver high-quality audio and have a built-in microphone for phone calls and voice commands.
Overview Of AirPods Features
As a proud user of AirPods myself, it’s easy to see why these wireless earbuds have become so popular. Apple has packed an impressive range of features into their sleek design, making them incredibly versatile and convenient for daily use.
Another fantastic aspect of AirPods is their
Siri integration, which allows us to use voice commands for easy control over our devices – whether changing songs or making phone calls without touching our phones.
The
noise reduction capabilities offered by AirPods Pro are also worth mentioning; their
active noise cancellation technology ensures that we can enjoy our favourite tunes without pesky outside noises interfering.
Moreover, users can rely on
intuitive controls such as customizable swipes and taps on the stems for added convenience while controlling audio playback or engaging Siri.
Importance Of Microphones In AirPods
One of the standout features of AirPods is their
integrated microphone, which plays a critical role in the earbuds’ overall functionality.
The microphone allows users to make phone calls, use voice commands with Siri, and interact with other audio-based applications.
The importance of microphones in AirPods lies in their ability to capture sound and how they integrate seamlessly into the product’s overall design.
By building microphones directly into each earbud stem, Apple has created a sleek and intuitive system that allows for quick access to controls like volume adjustments or track changes while ensuring high-quality sound delivery at all times.
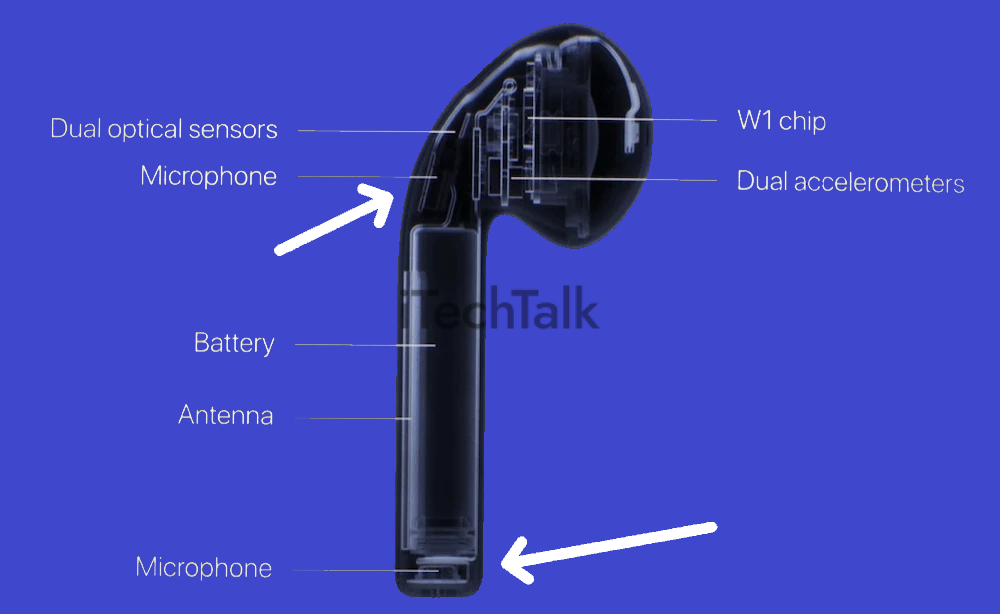
Identifying The Microphone On Each Earbud
To identify the microphone on your AirPods, look for a small circular grille near the bottom of each stem. This grille conceals the first microphone to pick up audio when calling and using Siri.
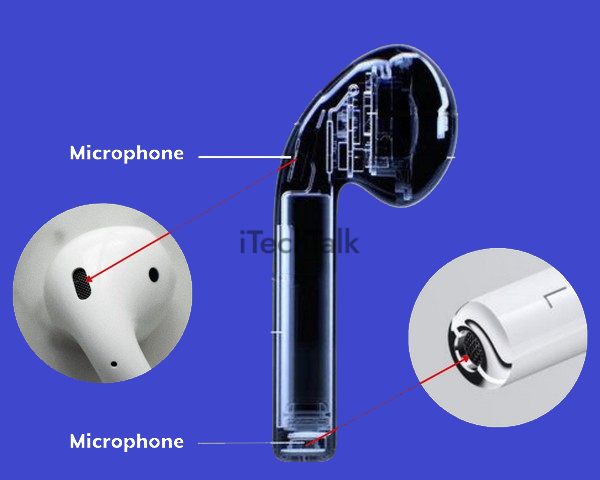
Additionally, in some models like the 3rd generation AirPods, an inward-facing microphone inside each earpiece helps reduce background noise.
If you’re having trouble locating either of these microphones, consult your AirPods manual or visit Apple’s support website for more information.
How To Change Microphone Settings On AirPods
Users can change the microphone settings on AirPods by accessing the Bluetooth menu on their device, selecting their AirPods, and choosing which side they want to use for phone calls or voice commands.
Setting the Microphone To Left, Right, Or Automatic
To change the microphone settings on AirPods, users can access the Bluetooth settings on their devices and select their AirPods. From there, they can set the microphone to the left
, right, or automatic mode.
This is particularly useful for those who prefer one ear over another when making phone calls or using Siri.
For example, setting it to manual may be more effective if you have a noisy environment around you while on a call and want to use the microphone closest to your mouth.
Or if you’re using Siri and only want one earbud in at a time, setting it to left or right will prioritize that particular earbud’s microphone instead of automatically switching between them.
Using a Microphone For Phone Calls And Siri
I love using my AirPods to make phone calls and give voice commands to Siri. The
microphone on each earbud allows for clear communication, even in noisy environments.
To use the microphone for a phone call, answer the call or initiate one through your device.
When using Siri, you can activate it by double-tapping either AirPod or saying “Hey Siri”. The microphone will then pick up your command and execute it accordingly.
Tips For Optimal Microphone Use
From my experience, using the microphone on AirPods can be tricky. However, there are some tips and tricks to ensure optimal microphone use.
Firstly, make sure that you hold your head upright and speak clearly into the microphone for better sound quality.
Secondly, I recommend cleaning your AirPods frequently to avoid any debris or dirt from blocking the mic.
Another tip is experimenting with different settings to find what works best. For example, try setting the microphone to automatic so it switches between the left and right earbuds depending on which one has a clearer connection.
Following these tips and regularly cleaning your AirPods’ microphones ports will result in an optimal user experience when making phone calls or interacting with Siri through voice commands on your AirPods’ microphones.
Troubleshooting Microphone On Airpods Issues
To troubleshoot microphone issues on AirPods, check for dirt or debris around the microphone port and test the microphone quality.
Checking For Dirt Or Debris
One common issue affecting the microphone on your AirPods is a
build-up of dirt or debris. To ensure your microphone is working correctly, checking for any obstructions regularly is essential.
Here are some steps you can take:
- Inspect the microphone: Take a close look at the stem and earpiece of your AirPods to identify any visible dirt or debris.
- Blow away debris: Use a small brush or compressed air to remove particles blocking the microphone opening.
- Clean with a soft cloth: Gently wipe the exterior of your AirPods with a soft, lint-free cloth to remove any dirt or smudges.
- Avoid using water: Never use water or liquid cleaners on your AirPods, as this may damage the microphones and other sensitive components.
Following these simple steps, you can help
keep your AirPods in top condition and ensure optimal microphone performance.
Testing Microphone Quality
It’s important to ensure that the microphone on your AirPods is working properly for clear phone conversations or accurate Siri commands. You can use the Voice Memos app on your iPhone or iPad to test the microphone quality.
Simply record a short audio clip while speaking into each earbud separately and listen back to check for any
discrepancies in sound quality.
You can also perform a quick sound-check by calling a friend or family member while wearing both earbuds and asking them if they can hear you.
If you notice any issues with
microphone sensitivity, try
adjusting the position of the AirPods in your ears or
cleaning out any debris from the ports using a soft-bristled brush.
Cleaning Microphone Ports
To ensure the optimal performance of AirPods, cleaning the microphone ports regularly is essential. Dirt, dust, and debris can build up over time and
affect the quality of audio picked up by the microphones.
To gently clean the microphone port on each earbud, use a dry cotton swab or soft-bristled brush to remove any visible dirt.
If you notice that one or both microphones are still picking up muffled sounds after cleaning, try using a
small amount of rubbing alcohol on a cotton swab to clean around the port again gently.
Regular cleaning of AirPods’ microphone ports ensures they continue performing optimally and is an easy way to extend longevity for these valuable accessories.
Common Problems And Solutions
As an AirPods user, I have encountered a few issues with the microphone on my earbuds.
Here are some common problems and solutions that may help you if you encounter similar difficulties:
- Muffled or low audio quality: This can be caused by dirt or debris blocking the microphone ports. Try using a soft-bristled brush to gently clean the area around the microphone, or use compressed air to blow away any visible dust.
- One-sided microphone not working: If only one side of your AirPods picks up sound while the other is silent, try resetting your earbuds. Hold the button on the back of the case until the LED light blinks rapidly, then re-pair your AirPods with your device.
- Microphone sensitivity issues: Some users may find their AirPods too sensitive, picking up too much background noise or wind interference during phone calls or recordings. You can adjust this by changing the microphone settings in your phone’s Bluetooth menu, selecting “AirPods”, and choosing either left, right, or automatic for primary microphone use.
- Siri activation issues: If you’re having trouble activating Siri through voice commands on your AirPods, try adjusting your microphone placement or volume levels to ensure clear audio input.
- Connectivity problems: Occasionally, AirPods may disconnect from your device or fail to connect properly in the first place. Ensure your device’s Bluetooth is turned on and in range of your earbuds, and try resetting both devices if necessary.
- Battery life concerns: While not directly related to microphone issues, keeping an eye on battery levels for optimal performance from your AirPods overall is important.
Remember that proper maintenance and care can extend the lifespan of your AirPods’ microphones and ensure top-notch sound quality for all audio functions.
Resetting AirPods
Resetting AirPods can be an effective solution if you’re experiencing issues with your microphone. Hold down the setup button on the back of the case to reset the AirPods until the LED light flashes amber.
I’ve found that resetting my
AirPods has fixed several issues I’ve had in the past, including microphone problems. It’s a
quick and easy fix requiring no technical expertise.
Contacting Apple Support
If you have tried all the troubleshooting steps and your AirPods microphone is still not working, it may be time to contact
Apple Support for further assistance. You can reach out to Apple Support through their website or by phone.
The support team will likely troubleshoot with you over the phone and try to diagnose the issue.
It’s important to note that Apple may offer free repair or replacement service if your AirPods are still under warranty. However, if your warranty has expired, there may be fees associated with any repairs needed.
Conclusion
In conclusion, the microphone on AirPods is an
essential feature for making phone calls and interacting with Siri. It is
located on the stem below the control panel and can be easily identified.
Users can change their AirPods settings to set the microphone to the left, right, or automatic. Troubleshooting tips include checking for dirt or debris, testing microphone quality, cleaning ports, resetting AirPods, or contacting Apple Support.