Are you
struggling with your MacBook Camera Is Not Working?
Well, you’re not alone, as this issue has affected several MacBook users worldwide. This article guides you in resolving these frustrating
webcam problems through
tested troubleshooting methods and
practical maintenance tips.
Delve deeper into our post, and let’s reclaim the functionality of that all-important camera so you can get back to your virtual meetings or FaceTime sessions without a hitch!
Quick Summary
- Camera permission settings in System Preferences can cause the Macbook camera to stop working, so check and modify these permissions.
- Multiple apps using the camera simultaneously can lead to conflicts and prevent the camera from functioning properly, so close unnecessary apps and adjust privacy settings accordingly.
- Outdated software can create compatibility issues with the camera, so regularly update macOS and related applications to ensure optimal performance.
- Antivirus settings may block or interfere with the camera’s functionality, so review these settings and ensure they allow access to the camera.
Possible Reasons for MacBook Camera Is Not Working
There are several reasons why the camera on your MacBook may not be working, including
webcam permissions not enabled,
apps using the camera simultaneously, software issues, antivirus settings, Screen Time limits, and a malfunctioning camera indicator light.
Webcam permissions not enabled
In today’s digital age, privacy is paramount. As a result, your MacBook requires permission to use the built-in camera for individual applications – protecting you from any unauthorized access.
However, sometimes users unknowingly deny these permissions or software updates cause them to reset, which could lead to the MacBook camera not working.
You can check and modify these permissions in System Preferences under Security & Privacy section, followed by the Camera subsection.
If an application needs access but isn’t listed, launch it and use it to trigger a new permission request prompt. This simple step can effectively troubleshoot your MacBook’s
undetected camera issues.
Apps using the camera simultaneously
If you’re experiencing issues with your Macbook camera, one possible reason could be that multiple apps are trying to use the camera simultaneously. This can cause conflicts and prevent the camera from working properly.
To troubleshoot this issue, check which apps currently use the camera. You can do this by opening the Activity Monitor app and looking for any processes that involve the camera.
Once you identify these apps, close them individually and see if it resolves the problem. It’s also a good idea to check your privacy settings to ensure that only necessary apps have permission to access your camera.
Software issues
Software issues are a common reason the camera on a MacBook may not be working. Outdated software can sometimes cause
compatibility problems with the camera, leading to
malfunctions or failure to detect it.
It’s crucial to regularly update macOS and any related applications to ensure optimal camera performance. Additionally, some users may experience
camera problems after updating their MacBooks to the latest macOS version, such as Big Sur.
In these cases, simply
restarting the affected app can often resolve the issue and restore normal functionality. Regularly keeping your software up-to-date will help prevent and troubleshoot potential camera issues on your MacBook.
Antivirus settings
Sometimes, the
antivirus settings on your Mac can interfere with the
camera’s functionality.
Antivirus software is designed to protect your device from malware and other threats, but it may
mistakenly identify your camera as a potential risk.
This can lead to the
camera not working properly or being
blocked entirely. To resolve this issue, you can
check your antivirus software’s settings and ensure it allows camera access.
Additionally, certain antivirus programs have specific camera-related features that you may need to adjust. For example, there might be an option to
enable or disable webcam protection within the antivirus settings.
By reviewing these settings and ensuring they allow for proper camera usage, you should be able to
fix any issues related to antivirus interference with your Mac’s camera.
It’s worth noting that while having antivirus software installed is important for safeguarding your device, it’s essential to configure its settings correctly so as not to block legitimate functions like the built-in camera inadvertently.
Screen Time limits
If you have set up
Screen Time limits on your Mac, these restrictions may prevent
the camera from working. Screen Time allows you to
manage and control the usage of certain apps and features on your device.

However, it can inadvertently
disable the camera functionality if not configured properly. To troubleshoot this issue, go to System Preferences and click on “Screen Time.”
Check the settings for app limitations or communication limits that might affect camera access.
Adjusting these restrictions should help restore the camera’s functionality on your MacBook.
The camera indicator light is not working
If you notice that the camera indicator light on your MacBook is not working, it could be a sign of a
potential issue with the camera.
The camera indicator light is designed to turn on whenever the camera is in use, providing visual feedback that it’s active.
However, if this light doesn’t illuminate when you’re trying to use the camera, there may be an underlying problem.
One possible reason the camera indicator light is not working is a
software glitch or malfunction. It’s important to ensure that your macOS and any relevant software updates are installed correctly and up to date.
Outdated software can sometimes cause conflicts and prevent certain features from functioning properly.
Another possible cause could be related to
hardware issues with the camera itself. This might require
professional repair or replacement if necessary.
To determine whether it’s a software or hardware problem,
troubleshooting steps like checking webcam permissions, updating macOS, and performing restarts can often help resolve such issues.
Troubleshooting Steps to Fix MacBook Camera
To fix the MacBook camera, you can try restarting the app, updating macOS, checking camera access permissions, and applying the VDCAssistant command.
Restart the app
If your Macbook camera is not working, one of the first troubleshooting steps you can take is to
restart the app you’re trying to use.
A temporary glitch or conflict might be resolved by
closing and reopening the app.
This could help
refresh the camera connection and potentially fix any
minor software issues causing the problem.
Additionally, check if any other apps on your Mac actively use the camera simultaneously, as this could also lead to conflicts.
By restarting the app and ensuring no other apps are interfering with the camera usage, you may be able to resolve any camera-related issues on your MacBook quickly.
Restart the MacBook
One effective step is to restart the device to troubleshoot camera issues on your MacBook. Restarting the MacBook can help
refresh software settings and clear any temporary glitches affecting the camera’s functionality.
By powering off and then turning back on your MacBook, you give it a chance to reset and potentially resolve any underlying issues causing the camera not to work.
This quick and easy solution is often a good first step in troubleshooting camera problems on your Mac.
Remember to save any important work before restarting to avoid data loss.
Update macOS
To ensure that your Macbook camera is working properly, keeping your macOS up to date is crucial. Updating your operating system can provide important
software fixes and improvements that may address any
camera-related issues.
Outdated software can sometimes cause
conflicts with the camera functionality, leading to problems like
black screens or a non-responsive camera.
Regularly checking for macOS updates and installing them can help prevent or resolve such issues. Updating your operating system ensures optimal performance and improves
compatibility with other applications and devices.
So be sure to check for available updates regularly and install them promptly to
maintain a smooth functioning camera on your MacBook.
Check camera access permissions
To troubleshoot camera issues on your MacBook, it’s important to check the
camera access permissions. Your Mac may have certain
privacy settings restricting applications from accessing the camera.
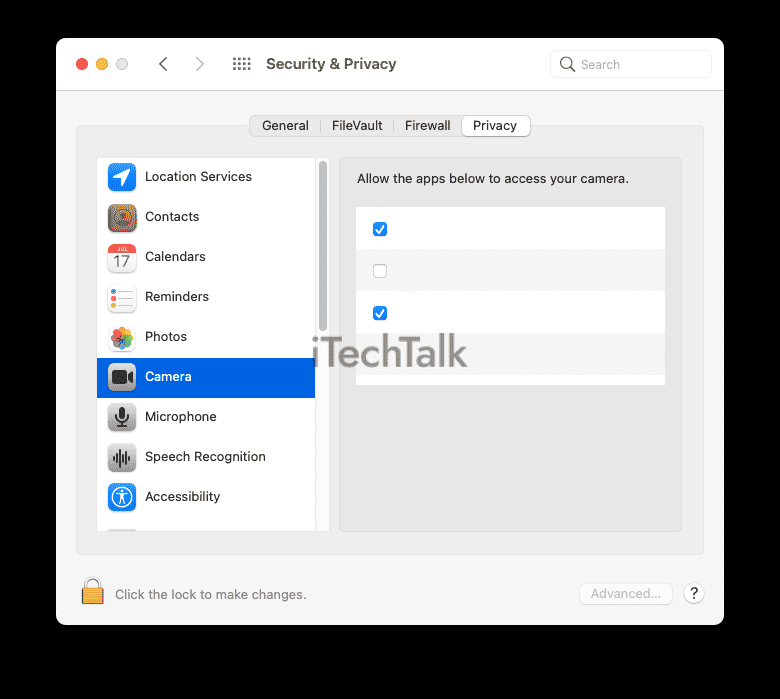
To ensure the camera is enabled, click “System Preferences” and click “Security & Privacy.” Then, navigate to the
“Privacy” tab and select “Camera” from the left sidebar. Here, you can see which apps have permission to access your camera.
Ensure the app you’re using is checked to utilize your MacBook’s camera successfully. This simple step can help resolve many camera-related problems and efficiently get your video calls or photo-taking back on track.
Check the camera indicator light
To
troubleshoot camera issues on your MacBook, it’s essential to check the
indicator light. The camera indicator light on your MacBook is designed to turn on when the camera is in use.
If the indicator light does not come on when you try to access the camera, it may indicate a
problem with the camera itself or its connection.
Software glitches or even hardware failures can cause this. By checking the functionality of the camera indicator light, you can quickly determine if there’s an issue that needs
further investigation and resolution.
Check antivirus settings
To
troubleshoot camera issues on your MacBook, it’s essential to check your antivirus settings. Sometimes,
antivirus software can mistakenly
block the camera or
interfere with its functionality.
By reviewing your antivirus settings, you can ensure that the camera can operate without any restrictions. This step is particularly important if you’ve recently installed new antivirus software or updated your program.
By confirming that antivirus settings aren’t blocking the camera, you can eliminate this as a potential cause for your MacBook camera not working properly.
Remove Screen Time limits
If you have set up
Screen Time limits on your MacBook, it may affect the
camera’s functionality. This feature allows you to manage and restrict access to certain apps and functions on your device.
However, if the camera is not working, it’s worth checking if
Screen Time restrictions are causing the issue.
To remove Screen Time limits for the camera:
- Go to “System Preferences” on your MacBook.
- Click on “Screen Time”.
- In the sidebar, select “Content & Privacy”.
- Scroll down and click on “Apps”.
- Look for any camera usage restrictions and ensure they are turned off.
Removing Screen Time limits can help resolve conflicts that might interfere with the camera’s operation. By disabling these restrictions, you ensure that the camera has unrestricted access.
Test camera detection
To test the
camera detection on your MacBook, follow these simple steps. First, open an application that utilizes the camera, such as FaceTime or Zoom. Next, check if the
camera indicator light turns on when you launch the app.
If the light doesn’t turn on or you see a
black screen instead of your image, try
covering the lens with your hand and removing it. This action should trigger a
change in lighting conditions that might prompt the camera to respond.
If none of these steps resolves the issue, a hardware problem with your MacBook’s camera may require professional repair.
Apply VDCAssistant command
To
troubleshoot camera issues on your MacBook, you can try applying the
VDCAssistant command. This command helps to manage camera functionality on macOS.
Here’s how to apply it:
- Open the Terminal app on your MacBook. You can find it in the Utilities folder within the Applications folder.
- Type the following command: sudo kill all VDCAssistant and press Enter.
- If prompted, enter your admin password and press Enter.
- The VDCAssistant process will be terminated and automatically restarted.
Create a new user account
You can try creating a new user account to troubleshoot camera issues on your MacBook further. This helps
determine if the problem is specific to your current user profile.
By creating a new account, you can
test whether the camera works properly in a fresh environment without any
potential conflicts or settings that may be causing the issue.
To create a new user account, go to System Preferences, click on Users & Groups, and select the “+” sign to add a new user. Once created, log into the new account and test the camera functionality.
If it works fine in the new account, you can conclude that there might be some configuration or software conflict in your previous user profile, causing the camera to malfunction.
Reset SMC
To fix
camera issues on your MacBook, another troubleshooting step you can try is resetting the System Management Controller (SMC). The SMC controls various hardware functions on your Mac, including the camera.
Sometimes, a simple reset can help resolve any glitches or conflicts that may be causing the camera to malfunction.
To reset the SMC on your MacBook, follow these steps:
- Shut down your MacBook.
- Connect the power adapter to your MacBook and plug it into a power source.
- On the built-in keyboard, simultaneously press and hold down the Shift + Control + Option keys (located on the left side of the keyboard) along with the power button for about 10 seconds.
- Release all keys simultaneously.
- Turn on your MacBook by pressing just the power button.
After
resetting SMC, check if your camera is working properly again. This process can sometimes help restore functionality to cameras and other hardware components on your Macbook.
Tips for Maintaining MacBook Camera Functionality
Regularly update your apps and software to keep your MacBook camera working smoothly.
Keep apps and software updated
To maintain the functionality of your MacBook camera, it’s crucial to keep your apps and software updated. Outdated applications or operating systems can often lead to
compatibility issues and glitches with the camera.
Regularly checking for updates and installing them promptly ensures that any bugs or vulnerabilities affecting the camera’s performance are addressed. It also ensures you access the latest features and improvements that enhance camera functionality.
Keeping your apps and software updated is a simple yet effective way to prevent potential problems with your MacBook camera in the long run.
Clean the camera lens
To
maintain the functionality of your MacBook camera, it’s essential to
keep the camera lens clean. Over time, dirt or smudges can
accumulate on the lens,
resulting in blurry or distorted images.
To clean the lens effectively, use a
soft microfiber cloth or lens cleaning solution specifically designed for electronics. Gently
wipe the lens in circular motions until it’s free from residue or fingerprints.
This simple step will ensure that your MacBook camera captures clear and sharp images every time you use it. Avoid
harsh chemicals or abrasive materials, which can damage the delicate camera lens.
Avoid physical damage
To maintain the functionality of your Macbook camera, it’s crucial to avoid physical damage. Accidental bumps or drops can cause internal components to become misaligned or damaged, resulting in a non-working camera.
Additionally,
pressing or tapping on the camera lens can lead to
cracks or scratches that obstruct image quality.
To prevent physical damage, handle your Macbook carefully and avoid placing heavy objects on top of it. Using a protective case or sleeve minimises the impact risk when carrying it around.
Keeping liquids away from your device is also important, as spills can cause irreparable damage.
Regularly inspect and clean the camera lens using a soft microfiber cloth to remove dust and smudges that may affect image clarity. Gently wipe in a circular motion without applying excess pressure.
Conclusion
In conclusion, there can be several reasons why your MacBook camera may not be working. It could be due to
webcam permissions,
software issues,
conflicting apps, or even a
malfunctioning indicator light.
Following the troubleshooting steps outlined in this article and taking measures to maintain your camera’s functionality, you can solve many camera problems on your Mac and ensure
smooth video conferencing experiences.
Remember to update your software, clean the lens regularly, and handle the hardware carefully to prevent further issues.
FAQs
1. Why is my Macbook camera not working?
There could be several reasons why your Macbook camera is not working, including software issues, outdated drivers, privacy settings blocking access to the camera, or hardware malfunctions.
2. How can I troubleshoot my Macbook camera not working?
To troubleshoot your Macbook camera, try restarting your computer, checking for and installing any available software updates, resetting the SMC (System Management Controller), adjusting privacy settings to allow camera access for relevant apps, and contacting Apple Support for further assistance.
3. How do I check if my MacBook’s camera is physically damaged?
You can visually inspect the camera lens on your Macbook for any signs of physical damage or obstruction that may be causing it to malfunction. Additionally, you can test the camera with different applications or try using an external webcam to determine if the issue lies with the internal hardware.
4. Can third-party apps cause issues with my MacBook’s camera functionality?
Yes, certain third-party apps may conflict with or affect the functionality of your MacBook’s built-in camera. Checking for app updates and ensuring compatibility with your current macOS version is recommended. You can uninstall or disable problematic applications until the issue is resolved.