To Remove Printer From MacBook, use HP Uninstaller, manually remove the printer or employ App Cleaner & Uninstaller.
Are you struggling to figure out how to Remove Printer From MacBook? Since this process isn’t as straightforward as it seems, many users find themselves stuck.
However, our
comprehensive guide will walk you through each removal process step in an
easy-to-understand manner.
Discover the simple methods for
freeing up your system from
old or unwanted printers.
Quick Summary
- Removing a printer from a MacBook can be done manually through the System Preferences or by using uninstaller programs like HP Uninstaller or App Cleaner & Uninstaller.
- When manually removing a printer, make sure to also remove corresponding printer drivers for a complete clean-up of unnecessary files.
- Restarting your Macbook after uninstalling the printer and checking for any remaining printer files are additional steps to ensure a smooth removal process.
How to Remove Printer From MacBook
To uninstall a printer on your Mac, you have several methods. You can manually remove the printer, use HP Uninstaller if applicable, or employ
App Cleaner & Uninstaller.
Manual Method
Initiating the process of manual printer removal is easy. First, on your Macbook, navigate to the
Apple menu at the screen’s top corner. Choose
System Preferences and click to open it.
Look for the
Printers & Scanners pane in the System Preferences section, and select it to reveal all printers linked to your MacBook. Identify the printer you wish to remove, and highlight it.
With your desired printer selected, click the minus (-) button on your list’s bottom. Confirm the deletion by clicking delete when prompted; this will completely uninstall the chosen printer from your MacBook.
Using HP Uninstaller

To remove a printer from your Macbook using the
HP Uninstaller, follow these steps:
- Open an internet browser and visit the official HP website.
- Search for the specific model of your printer and download the HP Uninstaller tool.
- Once downloaded, locate the file in your Downloads folder and open it.
- Follow the on-screen instructions to install the HP Uninstaller tool.
- After installation, open the HP Uninstaller application.
- Select the printer you want to remove from the list of installed printers.
- Click the “Uninstall” or “Remove” button to initiate the uninstallation process.
- Follow any additional prompts or instructions the HP Uninstaller tool provides to complete the removal.
Using App Cleaner & Uninstaller
You can also use
App Cleaner & Uninstaller to remove a printer from your MacBook. This software is designed to
uninstall applications and their associated files, including any printer-related files from your Mac.
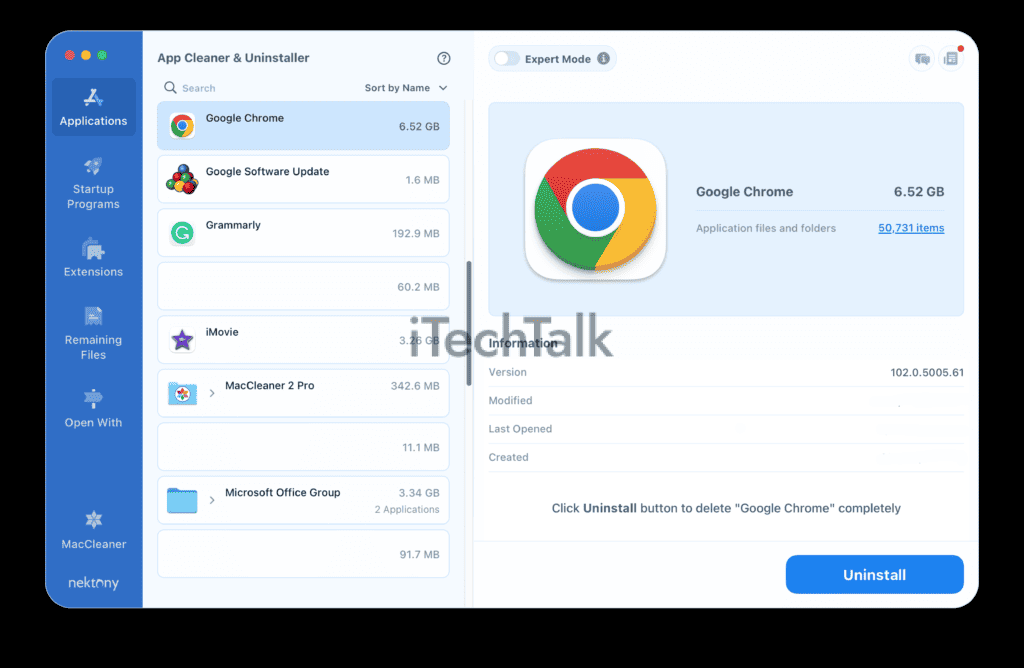
Here’s how you can use App Cleaner & Uninstaller to remove a printer:
- Download and install App Cleaner & Uninstaller from the official website.
- Open the application on your Mac.
- In the main interface of App Cleaner & Uninstaller, you will see a list of all installed applications.
- Locate the printer software or driver that you want to uninstall.
- Check the box next to the printer software or driver in the list.
- Click on the “Remove” button to start the uninstallation process.
- App Cleaner & Uninstaller will scan your Mac for any associated files and prompt you to delete them.
- Review the list of files that will be deleted and click on “Confirm” to proceed with the removal.
- Wait for App Cleaner & Uninstaller to complete the uninstallation process.
- Once done, restart your Mac.
Steps to Delete Printer Drivers
To completely remove a printer from your Macbook, you may also need to delete the printer drivers.
Follow these steps:
- Open Finder and click on “Go” in the menu bar.
- Select “Go to Folder” and type “/Library/Printers/” (without quotes) in the text box.
- Click “Go”, and you will be directed to the Printers folder.
- Locate the folder with the name of your printer manufacturer (e.g., HP, Canon, Epson).
- Open the folder and look for a file named “PDEs” or “PPDs”.
- Delete this file to remove the printer driver from your Macbook.
- After deleting the printer driver, empty your Trash to permanently remove it from your system.
Additional Tips To Remove Printer From MacBook
In addition to the methods mentioned above, here are some extra tips to help you remove printers on your Mac:
– Restarting your Mac can sometimes resolve any lingering issues with printer removal.
– After uninstalling a printer, check for any remaining files in other folders and delete them.
Read on to learn more about these additional tips for removing printers on your Mac.
Restarting your Mac
To ensure a
smooth removal of the printer from your Macbook, it is recommended to
restart your device after completing the uninstallation process.
Restarting your Mac can help clear any temporary files or cache related to
the printer and refresh your system settings.
Simply
go to the Apple menu in the top left corner, click “Restart,” and wait for your Macbook to reboot.
Restarting your Mac gives it a fresh start and allows it to function optimally without any remnants of the removed printer. This step can help prevent potential conflicts or issues when connecting or installing other printers.
Remember that restarting your Mac is not always necessary but highly recommended for a clean slate after removing a printer. It’s an easy and effective way to ensure that all traces of the old printer are completely cleared from your system.
Checking for remaining printer files
When removing a printer from your Macbook, it’s important to check for any remaining printer files that may still be on your system.
These files could cause
conflicts or issues if they are not properly removed.
Here are the steps to follow when checking for remaining printer files:
- Open Finder on your Macbook.
- Click on the “Go” tab in the menu bar at the top of your screen.
- Select “Go to Folder” from the drop-down menu.
- In the window that appears, type “/Library/Printers/” (without quotes) and hit enter.
- This will open the Printers folder, where all printer-related files are stored.
- Look for any folders or files related to the printer you uninstalled.
- Select any and move them to the trash bin if you find any.
- Empty the trash bin to delete these remaining printer files permanently.
Conclusion
In conclusion, removing a printer from your MacBook is a
simple process that can be done manually or through uninstaller programs. Following the outlined steps and ensuring all
printer drivers are deleted, you can easily eliminate unwanted printers from your device.
Remember to
restart your Mac after uninstalling it and check for any remaining printer files for complete removal. With these tips in mind, you’ll have no trouble organising your printing preferences on your Macbook.
FAQs
1. How do I remove a printer from my Macbook?
To remove a printer from your Macbook, go to the Apple menu and select “System Preferences.” Then, click “Printers & Scanners” and select the printer you want to remove. Finally, click the “-” button at the bottom of the list to delete the printer.
2. Can I remove multiple printers at once from my Macbook?
Yes, you can remove multiple printers at once from your Macbook. Simply hold down the “Command” key on your keyboard and select multiple printers by clicking on their names in the list. Then, click on the “-” button at the bottom of the list to delete them altogether.
3. Will removing a printer from my Macbook affect other connected devices?
Removing a printer from your Macbook will not affect other connected devices unless they depend directly on that specific printer for functionality (e.g., shared network printing). If other devices use different printers or connections, they should not be affected by removing one particular printer.
4. How can I reinstall a removed printer on my Macbook?
To reinstall a removed printer on your Macbook, return to “System Preferences” and click “Printers & Scanners.” Then, click the “+” button at the bottom of the list to add a new printer. Follow the prompts provided by macOS to reconnect and install your desired printer onto your Macbook again.