Ever struggled with the Right Click Delete Key And Other MacBook Shortcuts on your Macbook, scratching your head to recall those elusive shortcuts?
Did you know that keyboard shortcuts can boost productivity by saving valuable time and rendering a smoother workflow? This article provides an in-depth analysis of critical shortcuts, focusing primarily on using the right-click and delete keys most effectively.
Dive in as we simplify these nifty MacBook hacks tailor-made for efficiency!
Quick Summary
- Understanding the right-click function on a Macbook can significantly streamline tasks by providing quick access to commonly used commands and options specific to the highlighted item.
- The delete key on a Macbook allows for swift removal of characters or text, saving time and promoting accuracy in editing processes.
- Mastering different ways to right-click, such as using touchpad gestures, external mouse buttons, or an Apple Magic Mouse, can enhance navigation and productivity on a Macbook.
- Customizing right-click options on the trackpad personalizes the user experience and allows for more efficient workflow.
- Utilizing other useful shortcuts like page up/page down functions and cut/copy/paste shortcuts further enhances productivity on a Macbook.
Importance of Right Click Delete Key And Other MacBook Shortcuts
The right-click function on a Macbook is crucial as it allows users to access context menus and perform various actions, enhancing productivity and ease of use.
The delete key on a Macbook also plays a significant role, allowing the ability to remove selected items or characters quickly.
Understanding the functionality of the right click
On your Macbook, the right-click function acts as a gateway to multiple quick actions and settings. This powerful tool opens a context menu with options specific to your screen’s highlighted item or area.
Whether handling files in Finder, composing an email, or browsing web pages, right-clicking provides shortcuts for functions like copying text, changing display properties or accessing hyperlink actions.
Understanding and utilizing the right click significantly streamline your tasks by providing easy access to commonly used commands without navigating numerous menus.
Benefits of using the delete key on a Macbook
Using the delete key on a Macbook offers several benefits that greatly enhance productivity. Firstly, the delete key lets you quickly and efficiently remove characters or text in a document, email, or other text-based application.
Instead of manually highlighting and deleting each character individually, press the delete key and watch as it instantly erases whatever is to the right of your cursor.
Additionally, the delete key allows you to easily edit and refine your work without disrupting your flow. Make a typo? No problem! Just place your cursor after the error and tap the delete key to make it instantly disappear.
This saves you valuable time by eliminating unnecessary steps in editing.
Furthermore, using the delete key on a Macbook promotes accuracy when editing large chunks of text.
Whether you’re removing paragraphs or entire sections from a document, this handy feature ensures precise removal without accidentally deleting more than intended.
How to right-click and delete key enhance productivity
The right-click and delete keys on a Macbook are powerful tools that greatly enhance productivity. With the right click, you can quickly access contextual menus for shortcuts and options related to the selected item or object on your screen.
This saves time by eliminating the need to navigate multiple menus or settings to perform specific actions.
On the other hand, the delete key allows you to swiftly remove unwanted files, folders, or text without relying solely on dragging them into trash bins or using complex keyboard combinations.
These simple yet effective features streamline workflow and enable users to complete tasks more efficiently.
In addition, mastering the different ways to use these functions can further boost productivity. For example, learning to customize right-click options on your trackpad lets you personalize it according to your preferences and work style.
Different Ways to Right-Click on a Macbook
There are several ways to right-click on a Macbook, including using the two-finger touchpad gesture, one finger on the touchpad, external mouse buttons, and even right-clicking with an Apple Magic Mouse.
Using the two-finger touchpad gesture
The two-finger touchpad gesture is a convenient way to right-click on a Macbook. With this gesture, you can place two fingers on the trackpad and click with your thumb.
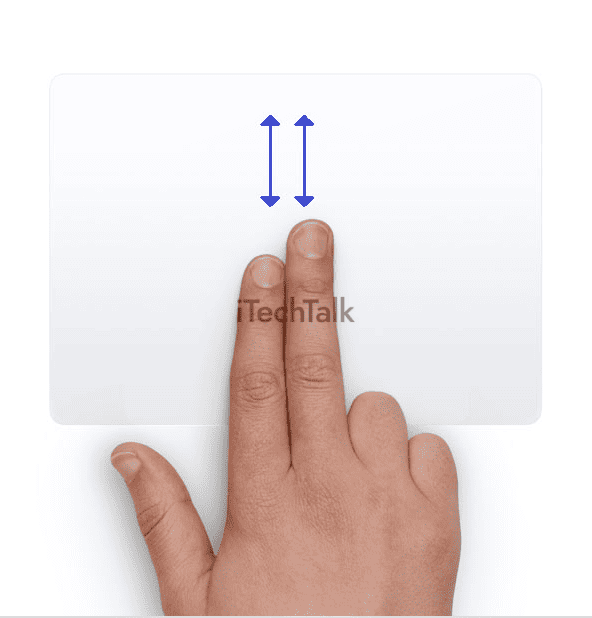
This action will simulate a right-click, allowing you to effortlessly access context menus and additional options.
The two-finger touchpad gesture is a handy shortcut that saves time and makes navigation more intuitive for Mac users.
Using one finger on the touchpad
One of the simplest ways to right-click on a Macbook is by using just one finger on the touchpad. To do this, you can place your finger on the right side of the touchpad and click down.

This action will trigger a right-click, allowing you to access additional options and menus associated with an item or file.
It’s a convenient method that doesn’t require any external mouse or extra gestures.
By mastering this one-finger touchpad technique, you’ll be able to make the most out of your MacBook’s functionality and streamline your workflow for increased productivity.
So whether you’re editing documents, managing files, or browsing the web, this simple gesture can save you time and effort when accessing context-specific actions and settings.
Remember that these shortcuts are designed to enhance your overall user experience on a Macbook and make performing various tasks more efficient.
Using external mouse buttons
External mouse buttons provide another way to right-click on a MacBook. If you prefer an external mouse, connect it to your MacBook and use the additional buttons.
These buttons can be programmed to perform various functions, including right-clicking.
By customizing the settings in System Preferences, you can assign a specific button on your external mouse for right-clicking, making it easier and more efficient for you to access contextual menus and perform actions quickly.
Whether working on design projects or managing files and folders, using external mouse buttons gives you flexibility and control over your Macbook workflow.
So please make the most of your external mouse by assigning one of its buttons as a dedicated right-click option on your Macbook!
Right-clicking with an Apple Magic Mouse
Right-clicking with an Apple Magic Mouse is a breeze. This innovative mouse has a touch-sensitive surface that allows for intuitive right-click functionality.
Simply press on the right side of the mouse’s surface to activate the right click and access the context menu.
The Magic Mouse’s sleek design and advanced technology make it popular among Mac users, providing seamless control and effortless navigation.
With this feature, you can easily perform various actions and access additional options from within applications, enhancing your overall user experience on your Macbook.
So whether you’re editing photos or managing files, the Apple Magic Mouse offers an efficient way to right-click without hassle.
Customizing right-click options on the trackpad
Customizing right-click options on the trackpad allows you to personalize your Macbook experience.
Here’s how you can do it:
- Go to “System Preferences” from the Apple menu.
- Click on “Trackpad” to open the Trackpad preferences.
- In the “Point & Click” tab, under the “Secondary click” section, you will see two options: “Click in the bottom right corner” and “Click in the bottom left corner.” Choose the option that feels most comfortable for you.
- You can also customize what action occurs when you right-click by clicking on the drop-down menu next to either option.
- In addition to choosing a secondary click location, you can modify the tracking speed and enable or disable other gestures in this section of the Trackpad preferences.
- Experiment with different settings until you find what works best for your workflow and preferences.
Other Useful Macbook Shortcuts
In addition to right-clicking and using the delete key, several other useful shortcuts on a MacBook can enhance your productivity.
Page-up and page-down functions
The page up and page down functions are handy keyboard shortcuts on a Macbook that allow you to navigate through documents, web pages, and other content quickly.
With a key press, you can effortlessly scroll up or down without using your mouse or trackpad.
The page-up function moves the viewable area up by one screen, while the page-down function moves it down by one screen. These shortcuts are especially useful when reading long articles or reviewing large documents.
Utilizing these convenient shortcuts allows you to save time and navigate through content more efficiently on your Macbook.
Cut, copy, and paste shortcuts
Cut, copy, and paste shortcuts are essential for efficient and fast editing on a Macbook. These shortcuts allow you to quickly manipulate text or files without using the mouse.
Here are the essential cut, copy, and paste shortcuts on a Mac:
- Cut: Command + X
- This shortcut temporarily removes selected text or files from their current location and stores them in the clipboard.
- Copy: Command + C
- Use this shortcut to duplicate selected text or files and store them in the clipboard without removing them from their original location.
- Paste: Command + V
- Once you’ve cut or copied content using the previous shortcuts, you can use this one to insert the copied or cut items at the current cursor position.
- Paste and Match Style: Option + Shift + Command + V
- When pasting content from another source, like a website or document, this shortcut ensures that the pasted content adopts your desired formatting.
- Undo Paste: Command + Z
- If you’ve made an error while pasting content, this command allows you to undo your last paste action.
- Duplicate: Command + D
- Quickly duplicate a selected file, folder, or document without using drag-and-drop methods.
- Find: Command + F
- Use this shortcut to open the ‘Find’ dialogue box in most applications, where you can search for specific words or phrases within a document or webpage.
Sleep, log out, and shut down shortcuts
Sleep, log out, and shut down shortcuts:
- Press the Control + Shift + Power button to put your Macbook to sleep mode.
- Press Command + Option + Power button or Command + Control + Power button to instantly log out of your user account.
- Press Command + Option + Control + Power button or Command + Control + Eject key to bring up the restart, sleep, and shutdown dialogue box.
- Press the Control + Power button or Control + Media Eject key to display the shutdown options pop-up window.
- Press Command + Option + Control + Media Eject key to shut down your Macbook without confirmation prompts instantly.
Finder and system shortcuts
Finder and system shortcuts can greatly enhance your navigation and efficiency on a MacBook.
Here are some important shortcuts to remember:
- Command + Space: Opens the Spotlight search bar, allowing you to search for files and applications more quickly.
- Command + Tab: Switches between open applications, making it easy to multitask and switch focus.
- Command + H: Hides the active application, minimizing distractions and decluttering your screen.
- Command + Q: Quits the active application; useful when you want to close an app completely.
- Command + Option + Esc: The Force Quit Applications window opens, allowing you to close unresponsive apps forcefully.
- Command + A: Selects all items in a folder or document, saving you the effort of manually selecting each item individually.
- Command + C: Copies selected items or text to be pasted elsewhere.
- Command + V: Pastes copied items or text in the desired location.
Document shortcuts
Document shortcuts on a Macbook can make working with files and documents much more efficient.
Here are some essential document shortcuts to help you navigate through your work:
- Command + N: Create a new document or file.
- Command + O: Open an existing document or file.
- Command + S: Save the current document.
- Command + Shift + S: Save the document with a different name or location.
- Command + P: Print the current document.
- Command + Z: Undo the last action.
- Command + Shift + Z: Redo the last action that was undone.
- Command + X: Cut the selected text, file, or object.
- Command + C: Copy the selected text, file, or object.
- Command + V: Paste the copied or cut text, file, or object.
- Command + A: Select all content in the current document or folder.
Accessibility shortcuts
Accessibility shortcuts on a Macbook can greatly improve the user experience for individuals with disabilities or special needs.
Here are some useful accessibility shortcuts you can try:
- Zoom: Press and hold the “Option” key while pressing “=” (equal sign) to zoom in. To zoom out, press and hold the “Option” key while pressing “-” (minus sign).
- VoiceOver: Press “Command + F5” to toggle VoiceOver on or off. VoiceOver is a built-in screen reader that audibly describes what’s happening on your Mac.
- Increase or Decrease Text Size: Press the “Control” key while scrolling up or down on your trackpad. To increase or decrease text size respectively.
- Keyboard Navigation: Press “Tab” to move between elements such as buttons, links, and input fields on a webpage or within an application.
- Dictation: Press the “Fn” (Function) key twice to enable dictation mode. You can then use your voice to dictate text instead of typing.
- Invert Colors: Press “Command + Option + Control + 8” to invert colours on your screen, which can be helpful for users with visual impairments.
- Increase Contrast: Press “Control + Option + Command + . (period)” to increase the contrast of items displayed on your screen.
- Reduce Motion: Go to System Preferences > Accessibility > Display > Reduce motion and tick the box. This will reduce animation effects and transitions, making it easier for users with motion sensitivity.
- Closed Captions: Press “Control + Command + F” while watching videos to enter full-screen mode with closed captions enabled if available.
- Sticky Keys: If you find it difficult to press multiple keys simultaneously, you can enable Sticky Keys by going to System Preferences > Accessibility > Keyboard > Enable Sticky Keys. This allows you to press one key at a time for shortcuts that usually require multiple keys.
Conclusion
In conclusion, understanding and utilizing the right-click and delete keys on a Macbook can greatly enhance productivity. The right-click provides quick access to important actions, while the delete key allows for seamless editing and deletion of content.
Exploring other useful Macbook shortcuts can help streamline tasks and simplify system navigation. Mastering these shortcuts will undoubtedly elevate your Macbook experience.
FAQs
1. How can I right-click on a MacBook without a dedicated delete key?
To right-click on a MacBook without a dedicated delete key, you can use the trackpad by holding down the Control key and then clicking or tapping on the trackpad with one finger.
2. What are some other useful shortcuts for MacBook users?
MacBook users have several useful shortcuts, such as Command+C to copy, Command+V to paste, Command+Z to undo, and Command+S to save. Additionally, using Command+Spacebar opens Spotlight search for quick file or app searches.
3. Can I customize keyboard shortcuts on my MacBook?
You can customize keyboard shortcuts on your MacBook by going to System Preferences > Keyboard > Shortcuts tab. From there, you can add new shortcuts or modify existing ones according to your preferences and needs.
4. Are there shortcuts specific to Safari browser navigation on a MacBook?
Yes, there are several Safari browser navigation shortcuts specifically designed for MacBooks. For example, pressing Command+T opens a new tab, while pressing Command+W closes the current tab. To navigate between open tabs in Safari quickly, you can use Control+Tab (forward) and Control+Shift+Tab (backward).