Struggling to add your Canon printer to your Mac? This is a common issue that many Apple MacBook owners face.
It can be tricky to determine whether you should opt for a wireless or wired setup to find the correct drivers on the official website.
But worry no more! This blog post is designed as a step-by-step guide to help you navigate this connectivity maze with ease and assurance.
Ready? Let’s dive deep into simple yet effective solutions to Add Canon Printer To Mac.
Quick Summary
- Adding a Canon printer to a Mac can be done through the System Preferences.
- There are three methods to connect a Canon printer: adding it in System Preferences, connecting wirelessly via a router, or using a wired connection with a USB cable.
- Troubleshoot common issues such as the printer not appearing in System Preferences, finding the correct printer driver, poor print quality, wireless connection issues, and error messages during installation or printing.
- Ensure proper printer driver installation by visiting the official Canon support website and downloading the latest driver for your specific Canon printer model.
- Check network connectivity by verifying the Wi-Fi connection, restarting the router, moving closer to the router if there’s weak signal strength, disabling VPN or firewall temporarily if necessary, checking the printer’s network settings, and restarting the printer if needed.
Steps to Add Canon Printer To Mac
To connect your Canon printer to your Mac, follow these simple steps: Add the printer in System Preferences, connect wirelessly via a router, or use a wired connection with a USB cable.
Adding the Printer in System Preferences
Connecting a Canon printer to your Mac involves several steps that can be navigated through the System Preferences.
Follow these instructions:
- Click on the Apple icon in your desktop’s top left corner.
- Select “System Preferences” from the drop-down menu.
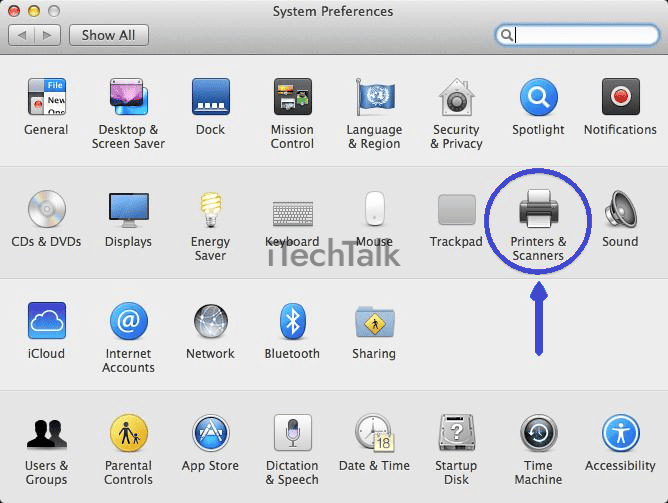
- Locate and click on “Printers & Scanners” or “Print & Fax,” depending on your Mac OS version.
- A list of already added printers will appear on the left side of the opened tab if you have any installed previously.
- To add a new printer, click on the “+” sign at the bottom of this list.
- Your Mac will now search for available printers around you; ensure your Canon printer is switched on and connected to the same network as your Mac if it’s a wireless connection.
- Once found, your Canon printer model should appear in this list.
- Click on it to select it and then hit “Add.”
- If you don’t see it, check your network connections or use a USB cord temporarily — make sure both devices’ power is ON.
- After successfully adding, you’ll see your Canon printer appearing in the list of printers within system preferences.
Connecting Wirelessly via Router
To connect your Canon printer to your Mac wirelessly using a router, follow these steps:
- Ensure your Mac and the Canon printer are connected to the same Wi-Fi network.
- Go to “System Preferences” from the Apple menu on your Mac.
- Click “Printers & Scanners” or “Print & Scan” in the System Preferences window.
- If the padlock icon at the bottom left corner is locked, click on it and enter your username and password to make changes.
- Click on the “+” button below the list of printers to add a new printer.
- In the pop-up window, you should see your Canon printer listed under “Default,” “Nearby Printers,” or “IP Printers.” Select your Canon printer from the list.
- If you don’t see your Canon printer listed, click the “IP” tab and manually enter its IP address. You can find this information in the printer’s documentation or by accessing your router’s administration interface.
- Once you’ve selected or entered all the necessary details for your Canon printer, click the “Add” button to proceed with the setup process.
- Your Mac will now attempt to connect to the Canon printer wirelessly via your router. This may take a few moments.
- Once connected, a green circle with a checkmark should appear next to your Canon printer’s name in System Preferences.
Connecting Using a Wired Connection (USB)

To connect your Canon printer to your Mac using a wired connection (USB), follow these simple steps:
- Ensure that your Canon printer and Mac are turned on and nearby.
- Locate a USB cable that is compatible with your Canon printer model.
- Connect one end of the USB cable to the USB port on your Canon printer.
- Connect the other end of the USB cable to an available USB port on your Mac.
- Wait for your Mac to recognize the connected printer.
Tips for Connecting a Canon Printer to Mac
To troubleshoot common issues when connecting a Canon printer to your Mac, ensure you have the latest printer drivers installed, check the network connectivity between your Mac and the printer, and consult official Canon support resources or online forums for additional guidance.
Troubleshooting common issues
Having trouble connecting your Canon printer to your Mac? Don’t worry; we’ve got you covered!
Here are some common issues you may encounter and how to troubleshoot them:
- Printer not appearing in the System Preferences:
- Ensure that your printer is turned on and connected to your Mac.
- Check if the printer is compatible with your version of macOS.
- Restart both your printer and Mac, then check again.
- Unable to find the correct printer driver:
- Visit the official Canon support website and search for the correct driver for your specific printer model.
- Download and install the driver following the instructions provided.
- The poor print quality or misaligned prints:
- Clean the printhead by accessing the maintenance options in your printer’s settings.
- Ensure you’re using high-quality paper compatible with your Canon printer.
- Check if there are any ink cartridge issues and replace them if necessary.
- Wireless connection issues:
- Ensure your Canon printer and Mac are connected to the same Wi-Fi network.
- Restart both your printer and Mac, then try reconnecting.
- Temporarily disable any firewall or VPN software that might be blocking the connection.
- Error messages during installation or printing:
- Check if any firmware updates are available for your Canon printer on their official website.
- Disconnect all cables from the printer, wait for a few seconds, then reconnect them.
- Resetting the printing system in System Preferences may resolve certain error messages.
Ensuring proper printer driver installation
Installing the proper printer drivers is important to ensure a smooth connection between your Canon printer and your Mac.
Follow these steps:
- Visit the official Canon support website.
- Navigate to the “Support” or “Drivers” section.
- Enter your Canon printer model number and select your operating system (Mac OS).
- Download the latest driver for your specific Canon printer model.
- Once the driver has finished downloading, locate the file on your Mac and double-click to begin the installation process.
- Follow the on-screen instructions to complete the installation of the printer driver.
Checking network connectivity
To ensure a smooth connection between your Canon printer and your Mac, it’s important to check the network connectivity.
Here are some steps you can follow:
- Verify Wi-Fi Connection: Ensure your Mac is connected to the same Wi-Fi network as the printer. You can check this by clicking on the Wi-Fi icon in the menu bar and selecting the network name.
- Restart Router: If you’re experiencing connectivity issues, try restarting your router. Unplug it from the power source, wait for a few seconds, and then plug it back in.
- Move Closer to Router: If you’re trying to connect wirelessly and experiencing weak signal strength, move closer to the router. Walls or other obstacles may interfere with the signal.
- Disable VPN or Firewall: Temporarily disable any virtual private networks (VPNs) or firewalls that may be blocking the printer from connecting to your Mac.
- Check Printer’s Network Settings: On your Canon printer, navigate to the network settings menu and ensure it’s connected to your Wi-Fi network. You may need to enter your Wi-Fi password if prompted.
- Restart Printer: Try restarting your Canon printer by turning it off and unplugging it from the power source for a few seconds before plugging it back in and turning it on again.
Useful Links and Resources for Canon Printer Setup on Mac
If you want more information and resources to help set up your Canon printer on your Mac, check out the official Canon support website, online forums, and communities dedicated to Mac users.
Need assistance? Reach out to Canon customer support for expert guidance. Happy printing!
Official Canon support website
To set up your Canon printer on your Mac, it’s helpful to have access to the official Canon support website. Here, you can find many resources and information about your printer model and your macOS version.
The site provides step-by-step guides, FAQs, troubleshooting tips, and downloadable drivers that ensure proper functionality between your Canon printer and Mac.
Whether you need assistance with wireless setup or driver installation, the official Canon support website is an invaluable resource for all your printer-related queries.
So bookmark this site for easy reference whenever you encounter any issues during the setup process!
Online forums and communities
To further assist you in adding your Canon printer to your Mac, exploring online forums and communities can be incredibly helpful.
These platforms offer a wealth of knowledge from fellow Apple MacBook owners who have faced similar challenges or have successfully connected their Canon printers to their Macs.
By joining these forums and communities, you can gain access to valuable tips, tricks, and step-by-step guides shared by experienced users.
You’ll also be able to ask questions specific to your situation and receive expert advice.
Additionally, these platforms often provide troubleshooting solutions for common issues that may arise during the setup process.
Explore reputable online forums and communities dedicated to Apple products or Canon printers on Mac devices. Their members are usually enthusiastic individuals willing to share their experiences and expertise with others like you.
Canon customer support contact information
If you encounter any difficulties while adding your Canon printer to your Mac, don’t worry! Canon provides excellent customer support to assist you.
You can contact Canon’s friendly and knowledgeable support team if you need assistance with the setup process or troubleshooting any issues.
They are available through various phone, email, and live chat channels. Don’t hesitate to contact them for expert guidance on connecting your Canon printer smoothly to your Mac.
Remember, by contacting Canon’s customer support for help with your printer setup on your Mac, you can ensure a hassle-free experience and enjoy seamless printing without any technical glitches.
Conclusion
In conclusion, adding a Canon printer to your Mac is a straightforward process that can be done through the System Preferences.
Whether you connect wirelessly or use a USB cable, following the steps outlined in this guide will help ensure a smooth setup.
Remember to troubleshoot any common issues, install the proper printer driver, and check network connectivity for a successful printer connection.
With these tips and resources, you’ll be well-equipped to set up your Canon printer on your Mac easily.
So go ahead and enjoy convenient printing from your Macbook!