Finding a specific file on your cluttered MacBook can feel like searching for a needle in a haystack. Poor
organization of files and folders can significantly
decrease productivity.
This article will guide you through the straightforward steps to Organize Files On MacBook,
streamline your file storage and enhance your efficiency easily. Ready to reclaim control over digital chaos? Let’s get started!
Quick Summary
- Create folders for different categories and use tags to find and sort files on your Macbook easily.
- Utilize iCloud Drive to store and access files across devices, enabling automatic syncing for seamless file organization.
- Use the Stacks feature on your Mac desktop to automatically organize files by type, reducing clutter and improving accessibility.
- Develop a consistent file naming system that is descriptive, concise, and includes relevant keywords for easy searching.
How To Organize Files On MacBook
Create folders for different categories and use tags to find and sort
files on your Mac easily.
Create folders for different categories
Creating folders for different categories is a
user-friendly approach to
streamline your files and
boost your productivity on MacBook.
To get started with this organization method, follow these simple steps:
- Open Finder.
- In the menu bar, select File > New Folder.
- Give the new folder a descriptive name, such as “Work Documents” or “Family Photos”. Opt for a labelling system that’s easy to remember and makes sense concerning your tasks or projects.
- Drag and drop relevant files into their designated folders.
Use tags to find and sort files easily
Tags are a convenient feature in macOS that allows you to find and sort your files easily. You can quickly locate specific documents or group-related files by assigning tags to your files.
Here’s how to use tags effectively on your Mac:
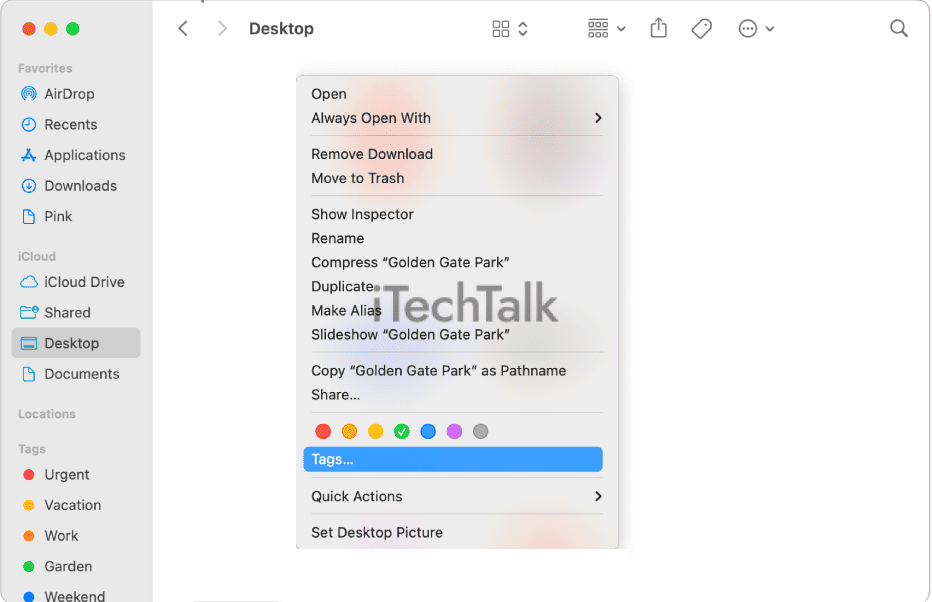
- Assigning Tags: Right-click on a file or folder, select “Tags,” and choose from existing tags or create new ones. You can assign multiple tags to a single item.
- Customizing Tags: Go to the Finder menu, click “Preferences,” and select “Tags.” From there, you can customize the colours and names of your tags according to your preferences.
- Searching by Tags: In the Finder search bar, type the tag name preceded by “tag:” (e.g., tag: work) to display all files with that particular tag.
- Combining Tags: You can combine multiple tags in a search using commas (e.g., tag: work, tag: important). This helps narrow down results further.
- Sorting by Tags: In Finder windows, you can add the “Tags” column to view and sort files by their assigned tags alphabetically or in other predefined orders.
- Using Smart Folders with Tags: Create a Smart Folder based on specific tag criteria. For instance, create a Smart Folder that automatically collects all files with the “work” tag, saving you time searching for them individually.
- Modifying Tags in Bulk: To modify tags for multiple files at once, select them all and right-click or go to the File menu > Tags > Choose tags to apply or remove.
Utilizing iCloud Drive
Store and access files across devices easily with iCloud Drive, enabling automatic syncing for seamless file organization on your Macbook.

Store and access files across devices
Utilizing iCloud Drive on your Mac allows you to store and access your files across multiple devices seamlessly.
With iCloud Drive enabled, you can effortlessly sync your documents, photos, and other files between your MacBook, iPhone, iPad, and Windows PC.
This means that whether you’re at home or on the go, you’ll always have access to the most up-to-date version of your files.
Additionally, iCloud Drive offers automatic syncing capabilities to instantly reflect any changes made to a file across all
connected devices.
This feature allows you to streamline your file organization process and ensure that important documents are readily available whenever and wherever needed.
Enable automatic syncing
By enabling
automatic syncing on your Mac, you can ensure that your files are always up to date-and accessible across all your devices.
This feature allows you to seamlessly store and access files on iCloud Drive, eliminating the need for manual file transfers or duplicates.
With automatic syncing enabled, any changes made to a file on one device will be reflected on all other devices connected to the same iCloud account.
This saves time and helps streamline your file organization process by keeping everything in sync without any extra effort required.
So, enable automatic syncing on your Macbook to manage your files and increase productivity effortlessly.
Managing Desktop Clutter
Utilize the Stacks feature to
organize files on your Mac desktop automatically.
Utilize Stacks feature
The
Stacks feature on your Macbook is a powerful tool for organizing your desktop clutter. It automatically
groups files of the same type into neat stacks, keeping your desktop clean and organized.
Here’s how to make the most of this feature:
- Click on the desktop to make sure you’re in Finder.
- From the top menu, click on View and select Use Stacks.
- Your files will be grouped into stacks based on their types, such as images, documents, or spreadsheets.
- To expand a stack and see its contents, click on it.
- You can customize how stacks are sorted by Control-clicking on the desktop and selecting Group Stacks By from the pop-up menu. Choose options like Date Last Opened or Tags to organize files according to your preference.
- If you want to clean up your desktop further, you can right-click on a stack and choose Clean Up Stacks. This will remove any unnecessary duplicates or outdated files within that stack.
Remove duplicate files
Removing duplicate files is important in organizing your files on a Mac.
Here’s how you can do it:
- Use a duplicate file finder app: Several apps can scan your Mac for duplicate files and help you remove them. Some popular options include Gemini, Duplicate File Finder Remover, and Duplicate Cleaner For iPhoto.
- Sort files by name or size: Before using an app, you can manually identify duplicate files by sorting your files by name or size. Look for files with the same names or similar sizes to find potential duplicates.
- Compare file content: If two files have different names but similar contents, you can use the “Quick Look” feature on Mac to preview the files and compare their content. This will help you determine if they are duplicates.
- Delete duplicates manually: Once you’ve identified duplicate files, select them and move them to the Trash. Remember to empty the Trash to delete them from your Mac permanently.
- Use iCloud Photo Library: If you have iCloud Photo Library enabled, it automatically identifies and removes duplicate photos from your library.
- Finding and removing duplicate files can help to declutter and organize your files.
Organize files in the Documents folder
To efficiently
organize your files on your Mac, paying attention to the Documents folder is important.
Here are some tips for organizing files in this folder:
- Create subfolders: Divide your files into categories and create subfolders within the Documents folder. For example, you can have separate folders for work-related documents, personal documents, invoices, or projects.
- Use descriptive names: Give each file a clear and descriptive name that reflects its content. This will make it easier for you to find specific files later on.
- Sort by date: Arrange your files chronologically by sorting them based on their creation or modification dates. This can be especially helpful if you frequently reference or update certain documents.
- Archive old files: Regularly review and archive any old or outdated files you no longer need immediate access to. Move them to a separate archived folder or transfer them to an external hard drive for long-term storage.
- Utilize file tags: Use macOS’ tagging feature to add relevant keywords or labels to your documents within the Documents folder. This can help you quickly locate specific files based on their tags.
- Group related files together: If you have multiple related files, consider creating a separate folder specifically for those documents within the Documents folder. This will help keep things organized and easily accessible.
Develop a file naming system
Developing a file naming system can greatly enhance organization and productivity when organising files on your Mac.
Here are some tips to help you create an efficient file naming system:
- Be descriptive: Use clear and concise names that accurately describe the file’s contents. Avoid generic or vague terms that can lead to confusion.
- Use consistent formatting: Choose a style for your file names and stick to it. This could include using capital letters, underscores, or hyphens to separate words, depending on your preference.
- Include dates: If relevant, include dates in your file names to identify when the file was created or last modified easily. This can be especially useful when dealing with multiple versions of the same document.
- Add keywords: Incorporate keywords related to the file’s content to make searching for specific files easier. Think about the most important aspects of the file and include relevant terms in the name.
- Keep it short: Aim for concise file names that are easy to read and understand. Long file names can be cumbersome and may get cut off in certain applications or interfaces.
- Organize by category or project: Consider including a category or project name at the beginning of the file name to further categorize your files and make them easier to locate.
- Avoid special characters: Stick to alphanumeric characters in your file names and avoid using special characters or symbols that may cause compatibility issues with different systems or software.
Other Tips for File Organization
In addition to using folders and tags, several other tips can help you streamline file organization on your Mac.
From utilizing Smart Folders for automatic grouping to transferring files to iCloud Drive or an external drive, these strategies will enhance productivity and keep your digital files easily accessible.
Find out more by reading the full article!
Use Smart Folders for automatic grouping
Smart Folders are a useful feature on your Mac that allows for automatic grouping of files based on specific criteria. Smart Folders lets you quickly access files that meet certain conditions without searching your entire file system.
Here’s how to use Smart Folders for automatic grouping:
- Click on the File menu in Finder and select New Smart Folder.
- A new window will appear with a search field at the top.
- Click on the ‘+’ button on the right side of the search field to add criteria for your Smart Folder.
- You can specify various conditions such as file name, file type, date modified, or even tags.
- After adding your desired criteria, hit Enter to perform the search.
- All files that meet the specified conditions will be displayed in the Smart Folder.
Favourite important folders
One great feature of macOS is the
ability to favourite important folders, making them easily accessible whenever needed.
Here’s how you can take advantage of this useful tool:
- To favourite a folder, open Finder and navigate to the folder you want to mark as a favourite.
- Right-click on the folder and select “Add to Favorites” from the dropdown menu.
- The folder will now appear in the sidebar under the “Favorites” section, allowing you to access it anytime quickly.
Clean up the Downloads folder
The Downloads folder on your Mac can quickly become cluttered with files you no longer need. Cleaning up this folder helps free up space on your MacBook and makes it easier to
find and access important files.
Here are some tips for cleaning up the Downloads folder:
- Sort files by date: Start by sorting the files in your Downloads folder by date. This will allow you to identify the oldest files that you no longer need.
- Delete unnecessary files: Go through the sorted list and delete any files that you no longer need or have already been backed up elsewhere.
- Move important files: If any important files are in the Downloads folder, move them to a more appropriate location, such as a specific folder or external drive.
- Utilize decluttering tools: macOS offers built-in decluttering tools like Stacks, which automatically organizes similar file types into neat stacks on your desktop. Enable Stacks to keep your Downloads folder tidy.
- Set a regular cleaning schedule: To prevent the Downloads folder from becoming cluttered again, set a regular cleaning schedule. For example, you can clean it out once a week or once every month.
Make use of macOS’s decluttering tools
To further simplify and streamline your file organization on your Mac, take advantage of macOS’s built-in decluttering tools.
These tools are designed to help you keep your files neat, ensuring easy access and efficient management.
Here’s how you can make use of these handy features:
- Use the “Optimize Storage” option: macOS offers an “Optimize Storage” feature that automatically removes old, unused files from your Mac. This includes clearing out items from the Trash bin and removing downloaded files that have been idle for a while. Enabling this option can free up valuable storage space and keep your Mac running smoothly.
- Enable the “Desktop & Documents Folders” sync: If you tend to save a lot of files on your desktop or in the Documents folder, consider enabling iCloud Drive’s “Desktop & Documents Folders” syncing feature. This will automatically store these files in iCloud, making them accessible across all your devices. It also helps to free up space in your local storage.
- Utilize the “Storage Management” tool: Your Mac has a built-in “Storage Management” tool to easily identify large files and applications taking up significant disk space. Simply go to Apple menu > About This Mac > Storage tab, then click on the “Manage…” button to access the tool. From there, you can review and delete unnecessary large files or move them to an external drive.
- Empty your Trash regularly: Remember to empty your Trash regularly to delete any files you no longer need or want permanently. This will help avoid cluttering up your system with unnecessary data.
- Take advantage of Spotlight search: Spotlight is a powerful search tool on macOS that can help locate specific files quickly. Instead of manually browsing through folders, type in keywords or file names into Spotlight (accessible through the magnifying glass icon in the top-right corner of your screen) to find and open files instantly.
Transfer files to iCloud Drive or an external drive
To further streamline your file organization on your Mac, consider transferring files to iCloud Drive or an external drive. This will help you
free up storage space on your device and
securely store your files for easy access.
Here’s how you can transfer files:
- Select the files you want to transfer: Choose the files or folders you want to move to iCloud Drive or an external drive.
- Right-click and select “Copy” or use the keyboard shortcut “Command + C” to copy the selected files.
- Open your iCloud Drive or connect your external drive to your Mac.
- Paste the copied files into the desired location: Right-click in the destination folder and select “Paste” or use the keyboard shortcut “Command + V” to paste the files.
- Wait for the transfer to complete: Depending on the file size and transfer speed; it may take some time for the files to be transferred.
- Verify successful transfer: Double-check that all your transferred files are now stored in either iCloud Drive or on your external drive.
Conclusion
In conclusion, organizing files on your Macbook is essential for
maximizing productivity and efficiency. You can easily streamline file management and declutter your desktop by utilizing folders, tags, iCloud Drive, and other built-in macOS features.
Remember to
develop a consistent file naming system and
use tools like Smart Folders to automate organization. With these tips, you can
keep your files organized and accessible whenever needed.
FAQs
1. What is the best way to organize files on a MacBook?
The best way to organize files on a MacBook is by using folders and subfolders. Create categories that make sense for your needs, such as “Work,” “Personal,” or “Projects,” and then further organize files within those categories.
2. How do I create a new folder on my MacBook?
To create a new folder on your MacBook, right-click or control-click anywhere in the Finder window, select “New Folder” from the drop-down menu, and give it a name. Alternatively, you can use the shortcut Command + Shift + N.
3. Can I customize the icons of my folders on macOS?
Yes, macOS allows you to customize the icons of your folders. Right-click or control-click on the folder you want to change and select “Get Info” from the drop-down menu. In the Info window, click once on the current icon in the top-left corner, then press Command + V to paste an image file onto it.
4. Is there a way to automatically sort files into specific folders based on criteria?
Yes, macOS offers Automator, which allows users to create custom workflows for automating tasks like sorting files into specific folders based on criteria such as file type or keyword tags. You can access Automator through the Applications > Utility folder and explore its functionalities to set up automated file organization processes according to your needs.