To Create New File On Mac use Finder, TextEdit, Terminal, or Automator.
Struggling to
create new file on
Mac? You’re not alone. Many people, especially those transitioning from Windows, stumble upon this crucial but seemingly tricky task.
Our comprehensive guide takes you by hand, providing step-by-step insights on creating files in various ways, such as using
Finder,
TextEdit and even
Terminal for the more tech-savvy readers.
Stick around; we are about to make your Mac experience significantly smoother!
Quick Summary
- Multiple ways to create new files on a Mac include the Finder, TextEdit, Terminal, or Automator.
- You can easily generate blank documents and folders using the Finder with a few clicks or keyboard shortcuts.
- TextEdit is a versatile text editing application that comes pre-installed on Macs and allows for quick and easy file creation and editing.
- The terminal provides advanced options for file creation, allowing users to generate files with specific formats or modify existing ones using simple commands.
Ways to Create New File On Mac
There are several ways to
create new file on Mac, including the Finder, TextEdit, Terminal, or Automator.
Using the Finder
Creating a new
file on your Mac relieves you of unnecessary stress.
Launch Finder is an integral tool that aids in creating and managing files flawlessly.
From the menu bar, select “File,” then choose “New Document” to quickly generate a blank slate for your ideas or data – it’s just that easy.
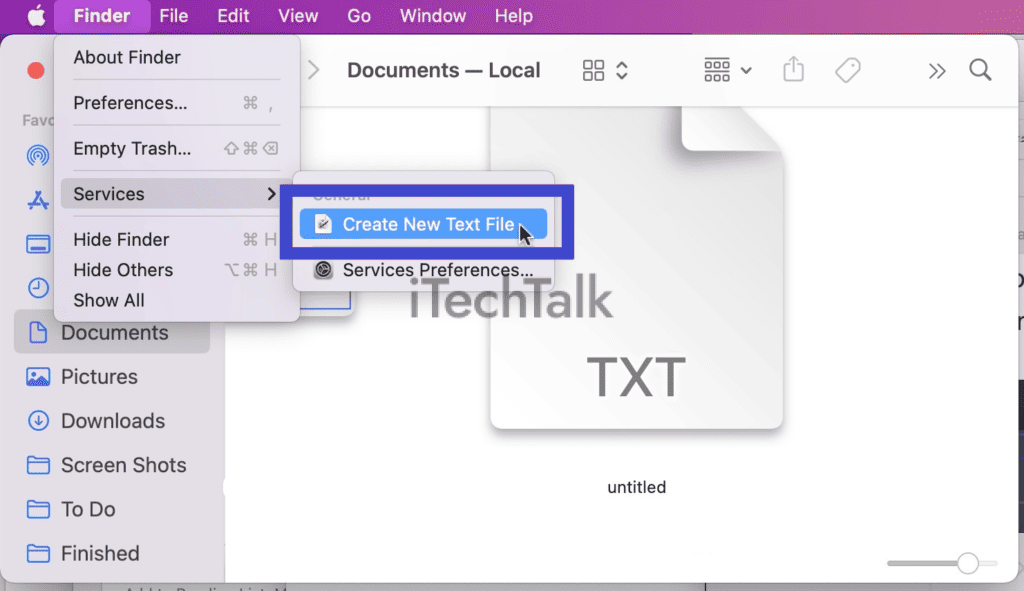
Alternatively, if you’re already exploring a specific folder or directory in Finder, have no fear – help is near!
Click on the Finder tab, navigate towards Services, and opt for ‘Create New.’ It’s essentially like magic at your fingertips.
Creating folders follows suit as well; right-click on your desktop or use the iconic keyboard combination ⌘ + Shift to bring about fresh storage space instantly.
Indeed, balancing file organization becomes effortless with handy options available within seconds—be it jotting down notes in the TextEdit app or curating spreadsheets by default Apple apps.
So let all apprehensions fade as you dive into seamless file and folder creation using Mac’s intuitive interface from today!
Using TextEdit
TextEdit is a
versatile text editing application that
comes pre-installed on your Mac. It allows you to
create and edit plain text documents with ease.

To create a new file
using TextEdit, follow these steps:
- Launch TextEdit from the Applications folder or type “TextEdit” in Spotlight.
- Once TextEdit is open, go to the menu bar at the top of your screen and click “File”.
- From the drop-down menu, select “New” to create a new document.
- You can choose between creating a plain text document or Rich Text Format (RTF) document by clicking either option.
- After selecting your preferred format, a blank untitled document will appear where you can start typing and adding content.
TextEdit’s intuitive interface and easy-to-use features allow you to create and edit documents without hassle quickly.
Whether you need to write notes, draft emails, or work on simple projects, TextEdit provides a seamless experience for MacBook owners.
Remember: It’s important to save your file once you’re done working on it so you don’t lose any progress. Simply go to “File” > “Save” or use the shortcut ⌘ + S to save your document before closing it or continuing with further edits.
Using Terminal
To create a new file on your Mac
using Terminal, you can unleash
advanced file creation options.
You can generate files with specific formats or modify existing ones with simple commands.
You can use text editors like Nano or Vim to create new
files from scratch by opening Terminal and navigating to the desired directory.
Additional commands allow you to
rename files, change permissions, and
compress them into compressed archives.
The terminal provides a wealth of possibilities for
efficient file creation and manipulation on your Macbook.
Using Automator
Creating a new file on your Mac can be made even easier with the help of
Automator.
Automator is a built-in application on Mac that allows you to automate repetitive tasks and create custom workflows.
With Automator, you can streamline creating new files by automatically setting up actions to generate them in specific folders or with specific settings.
This powerful tool gives you more control over file creation on your Mac, saving you time and effort.
So whether you need to create multiple files at once or want to customize the parameters for each new file, using Automator is an excellent option for Apple MacBook owners looking to enhance their productivity.
Steps to Create a New File Using the Finder
Creating a new file on your Mac using the Finder is simple.
Just follow these steps:
- Open the Finder by clicking on the icon in the Dock or pressing ⌘ + Space and typing “Finder” in Spotlight.
- Navigate to the location where you want to create the new file. This can be your desktop, a folder, or any other directory.
- In the top menu bar, click “File” and choose “New Document”. You will see a drop-down menu with options such as Text Document, Folder, Presentation, and more.
- Select the type of file you want to create from the menu. For example, if you want to create a text document, choose “Text Document”.
- A new file with a default name like “Untitled.txt” will appear in your selected location. You can immediately start editing it by double-clicking on it.
Steps to Create a New File Using TextEdit
Creating a new file using TextEdit on your Mac is quick and easy.
Just follow these simple steps:
- Open TextEdit by clicking on its icon in the Dock or searching for it in Spotlight.
- Once TextEdit is open, click “File” in the menu at the top of your screen.
- In the dropdown menu, select “New” to create a new file.
- A blank document will appear on your screen, ready for you to start typing or editing.
Steps to Create a New File Using Terminal
To create a new file on your Mac using Terminal, follow these steps:
- Open the Terminal application by going to Applications > Utilities > Terminal.
- Navigate to the directory where you want to create the new file by typing “cd [directory path]” and pressing Enter. For example, if you want to create the file on your desktop, type “cd Desktop” and press Enter.
- To create a new file, use the touch command followed by the desired filename and extension. For instance, if you want to create a text file called “newfile.txt”, type “touch newfile.txt” and press Enter.
- You can verify that the file has been created using the ls command to list all files in the current directory. Type “ls” and press Enter to see the newly created file.
- If you need to edit or modify the file, use any text editor in the Terminal, such as Nano or vi. Simply type “nano [filename]” or “vi [filename]” and press Enter to open the editor.
Conclusion
In conclusion, creating new files on a Mac is a
simple and intuitive process. You can choose Finder, TextEdit, Terminal, or Automator.
You can organize and manage your documents on your Mac with just a few clicks or keystrokes. So go ahead and unleash your creativity with ease on your
Apple MacBook!