To Rotate Screen On iPad. Use the Control Center’s Portrait Orientation Lock function, assign a custom shortcut to the home button, or the AssistiveTouch button.
Have you ever struggled to
rotate your iPad screen for a better viewing experience? Don’t worry; we’ve got you covered.
In this blog post, we’ll guide you through the
simple steps to effortlessly Rotate Screen On iPad between
portrait and landscape modes.
We’ll also discuss some common issues that may prevent the screen from rotating and share
useful tips to
enhance your overall device experience.
Quick Summary
- To enable or disable screen rotation on an iPad, users can activate the Portrait Orientation Lock feature from the Control Center, customize the AssistiveTouch button for easier access, or use a home button shortcut.
- Troubleshoot common screen rotation issues by disabling Portrait Orientation Lock, updating software, and checking for hardware issues.
- Take advantage of helpful tips and tricks like using Split View and Slide Over to multitask efficiently, using Siri to rotate the screen hands-free, and customizing AssistiveTouch buttons for quick access to frequently used features.
Understanding The Basics To Rotate Screen On iPad
To enable or disable screen rotation on an iPad, users can activate the
Portrait Orientation Lock feature from the
Control Center, customize the
AssistiveTouch button for easier access, or use a home button shortcut.
Enabling Portrait Orientation Lock
Rotating the screen on your iPad can greatly enhance your experience while using the device. One way to manage screen rotation is by enabling the Portrait Orientation Lock feature.
The following steps will guide you through the process of enabling or disabling the lock:
- Access the Control Center by swiping down from the top-right of the screen on newer models or swiping up from the bottom of the screen on older models.
- Locate and tap the “Portrait Orientation” icon, which resembles a lock encircling a circular arrow.
- A red highlight will appear around the icon when enabled, indicating that your iPad’s screen rotation is now locked in portrait orientation.
- To disable Portrait Orientation Lock and allow automatic screen rotation, tap the icon again, removing the red highlight.
Now you can quickly and easily control your iPad’s screen orientation with just a few taps in the Control Center.
Using The Control Center
Accessing the
Control Center on an iPad is a quick and easy way to adjust the screen rotation settings.

Here are the steps to follow:
- Swipe up from the bottom of the screen to open the Control Center.
- Look for the “Portrait Orientation Lock” icon, which looks like a circular arrow with a lock symbol in the middle.
- Tap the icon once to turn on the rotation lock, preventing the screen from rotating when you turn on your iPad.
- Tap the “Portrait Orientation Lock” icon to turn off the rotation lock.
- Alternatively, you can customize your Control Center by adding a shortcut for “Rotation Lock” to make it easier to access in the future.
- To do this, go to Settings > Control Center > Customize Controls and scroll down until you see “Rotation Lock.”
- Tap on the green plus sign next to it, and it will be added to your Control Center.
- Now when you swipe up from the bottom of your iPad screen, you can quickly enable or disable the screen orientation lock by tapping this shortcut button in the Control Center.
Using these simple tips and tricks with Control Center should help you easily rotate your iPad’s screen whenever necessary without any hassle!
Customizing AssistiveTouch Button
I find the AssistiveTouch button extremely helpful in accessing screen rotation controls quickly.
Here are the steps to customize it:
- Go to “Settings” on your iPad.
- Navigate to “General” and then “Accessibility.”
- Scroll down and select “AssistiveTouch.”
- Turn on AssistiveTouch by toggling the switch.
- Tap “Customize Top Level Menu.”
- Select the “+” icon to add a new action.
- Choose “Rotation” from the list of actions.
- Drag and drop the rotation icon into your top-level menu.
- Tap, hold, and drag the icon anywhere you want on the screen for easy access.
- Exit settings, and you’re done! You can easily access screen rotation controls with just one touch of your customized AssistiveTouch button.
Overall, I find that customizing AssistiveTouch not only makes it easier for me to rotate my iPad screen but also makes other features more accessible!
Troubleshooting Common Screen Rotation Issues On iPad
– Disabling Portrait Orientation Lock
–
Updating Software
– Checking for Hardware Issues
To troubleshoot common screen rotation issues on iPad, try disabling Portrait Orientation Lock, updating the software, or checking for any hardware issues.
Disabling Portrait Orientation Lock
I often find that
portrait mode works best for reading and browsing, but other times I want to enjoy videos or games in landscape mode.
To disable Portrait Orientation Lock on my iPad, I follow these simple steps:
- Open Control Center by swiping up from the bottom of the screen (on older models) or touching the top-right corner of any screen and dragging downward (on newer models).
- Look for the “Portrait Orientation” icon, which features a padlock with a circular arrow.
- Tap the “Portrait Orientation” icon to turn off the lock.
- Now you can rotate your iPad freely and enjoy content in landscape mode.
Remember, if your iPad still does not rotate after disabling Portrait Orientation Lock, try checking for updates or contacting Apple support if the problem persists.
Updating Software
If you’re experiencing
screen rotation issues on your iPad, updating the device’s software is one possible solution.
Here are the steps to follow:
- Check if a software update is available by going to Settings > General > Software Update.
- If an update is available, tap “Download and Install.”
- Ensure your iPad is connected to Wi-Fi and has enough battery life before starting the update process.
- Once the download is complete, tap “Install” and enter your passcode if prompted.
- Wait for the installation process to finish, which may take several minutes.
- Once the update is complete, restart your iPad and check whether the screen rotation problem has been resolved.
Updating your iPad’s software can often
fix bugs and glitches that may be causing issues with screen rotation. It’s a simple step that can save you time and frustration troubleshooting other potential causes of the problem.
Checking For Hardware Issues
If your iPad still isn’t rotating after trying software solutions, there may be a
hardware issue causing the problem.
Here are some steps to check for hardware issues:
- Check if the screen physically rotates when you turn the device: If the screen doesn’t move at all, there’s likely an issue with the accelerometer or gyroscope.
- Clean the iPad screen: Dirt or debris on the screen can interfere with sensors and cause rotation problems.
- Remove any cases or covers: Cases or covers could block the sensors responsible for detecting orientation.
- Restart your iPad: Sometimes, a simple restart can fix hardware problems unrelated to internal damage.
- Contact Apple support: If none of these solutions work, it may be time to contact Apple support for further assistance in diagnosing and fixing any hardware issues with your iPad.
Tips And Tricks For iPad Screen Rotation
– Use the Home Button Shortcut by double-clicking on the home button, swiping right or left to find the app you want to rotate, and then tapping on it while holding the device in landscape mode.
– Make the most of
Split View and Slide Over by accessing these features from the Dock and adjusting their size as needed.
– Use Siri to Rotate the Screen by asking “Hey Siri” followed by a command like “Rotate screen.”
– Locking the Screen for Specific Apps can prevent it from rotating when using specific apps such as games or reading apps.
Using The Home Button Shortcut
One of the easiest and quickest ways to rotate your iPad screen is using the
home button shortcut.
Here’s how:
- Double-click the home button on your iPad.
- You will see the App Switcher, which reveals all the apps currently open on your device.
- Swipe left or right until you find the app whose screen rotation you want to adjust.
- Once you’ve found it, tap and hold on to its preview window.
- A menu with a “Rotate Left” or “Rotate Right” option should pop up.
- Tap on either option to correspond with your desired orientation.
This
quick and easy method can save you time compared to accessing Control Center or changing settings in AssistiveTouch.
Making The Most Of Split View And Slide Over
One of the best ways to optimize your iPad’s screen rotation is by using Split View and Slide Over. These features allow you to multitask efficiently and
use two apps at once on your device.
Here are some tips on how to make the most of these features:
- To use Split View, swipe up from the bottom of the screen to access your Dock. Then, drag an app onto the screen you’re currently using until it appears in a separate window. You can resize each window by dragging the divider line between them.
- To use Slide Over, swipe right from the right edge of your screen to bring up a sidebar with a list of compatible apps. Tap an app, and it will appear in a smaller window over your current app.
- You can easily switch between Split View windows by swiping down from the top of one window to see all open windows, then tapping on another one.
- To close a Slide Over window, swipe it off-screen from either side.
- Some apps may not be compatible with Split View or Slide Over, so check before using them together.
Utilizing these features allows you to maximize your productivity and take advantage of your iPad’s larger screen size for multiple tasks simultaneously.
Using Siri To Rotate The Screen
I find that using Siri is a convenient way to rotate the screen on my iPad without interacting with the device physically.
Here’s how to do it:
- Activate Siri by pressing and holding the Home button or saying “Hey, Siri” if you have enabled that feature.
- Say “Turn on/off orientation lock” or “Rotate screen” to Siri.
- If you say, “Turn on/off orientation lock,” Siri will ask if you want to turn it on or off. Respond accordingly.
- If you say “Rotate screen,” Siri will simply rotate the screen for you.
Using Siri is particularly useful if you’re cooking or doing something else where your hands might be messy, and getting your fingers all over the screen could worsen things.
Locking The Screen For Specific Apps
If you want to keep the screen locked in portrait or landscape mode for specific apps.
Here’s what you need to do:
- Open the app that you want to lock in a particular orientation.
- Hold your iPad in the desired orientation and then press the home button twice quickly to bring up the app switcher.
- Swipe right or left until you find the app you want to lock.
- Swipe up on the app preview to close it completely.
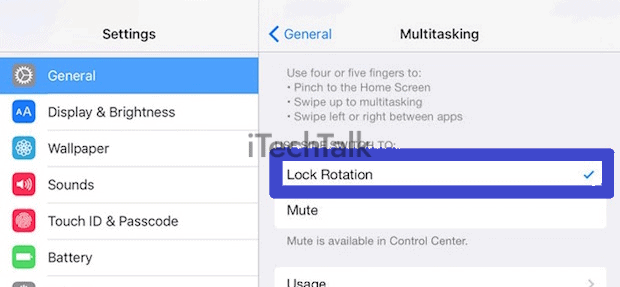
- Now, navigate to “Settings” and tap “General.”
- Next, scroll down until you find “Lock Rotation” and turn it on by tapping its switch.
- Return to your app and hold your iPad in the desired orientation.
- The screen should remain locked in that position even if you move your iPad around or rotate it.
- To unlock rotation for that app, return to “Settings,” go back into “General,” and turn off “Lock Rotation.”
Conclusion
In conclusion, learning how to rotate the screen on your iPad can greatly enhance your user experience. You can easily switch between landscape and portrait modes by enabling the portrait orientation lock, using the control center, and customizing the AssistiveTouch button.
However, if you encounter screen rotation issues, troubleshoot by disabling the portrait orientation lock or updating the software. Additionally,
take advantage of helpful tips and tricks like using Siri or locking the screen for specific apps.