Capturing the perfect screenshot on your iPad Pro is not only a valuable skill; it’s also incredibly easy to master.
With multiple methods at your disposal, in this blog, we will cover everything you need to know about how to Screenshot On iPad Pro – from using
physical buttons and
Apple Pencil gestures to employing
AssistiveTouch features.
Quick Summary
- There are multiple ways to take screenshots on an iPad Pro, including physical buttons, Apple Pencil gestures, and AssistiveTouch.
- Editing features like Markup allow for easy annotation and customization of screenshots before saving or sharing them through the Photos app or third-party apps.
- Troubleshooting common issues such as software updates and button confusion can ensure optimal performance when taking screenshots. Users can also utilize keyboard shortcuts and third-party apps for advanced features.
Different Methods To Screenshot On iPad Pro
There are several methods for
taking screenshots on iPad Pro, including the
physical buttons, Apple Pencil, and AssistiveTouch.
Using Physical Buttons
Taking screenshots on your iPad Pro using physical buttons is simple and quick.
Here’s how to do it:
- Locate the Sleep/Wake button: it is typically found at the top-right edge of the iPad.
- Find the volume up or volume down button, located on the right side of the device.
- Press and hold the Sleep/Wake button and either volume button simultaneously.
- Quickly release both buttons at the same time to capture a screenshot.
- You’ll hear a camera shutter sound (if your iPad’s sound is enabled) and see a brief flash on the screen, indicating that you have successfully taken a screenshot.
- The screenshot will appear as a thumbnail in the lower-left corner of your screen for a few seconds, allowing you to preview it before it disappears.
- Open your Photos app and head to the Recents album or Screenshots album to view, edit, or share your newly captured image.
Remember that this method
works specifically for iPads without a Home button, such as recent iPad Pro models. For older models with a Home button, press and hold the Home button together with the Sleep/Wake button instead.
Using Apple Pencil
One handy feature that can be used to take screenshots on the iPad Pro is the Apple Pencil.
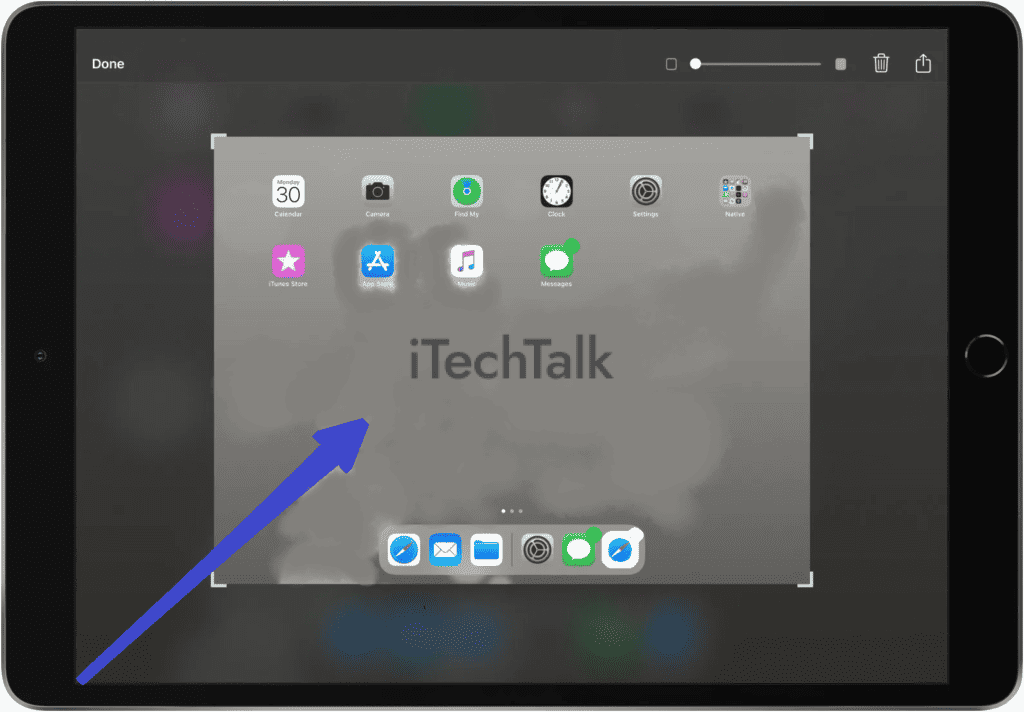
Here’s how to do it:
- First, ensure your Apple Pencil is charged and paired with your iPad Pro.
- Navigate to the screen you’d like to capture.
- Take out your Apple Pencil and hold it at the bottom of the screen.
- Swipe up with the pencil to reveal the Markup interface.
- Tap “Full Page” in the top right corner of the interface.
- Use your finger or Apple Pencil to scroll through the page until you’ve captured everything you want to include in your screenshot.
- Click on “Done” when you’re satisfied with your screenshot.
This method allows for more precision and ease when taking screenshots, especially if you must capture a specific portion of a webpage or document.
Using AssistiveTouch
AssistiveTouch is a feature on the iPad Pro that allows users to take screenshots without using physical buttons.
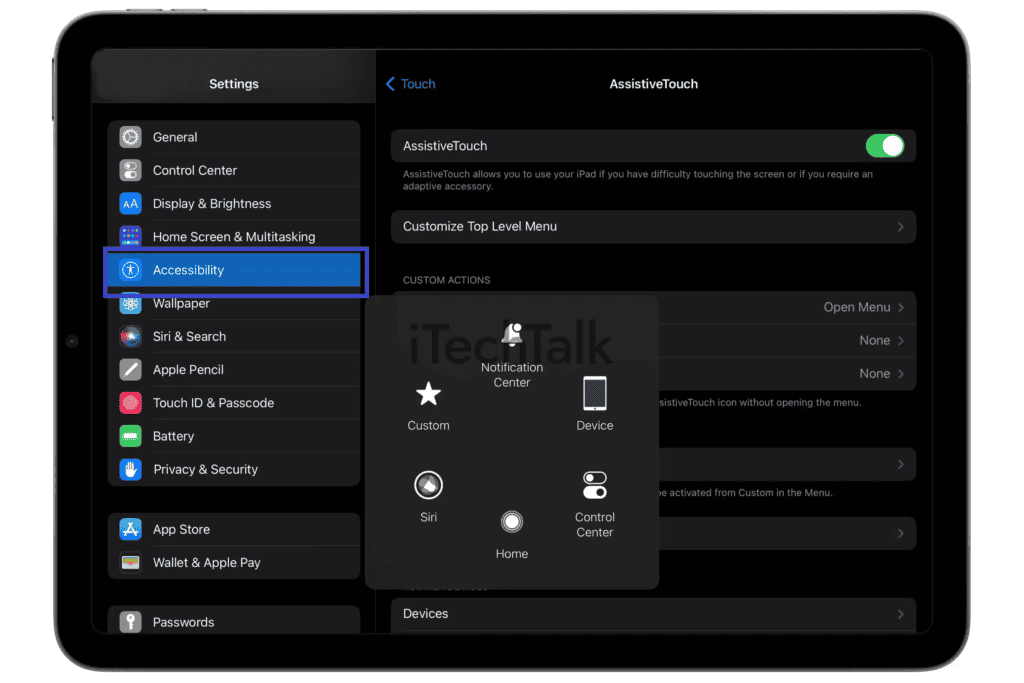
Here are the steps to take a screenshot using AssistiveTouch:
- Open your iPad’s Settings app and tap on “General.”
- Tap “Accessibility” and scroll down until you see “AssistiveTouch.”
- Toggle the switch next to “AssistiveTouch” to turn it on.
- A small gray button with a white circle will appear on your screen.
- To take a screenshot, tap the AssistiveTouch button, then tap “Device.”
- Tap “More” then “Screenshot.”
With AssistiveTouch enabled, users can easily access various functions without pressing buttons physically. This can be particularly useful for users with limited mobility or dexterity.
Overall, there are various ways to take screenshots on an iPad Pro, from physical buttons to assistive technology like AssistiveTouch.
Whichever method you choose,
taking screenshots can be an essential tool for capturing important information or moments on your device.
Editing And Sharing Screenshots
Access your recently captured screenshots through the Photos app, where you can edit them
using the Markup feature and save them to Files or iCloud for easy sharing with others.
Accessing Screenshots Through Photos App
You can head over to the Photos app to access your screenshots on an iPad. Once in the app, locate and tap on the “Recents” album, where all newly captured photos and screenshots will be stored.
If you want to edit your screenshots within the Photos app, tap on the screenshot of your choice and then hit “Edit.” This will open up various editing options, including crop, rotate, and filters.
Overall, accessing and managing your iPad screenshots is a straightforward process that provides great convenience for those needing their captured moments or information!
Editing Screenshots With Markup Feature
One of the great features of taking screenshots on an iPad is the ability to edit and annotate them using the built-in Markup feature easily.
Here are some ways to take advantage of this tool:
- After taking a screenshot, please tap on the thumbnail preview in the bottom corner of your screen to open it in Markup.
- Use the tools at the bottom of the screen to draw, write text, and highlight areas of the screenshot.
- To add more tools to your Markup toolbox, tap the plus sign icon and choose from options like magnifier, shapes, or signature.
- You can also use your Apple Pencil to edit and annotate screenshots in more detail.
- Once you’ve finished editing your screenshot, tap “Done” and choose whether to save it to your Photos app or share it with others directly from Markup.
Using Markup to edit screenshots, you can quickly add context or emphasis to important information captured on your iPad.
Saving Screenshots To Files Or iCloud
Once you’ve taken a screenshot on your iPad Pro, you can easily save it to the Files or iCloud app. This makes it easy to access and share your screenshots with others.
To save a screenshot to Files, open the Photos app and select the Recent album. From there, tap on the screenshot you want to save and select “Save Image” from the options menu.
Alternatively, if you have enabled
iCloud storage on your iPad Pro, your screenshots will be automatically saved.
This means you can access them from any
device connected to your iCloud account by logging in and opening up the Photos app or accessing them through iCloud.com.
Sharing Screenshots
Sharing screenshots on an iPad is a breeze. You can send your captured images to anyone with just a few taps.
Here’s how:
- Accessing Screenshots through Photos App: Open the Photos app on your iPad and go to the “Recents” album to find your latest screenshots. Tap the screenshot you want to share.
- Editing Screenshots with Markup Feature: Tap “Edit” on the top right corner of the screen and use the Markup feature to add annotations, text, or drawings on your screenshot if necessary.
- Saving Screenshots to Files or iCloud: Once done editing, tap “Done” and select “Save to Files” or “Save to iCloud Drive” if you want to save the screenshot for future reference.
- Sharing Screenshots: To share your screenshot with others, tap the share icon (looks like a square with an upward arrow) in the top right corner of the screen, choose a sharing method such as AirDrop, Messages, Mail, or other apps that support sharing content.
- Advanced Sharing Features: Some apps offer additional sharing features, such as sending screenshots directly to social media platforms or cloud storage services.
Remember to copy/paste your screenshots into other documents if needed. Moreover, if you’re using an iPad Pro with a Magic Keyboard attached, you can use keyboard shortcuts like Command + Shift + 4 to take a screenshot directly and then share it easily using the above methods.
Advanced Tips And Troubleshooting
Discover even more ways to optimize your iPad screenshot game by utilizing keyboard shortcuts and third-party apps, troubleshooting common issues, and ensuring that your device’s software is up-to-date for optimal performance.
Using Keyboard Shortcuts
If you want to take a screenshot on your iPad Pro quickly and efficiently, you can use
keyboard shortcuts.
Here are the steps to follow:
- Press the Command + Shift + 3 keys simultaneously to capture the entire screen image.
- Press the Command + Shift + 4 keys together to capture a selected part of the screen.
- To capture a specific window, press the Command + Shift + 4 keys, press the Space bar, and click on the window you want to screenshot.
- Once captured, your screenshots will be saved in your Photos app as usual.
When taking screenshots on an iPad Pro, keyboard shortcuts can save time and effort.
It’s important to note that these shortcuts may vary slightly depending on which iPad model you have or which version of iOS it’s running on.
Check your device’s user manual or online resources for instructions tailored to your iPad model.
Using Third-party Screenshot Apps
If you want more
advanced features and options when taking screenshots on your iPad Pro, you can consider downloading
available third-party screenshot apps.
Here are some of the best third-party screenshot apps for iPad:
- Picsew: This app allows you to stitch multiple screenshots together seamlessly, making it perfect for capturing long web pages or documents.
- Lightshot Screenshot: This app offers a range of editing tools, including annotations and cropping options, making it ideal for professional use.
- Greenshot: With this app, you can customize the image format and quality of your screenshots, as well as edit them with various filters and effects.
- Awesome Screenshot: This app provides an easy-to-use interface with simple editing functions like blur and highlighting tools.
- Snip & Sketch: This is another great option for editing screenshots, thanks to its intuitive interface and drawing tools.
By using these third-party screenshot apps, you can improve your productivity and ensure that all of your important information is captured in the best way possible on your iPad Pro.
Troubleshooting Common Screenshot Issues
Taking screenshots on an iPad is generally straightforward, but sometimes things can go wrong.
Here are some common issues people may encounter when taking screenshots on their iPads, and how to troubleshoot them:
- Screenshot not working: If you press the necessary buttons and no screenshot is taken, there could be a few different reasons. Ensure your iPad’s software is current, as this can sometimes cause bugs with screenshot functionality. Additionally, check that you’re pressing the right buttons simultaneously – it’s easy to get mixed up between the Sleep/Wake button and Volume buttons on newer models.
- Poor quality images: Sometimes screenshots can come out blurry or low-resolution, especially if your iPad has a low battery or isn’t functioning optimally. Try charging your device or closing any open apps that may slow it down.
- Unwanted elements captured in the screenshot: It’s possible that when attempting to capture a specific part of your screen, unwanted elements (such as notifications) also end up being included in the shot. To avoid this, try clearing any notifications before taking your screenshot.
- Can’t find saved screenshot: After taking a screenshot, it should automatically save to your Photos app in a folder labeled “Recents.” If you can’t locate your image there, try looking in other folders, such as Screenshots or Camera Roll.
By troubleshooting these common issues with iPad screenshots, users can better understand how to take high-quality images of their screens without frustration or confusion.
Updating IPad Software For Optimal Performance
Updating your iPad software is crucial for optimal performance. New software updates, such as iOS 15, can improve device speed and fix bugs impacting your ability to take screenshots.
To update your iPad software, go to settings, then general, and choose software update.
It’s important to ensure enough storage space before updating your device; otherwise, the installation process may not complete successfully.
Some users may experience difficulties during the software update process or after installing a new version of iOS.
If this happens, try troubleshooting by restarting your device or contacting Apple support for further assistance.
Conclusion And Final Thoughts
In conclusion, taking a screenshot on an iPad Pro is an
easy and useful feature that can greatly enhance your experience.
Whether using physical buttons, the Apple Pencil, or AssistiveTouch, capturing important information or moments has never been easier.
Remember to access your screenshots through the Photos app and take advantage of editing features like Markup before sharing them with others.
If you encounter any issues with taking a screenshot on your iPad Pro, try troubleshooting common problems or updating your software for optimal performance.