Capturing a Screenshot On iPhone SE is a crucial skill to master, whether
documenting an app bug or
sharing a memorable conversation with friends.
If you’ve ever wondered how to take a perfect screenshot on your beloved device without any hassle, this comprehensive guide is tailored just for you.
In the following sections, we’ll outline
step-by-step methods using physical buttons and AssistiveTouch.
Afterward, we will reveal where to find your screenshots and share
helpful tips and tricks to elevate your screenshot game.
Quick Summary
- To take a screenshot on iPhone SE, you can use physical buttons or AssistiveTouch.
- Screenshots can be found in the Photos or Files apps and organized into specific albums for easy access.
- Editing options are available within the Photos app, including cropping, adding text/drawings, using filters, and adjusting brightness/contrast.
- Siri can also take screenshots by activating with “Hey Siri” or pressing the side button and saying, “Take a screenshot.”
How To Take A Screenshot On iPhone SE
To
take a screenshot on your iPhone SE, you can use the physical buttons or AssistiveTouch by pressing and holding down two specific buttons simultaneously.

Using Physical Buttons
Taking a screenshot on the iPhone SE using physical buttons is quick and convenient.
Follow these simple steps to capture the screen:
- Open the screen or content you want to capture on your iPhone SE.
- Locate your device’s Side button (Sleep/Wake or Power button) and Home button.
- Simultaneously press and hold the Side button and Touch ID home button briefly.
- Release both buttons when you hear a camera shutter sound or see a flash on your screen, indicating that the screenshot has been taken successfully.
- If you have an iPhone SE (2nd Gen), use the Sleep/Wake and Home buttons instead.
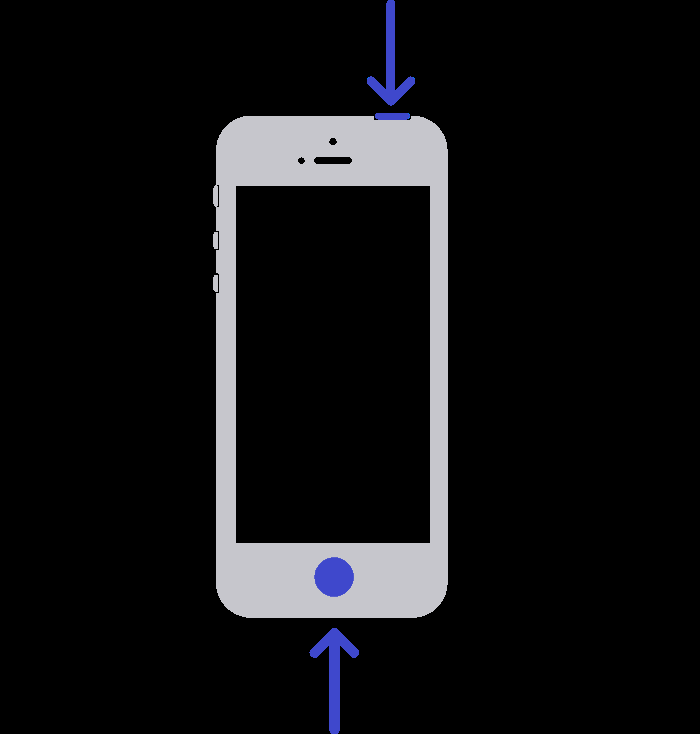
Remember, this method works best when you can access both buttons comfortably, making it easier to snap screenshots quickly and efficiently.
Additionally, using physical buttons eliminates the need for additional settings or third-party apps, keeping your iPhone SE experience streamlined and efficient.
Using AssistiveTouch
AssistiveTouch is a
virtual button that can take screenshots on the iPhone SE. This feature can be enabled in iPhone settings under
Accessibility.
Once activated, you can follow these steps to take a screenshot using AssistiveTouch:
- Open the screen or app that you want to capture
- Tap on the AssistiveTouch button on your screen
- Select “Device” from the menu options
- Tap “More”
- Choose “Screenshot”
This will capture a screenshot of your current screen and save it to your camera roll.
You can customize the AssistiveTouch feature by adding shortcuts for frequently used actions like taking screenshots or accessing the control center.
AssistiveTouch makes taking screenshots on the iPhone SE much easier, especially for those who struggle to press two physical buttons simultaneously.
So, if you ever need to take a screenshot on your iPhone SE without using physical buttons, try AssistiveTouch!
Where To Find Your iPhone SE Screenshots
Once you have captured a screenshot on your iPhone SE, finding it is easy – head over to the Photos app or Files app to access them, or use third-party apps for more advanced options.
In The Photos App
Once you have taken a screenshot on your iPhone SE, you can easily locate it in the Photos app. Open the app from your home screen and select the “Albums” tab at the bottom.
If you want to organize them further, you can create a new album specifically for your screenshots by tapping the “+” sign in the upper left-hand corner of the Albums page and selecting “New Album.”
Name it something like “Screenshots” or “Captured Images.” Once created, drag and drop any relevant screenshots into that folder for easy access later.
In The Files App
The Files app is a great way to organize and access your iPhone SE screenshots. To find screenshots using this app, open the app from your home screen and select the “Browse” tab.
In addition to organizing your screenshots, the Files app allows you to share them or move them to different folders easily.
Simply tap and hold on a screenshot file, then choose whether you want to copy it, move it or share it with someone else via AirDrop or another sharing method.
Using Third-Party Apps
Sometimes, the built-in screenshot feature on your iPhone SE may not suffice or meet your expectations. This is where third-party apps come into play.
One example is the Lightshot app, which lets you capture and share screenshots quickly.
It also includes a built-in image editor that enables you to annotate, crop, add text and lines, and highlight specific areas on your screen captures before sharing them across different platforms.
Other popular third-party screenshot apps include Snapseed, Skitch, and Dropbox Paper.
Tips And Tricks For Taking Screenshots On iPhone SE
You can enhance your screenshot-taking skills on iPhone SE by learning about
editing and sharing options, customizing AssistiveTouch features, utilizing
Siri voice commands, and more.
Editing Your Screenshots
When taking screenshots on your iPhone SE, it’s essential to know how to edit them to make them look perfect.
Here are some
editing tips you can use:
- Crop Your Screenshot – To crop your screenshot, open the Photos app, select your screenshot, and tap Edit. From there, select the Crop tool and adjust your screenshot accordingly.
- Add Text and Drawings – If you want to add text or drawings to your screenshot, tap on Edit > Markup in the Photos app. This lets you draw on the screenshot or add text using different fonts.
- Use Filters – You can apply filters to your screenshot by tapping Edit > Filters in the Photos app. This gives you various filter options that will enhance your image.
- Adjust Brightness and Contrast – To improve visibility in low-light conditions, adjust your screenshot’s brightness and contrast from the Photos app’s Edit menu.
- Share Your Edited Screenshot – Once you have finished editing, share your edited screenshot with family and friends via social media or messaging apps like WhatsApp or Messenger.
With these editing tips and tricks for iPhone SE screenshots, you can create stunning images that stand out from the rest!
Sharing Your Screenshots
Sharing your screenshots on the iPhone SE is a quick and easy process.
Here’s how:
- Once you have taken a screenshot, swipe left on the preview image in your screen’s bottom left corner.
- Tap the Share icon to bring up a list of available apps and options for sharing your screenshot.
- Choose the app or contact you want to share your screenshot with, such as Messages, Mail, or Airdrop.
- You can also share directly to social media platforms like Facebook, Twitter, and Instagram by selecting those apps from the list.
- Some apps even allow you to edit or annotate your screenshot before sharing it.
- You can also save your screenshot to iCloud Drive or other cloud storage services for quick access across your devices.
Remember, sharing your screenshots is a great way to
capture and communicate information quickly and efficiently with others.
So try these easy steps the next time you take a screenshot on your iPhone SE!
Customizing AssistiveTouch
AssistiveTouch is an accessibility feature on the iPhone SE that enables users to perform gestures and actions with a single tap.
With AssistiveTouch, you can customize the functions of your device’s physical buttons and add additional features such as taking screenshots.
Here are some ways to customize AssistiveTouch on your iPhone SE:
- Open Settings > Accessibility > Touch > AssistiveTouch.
- Tap Customize Top Level Menu and choose the function you want to add, such as Screenshot.
- You can also change the color or appearance of the AssistiveTouch button by selecting Customize Layout.
- To create custom gestures or add additional actions, select Create New Gesture or Create New Action.
- Once you’ve customized AssistiveTouch to your liking, you can access it by tapping the floating button on your screen.
Customizing AssistiveTouch can make your iPhone SE more convenient and accessible for users with disabilities or those who prefer alternative navigation methods.
So, knowing how to navigate this useful feature properly is always helpful.
Using Siri
I find it extremely convenient to use Siri to take screenshots on my iPhone SE.
This method can be especially useful if you need to take a screenshot quickly but don’t have both hands free to press physical buttons. Additionally, some users may find using voice commands more accessible than physically pressing buttons.
Troubleshooting Screenshot Issues On iPhone SE
If you’re experiencing issues with taking screenshots on your iPhone SE, it could be due to various factors such as an
outdated iOS version, low storage space, or hardware problems.
Screenshot Not Working
If you’re having difficulty taking screenshots on your iPhone SE, there could be various reasons why this is happening.
Here are some possible solutions to fix the issue:
- Check if your device has enough storage space, as running low on storage can prevent screenshots from being captured.
- Ensure your iOS software is up to date, as outdated software versions may have bugs affecting the screenshot feature.
- Try restarting your iPhone SE and then take a new screenshot to see if it works.
- If using physical buttons to take screenshots, ensure that you are pressing and holding both buttons at the same time until you hear a camera shutter sound or see a flash on the screen.
- If you’re using AssistiveTouch to capture screenshots, double-check that this feature is enabled in your device settings.
- If none of the above steps help, consider resetting all settings on your iPhone SE by going to Settings > General > Reset > Reset All Settings.
Remember, taking screenshots should be a simple process that requires little effort or troubleshooting.
By following these tips and tricks, you should be able to get back to taking screenshots of your favorite moments and memories without any issues!
Low Storage Space
When you have a
low storage space on your iPhone SE, taking screenshots or saving photos can be difficult. The iOS system requires some free space to save images and other files.
Delete any unnecessary photos or videos from your Photos app to fix this issue. You can transfer some of your files to iCloud or an external hard drive.
By freeing up some storage space on your iPhone SE, you can take more screenshots and easily save important images without worrying about running out of storage capacity.
Outdated IOS Version
If you’re having trouble taking screenshots on your iPhone SE, the issue might be due to an outdated iOS version.
It’s important to
keep your device updated with the
latest software to take full advantage of its features and capabilities, including
screenshot functionality.
To check if your iOS version is up-to-date, go to Settings > General > Software Update.
An older iOS version can also lead to other problems like
slow performance or
app crashes. So not only will updating your device improve screenshot-taking abilities, but it will also enhance the overall user experience.
Hardware Issues
If you’re having trouble taking a screenshot on your iPhone SE, it could be due to hardware issues. Sometimes, the physical buttons used to capture a screenshot may not work properly if damaged or malfunctioning.
In this case, you may need to get your device checked by an Apple technician or consider replacing it altogether.
Low battery levels can also affect your ability to take screenshots, as the device won’t have enough power to perform the necessary functions.
It’s important to note that while hardware issues can be frustrating, they’re often fixable through repairs or replacements.
Conclusion
Taking a screenshot on your iPhone SE is easier than you might think. Whether using physical buttons or the AssistiveTouch feature, capturing and accessing screenshots has never been simpler.
Don’t forget to try some tips and tricks outlined here, like editing and sharing screenshots, customizing AssistiveTouch, and using Siri for an even more seamless experience.
And if you encounter any issues, our troubleshooting section covers you.