Have you ever needed to Remove eSIM From iPhone but weren’t sure how? Whether
switching carriers, selling your device, or
upgrading to a new iPhone model, removing an eSIM can be essential.
In this blog post, we’ll walk you through the simple process of deleting an eSIM plan from your iOS device without any headache or confusion.
So let’s dive right in and learn how to regain control over your mobile data plans by effectively managing the cutting-edge eSIM technology on your Apple devices.
Quick Summary
- An eSIM is a digital version of a traditional physical SIM card that simplifies the process of connecting to mobile networks, activating multiple cellular plans on one device, and using two phone numbers without swapping out SIM cards.
- Reasons for removing an eSIM include switching carriers, selling or gifting your iPhone, or upgrading to a new model.
- To remove an eSIM from your iPhone, access the Settings app, select Cellular/Mobile Data, tap on the plan you want to delete, and confirm the removal. Backing up any necessary data before deletion is important as it cannot be undone.
- Troubleshooting steps such as resetting the eSIM or contacting your carrier can help resolve any issues encountered during removal. Always verify successful removal by checking if calls and texts go through with the deleted phone number after confirmation.
Understanding eSIM And Why You May Want To Remove It
An eSIM (electronic SIM) is a digital SIM card embedded within an iPhone that provides the same functionality as a physical SIM, allowing users to connect to mobile networks and use cellular data plans.
What Is An eSIM?
As a proficient SEO and high-end copywriter, I understand the importance of breaking complex concepts into easy-to-understand explanations.
So let’s get right to it – an eSIM, short for embedded Subscriber Identity Module, is a digital version of the traditional physical SIM card we usually insert in our smartphones.
This innovative technology has revolutionized how we connect to mobile networks by simplifying the process.
One notable advantage is activating multiple cellular plans on one device without swapping out physical SIM cards.
For example, with iPhones’ Dual SIM feature, you can have both work and personal phone numbers on a single device or access local mobile plans while traveling abroad.
Advantages Of eSIM Technology
As an SEO specialist and high-end copywriter, I can tell you that eSIM technology offers some significant advantages over physical SIM cards. One of the most appealing benefits is its
flexibility and convenience.
With eSIMs, users no longer have to switch out their SIM cards when traveling abroad or switching carriers.
Another advantage of eSIMs is their
compatibility with dual-SIM phones, which allows users to use two phone numbers on one device without carrying multiple phones or constantly swapping out SIM cards.
Plus, because there’s no physical card involved, it takes up less space in your device’s hardware.
It enables
manufacturers to create slimmer smartphones while offering the same network connectivity options.
Reasons To Remove eSIM From iPhone
You may want to remove an eSIM from your iPhone for various reasons, such as changing carriers, selling or gifting your device, or upgrading to a new iPhone model.
Changing Carriers
If you plan to switch carriers or change your mobile data plan, you may need to
remove your eSIM from your iPhone. The process is straightforward and can be
done through the Settings app on your device.
Once the eSIM profile is deleted, you’ll no longer be able to use that line of service with your iPhone.
For example, if you want to switch from AT&T to Verizon, removing the AT&T eSIM profile and adding the new Verizon profile is
necessary for a seamless transition.
It’s essential to note that deleting an eSIM plan isn’t reversible, so before confirming deletion; ensure it’s precisely what you want.
Selling Or Gifting Your Device
If you plan to sell or gift your iPhone, removing the eSIM is essential. This ensures the
new owner won’t access your cellular data and plans.
To remove the eSIM from your iPhone, go to Settings >
Cellular or Mobile Data and select the plan you wish to delete.

It’s important to note that
deleting an eSIM plan can’t be undone, so ensure you’ve backed up any necessary data before doing so. Additionally, if you plan on transferring a line over to a new device, it may be necessary to erase the old device’s eSIM first.
Upgrading To A New iPhone Model
When upgrading to a new iPhone model, you may need to remove the eSIM from your old device. This is especially important if you plan to sell or give away your phone, as the
eSIM holds sensitive information and personal data.
To remove the eSIM, follow the steps outlined in our guide by accessing the settings app and selecting “Delete eSIM.” It’s important to note that once removed, you will
lose connection to cellular networks for that line of service on the device.
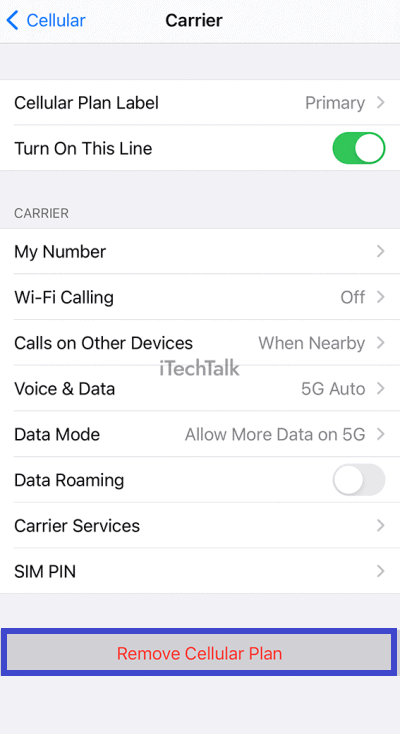
How To Remove eSIM From iPhone
To remove an eSIM from your iPhone, go to the Settings app, select Cellular or Mobile Data, tap on the plan you want to delete, and then select Delete eSIM – it’s that simple!
Want to know more? Keep reading for troubleshooting tips and additional information.
Accessing The eSIM Settings
To remove an eSIM from your iPhone, you must first access the eSIM settings. Here’s how: Open the “Settings” app on your iPhone and select either “Cellular” or “Mobile Data.”
Next, tap on the plan you want to delete and scroll down until you see the option to “Delete eSIM.” Once selected, confirm that you want to remove this plan by tapping “Delete,” then enter any necessary PIN codes or security information.
It’s important to note that once an eSIM is removed, you will lose connectivity for that service line.
Deleting The eSIM Profile
To delete an eSIM profile, users need to access the settings on their iPhones. From there, they can go to Cellular or Mobile Data and select the plan they wish to remove.
Tapping Delete eSIM will prompt a confirmation message.
It’s important to note that deleting an eSIM cannot be undone, and users may need to contact their carrier to reactivate that line in the future.
Additionally, users must back up any important data related to their eSIM before removing it from their iPhones.
Confirming The Removal
Once you have deleted an eSIM profile from your iPhone, confirming the removal is essential to ensure that the plan has been removed successfully.
To do this, return to your Settings app’s Cellular or Mobile Data option and verify that the
deleted eSIM plan is no longer displayed.
Additionally, check if you can
make or receive calls and
send text messages using the phone number linked to the removed eSIM card.
This step is especially crucial if you’re
switching carriers or upgrading to a new iPhone model, as any lingering issues with removing the eSIM could affect your
network connection quality on your new device or carrier.
Troubleshooting And Additional Tips
If you encounter issues when removing an eSIM from your iPhone, don’t worry. There are some simple troubleshooting steps you can take to resolve the problem and ensure a smooth removal process.
What To Do If You Encounter Issues
If you encounter any issues while removing an eSIM from your iPhone, you can try a few things. First, ensure that your device is updated to the
latest version of iOS.
If you still have trouble deleting the profile, try
resetting the eSIM by going to Settings > Cellular/Mobile Data > Manage Plans and selecting Reset eSIM.
It’s also a good idea to back up your eSIM data before attempting to remove it in case anything goes wrong.
Backing Up Your ESIM Data
Before removing an eSIM from your iPhone, it is important to
back up your data. This ensures you don’t lose vital information, such as
phone numbers and contacts associated with the eSIM plan.
To back up your eSIM data, go to Settings > Cellular > Add a New Plan.
It’s also worth noting that some carriers may offer
cloud-based solutions where users can save their eSIM data in case they need to reactivate it later.
Plus, if you’re switching from one carrier to another, check with the new provider regarding any options for
transferring your existing digital SIM profile without losing any stored information.
Final Thoughts And Conclusion
In conclusion, removing an eSIM from an iPhone is a
straightforward process that can be done through the phone’s settings.
While there are several reasons why you may want to remove it, such as changing carriers or upgrading your device, make sure to back up your eSIM data before deleting it, as the
removal cannot be undone.
ESIM technology has made it easier for users to
manage multiple mobile plans on their Apple devices without needing physical SIM cards.
However, if you no longer need your eSIM plan and wish to remove it from your iPhone, these simple steps will help you do so quickly and efficiently.
Conclusion
Removing an eSIM from your iPhone is a
simple process that
can be done quickly through the settings app.
Whether selling or gifting your device, changing carriers, or upgrading to a new model, removing the eSIM ensures you have full control over your mobile data plans.
Remember that once deleted, the plan cannot be recovered, and you may need to contact
your carrier for reactivation.