To Thunderbolt Bridge Mac connect a Thunderbolt cable on both Mac.
Are you wondering how to use the
Thunderbolt Bridge feature on your Mac? This
high-speed connection technology is integral to every
Apple computer, starting from
OS X Mavericks (Version 10.9).
In this article, we’ll dive deep into what Thunderbolt Bridge is, how to Thunderbolt Bridge Mac, and ways you can
troubleshoot common issues. Let’s unlock the full potential of your
Mac’s connectivity!
Quick Summary
- Thunderbolt Bridge is a high-speed connection technology on Mac computers that enables fast and efficient file transfer between two Macs with Thunderbolt 3 ports.
- To activate Thunderbolt Bridge, connect a Thunderbolt cable to the Thunderbolt ports of both Mac computers and configure the network settings in System Preferences.
- With Thunderbolt Bridge active, users can transfer files seamlessly between their connected Macs by using the Share function in Finder and selecting AirDrop as the destination for file transfer.
- If encountering any issues with Thunderbolt Bridge, troubleshooting steps include checking the cable connection, updating software, restarting the Macs, disabling firewall and VPN settings temporarily, or resetting network configurations.
What is Thunderbolt Bridge Mac?
Thunderbolt Bridge on Mac is a high-speed connection technology that allows you to connect two Macs with
Thunderbolt 3 ports for fast and efficient file transfer.
Definition of Thunderbolt Bridge
Thunderbolt Bridge on your Apple MacBook is more than just a
cutting-edge technology; it’s a sophisticated communication between your devices.

Essentially, Thunderbolt Bridge serves as the
bridge between two Mac computers with Thunderbolt 3 ports.
This high-speed hardware interface springs into action with the intentional connection of a Thunderbolt cable to both Macs’ specific ports, allowing for rapid and efficient transfer of large volumes of data such as audio, video files, apps, and programs.
The rousing perks don’t end there – not only does it provide unparalleled data transmission rates, but it also
charges iPhones and other connected devices at ease.
It’s not some mysterious digital entity or a virus lurking in your MacBook; rather, imagine this: A superhighway facilitating seamless transport – that’s what Thunderbolt Bridge brings to your device.
How it works
Thunderbolt Bridge on Mac is a powerful feature that allows you to
connect two Macs with Thunderbolt 3 ports, enabling
lightning-fast file transfers.
This technology utilizes the Thunderbolt interface, a
high-speed connection for peripherals like hard drives and RAID systems.
When you activate Thunderbolt Bridge by connecting a Thunderbolt cable between the two Mac computers creates a
direct network connection between them.
This means you can easily transfer
large amounts of data, whether audio, video, images, programs, or apps.
With its incredible speed and efficiency, Thunderbolt Bridge simplifies the process of sharing files between your Macs without compromising on quality or performance.
By leveraging the power of Thunderbolt technology, transferring files between your Mac computers has never been easier or faster.
The
seamless integration of Thunderbolt Bridge into your workflow allows you to effortlessly share and collaborate on projects with colleagues or friends who also own Apple devices.
And with its compatibility across various generations of Macs equipped with Thunderbolt ports (including the latest Thunderbolt 3), you can enjoy this feature regardless of your model.
How to Activate and Use Thunderbolt Bridge on Mac
To activate Thunderbolt Bridge on your Mac, connect a Thunderbolt cable to the Thunderbolt ports on both Mac computers you want to connect.
Steps to activate Thunderbolt Bridge
To activate Thunderbolt Bridge on your Mac, follow these simple steps:
- Connect a Thunderbolt cable to the 3 ports of both Mac computers you want to connect.
- Ensure both Macs are powered on and running the latest version of macOS.
- On each Mac, go to the “Apple” menu and select “System Preferences.”
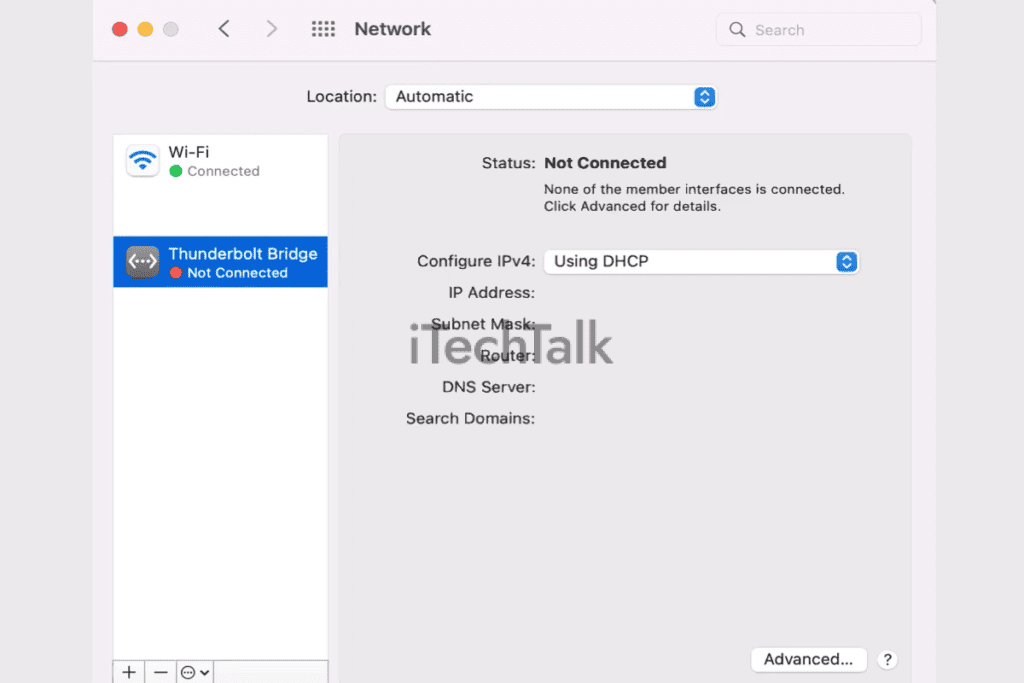
- In System Preferences, click “Network” to open the Network settings.
- Look for the Thunderbolt Bridge network interface in the list of available interfaces. If it’s not already there, click the “+” button at the bottom left corner and select “Thunderbolt Bridge” from the drop-down menu.
- Once you have added Thunderbolt Bridge as a network interface, could you select it from the left-hand side panel?
- Click on the “Advanced…” button in the bottom right corner to access advanced settings for Thunderbolt Bridge.
- In the Advanced settings, ensure that “Configure IPv4” is set to “Using DHCP.” This will automatically assign IP addresses to each Mac so they can communicate.
- Close the Network settings, and you’re now ready to use Thunderbolt Bridge for file transfer between your Macs.
Using Thunderbolt Bridge To Transfer Files Between Two Macs
Thunderbolt Bridge provides a fast and efficient solution to transfer files between two Macs.
Here’s how you can use Thunderbolt Bridge to make file transfer seamless and hassle-free:
- Connect the Macs: Start by connecting the Thunderbolt ports of both Mac computers using a Thunderbolt cable.
- Enable Thunderbolt Bridge: On each Mac, go to “System Preferences” and click “Network.” Look for the Thunderbolt Bridge option under the list of network connections. If it’s not available, click on the “+” button, choose “Thunderbolt Bridge” from the interface drop-down menu, and click on “Create.”
- Configure Network Settings: Once Thunderbolt Bridge is enabled, select it in the network connections list on both Macs. Ensure that both Macs have different IP addresses within the same subnet range (e.g., 192.168.2.x).
- Transfer Files: With Thunderbolt Bridge active and properly configured, you can transfer files between the two Macs. Open Finder on one Mac, locate the file(s) you want to transfer, right-click on them, and select “Share.” Choose “AirDrop,” and you should see the other Mac listed as an available destination for file transfer.
- Accept File Transfer: On the receiving Mac, a notification will appear asking whether you want to accept the incoming file(s). Click “Accept,” and the files will transfer over Thunderbolt Bridge.
- Monitor File Transfer Progress: As files are being transferred, you can monitor their progress through a status bar in Finder or via a progress window.
- Complete File Transfer: Once all files are successfully transferred, they will be available on both Macs.
Troubleshooting Thunderbolt Bridge
If you encounter any Thunderbolt Bridge issues, such as not connecting properly, follow these troubleshooting steps to fix the problem.
Fixing Thunderbolt Bridge Not Connected Issues
If you’re encountering issues with Thunderbolt Bridge not connecting on your Mac, don’t worry.
Here are some troubleshooting steps to help you resolve the problem:
- Check Thunderbolt Cable: Ensure the cable is securely connected to both Mac computers. Sometimes, a loose or faulty cable can prevent the connection.
- Update Software: Ensure both Macs have the latest software updates installed. Outdated software can cause compatibility issues with Thunderbolt Bridge.
- Restart Macs: Try restarting both Mac computers. This can often solve temporary connectivity issues.
- Disable Firewall and VPN: Disable any firewall or virtual private network (VPN) settings on both Macs. These security features may sometimes interfere with Thunderbolt Bridge connections.
- Reset Network Settings: If all else fails, you can try resetting the network settings on both Macs. To do this, go to System Preferences > Network > Advanced > Hardware tab, and click “Reset Configuration” for Thunderbolt Bridge.
How to remove Thunderbolt Bridge Network Interface
To remove the
Thunderbolt Bridge Network Interface from your Mac, follow these simple steps:
- Open the System Preferences on your Mac.
- Click on the “Network” icon.
- In the left-hand sidebar, you will see a list of network interfaces. Look for “Thunderbolt Bridge” and select it.
- Click on the minus ( – ) button at the bottom of the sidebar to remove the Thunderbolt Bridge Network Interface.
- A pop-up window will appear asking if you are sure you want to remove it. Click “Remove” to confirm.
- The Thunderbolt Bridge Network Interface will be removed from your Mac.
Conclusion
In conclusion, Thunderbolt Bridge on Mac is a powerful tool for
fast and efficient file transfer between two Mac computers.
With its
high-speed Thunderbolt interface, users can effortlessly
share large amounts of data, making it an
essential feature for Apple MacBook owners.
Activate Thunderbolt Bridge today and experience seamless connectivity like never before.