Are you looking to enhance your audio experience with AirPods using their
noise-canceling feature? Look no further!
This blog post
simplifies how to Turn On Noise Cancelling On AirPods, ensuring an
optimal listening experience free from
distracting background noise.
Not only will we guide you through activating this feature, but we’ll also provide helpful
tips and tricks along the way.
Quick Summary
- AirPods have a feature called noise canceling, which uses built-in microphones to detect external noise and create opposite sound waves to cancel it out.
- There are several benefits to using noise canceling on AirPods, including reducing background noise and improving audio quality.
- You can turn on the noise cancelling with Siri, the Control Center on your device, or by using the earbuds’ button for AirPods Pro.
- To optimize your experience, adjust settings based on different environments where you’re using them, and preserve battery life while still having access to active noise control features like transparency mode when necessary.
Understanding Noise Cancelling On Airpods
Noise cancelling on AirPods is a technology that uses microphones to detect and cancel external noise by creating an opposite sound wave.
What Is Noise Cancelling, And How Does It Work On Airpods?
Noise cancelling is a
cutting-edge technology designed to minimize external noise, providing you with an immersive audio experience.
In the case of AirPods, particularly with the
AirPods Pro and AirPods Max, this feature is known as Active Noise Cancellation (ANC).
The magic behind Apple’s ANC lies in its integrated system consisting of two microphones—one facing outward to detect environmental noises and another inward-facing microphone for detecting any sound still making its way through.
Using
advanced algorithms, your AirPods create anti-noise signals to neutralize constant sounds like airplane engines or traffic and unexpected interruptions such as loud conversations nearby.
Interestingly, as I was strolling through a bustling city street one day, trying out my new AirPods Pro for the first time—I couldn’t help but be amazed at how well they filtered out all the commotion around me.
Even amidst honking cars and chattering passersby—once I switched on Active Noise Cancellation—it felt like I had stepped into my own serene listening booth.
Benefits Of Using Noise Cancelling On Airpods
Using noise cancelling on AirPods can offer many benefits, including:
- Reducing background noise: Noise cancelling can help block out distracting sounds around you, allowing you to focus on your audio content.
- Improving audio quality: By reducing ambient noise, noise cancelling can enhance the clarity and detail of your audio playback.
- Enhancing comfort: Shutting out external distractions can make it easier and more comfortable to enjoy your music or podcasts for longer periods.
- Protecting hearing: With reduced background noise, you may be able to listen at lower volumes, which can help prevent damage to your ears over time.
- Better phone calls: Noise cancelling on AirPods Pro can help reduce external noise during phone calls, leading to clearer conversations on both ends.
- Increased privacy: By blocking out external sound, noise cancelling can also help keep your private conversations or audio content confidential.
- Spatial Audio with immersive sound: The AirPods Pro’s active noise cancellation feature allows for an immersive listening experience that brings music and movies to life in 3D audio space.
Overall, the benefits of using noise cancelling on AirPods are numerous and worthwhile for anyone who wants a more enjoyable and focused listening experience.
How To Turn On Noise Cancelling On AirPods
You can turn on the noise cancelling on your AirPods Pro using Siri, Control Center, or the earbuds’ button.
Use Siri To Turn On Noise Cancelling
To turn on noise cancellation with Siri, activate Siri and say, “Turn on noise cancelling.”

Here are the steps:
- Activate Siri by saying “Hey Siri” or by holding down the side button on your iPhone or iPad.
- Say, “Turn on noise cancelling.”
- Siri will then confirm that noise cancelling has been turned on for your AirPods.
It’s as simple as that! Using Siri to turn on noise cancellation can be a
quick and convenient way to enjoy a more immersive listening experience with your AirPods Pro.
Remember, you can also use Control Center or the AirPods Pro button to turn on the noise cancelling.
Use Control Center On iPhone Or iPad To Turn On Noise Cancelling
Controlling noise cancellation on AirPods through your iPhone or iPad is as easy as using Siri.
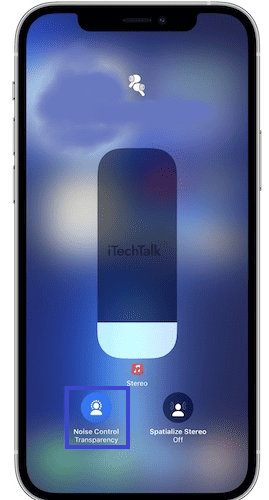
Here’s how:
- First, connect your AirPods to your iPhone or iPad via Bluetooth.
- Next, bring up Control Center by swiping down from the top right corner of the screen (for iPhones with Face ID) or swiping up from the bottom (for iPhones with a Home button).
- Look for the volume slider and press and hold it until you see additional audio controls appear.
- Tap on the info icon next to your AirPods in the audio controls.
- You can toggle on noise cancellation by tapping “Noise Cancellation” or switch to Transparency mode by tapping “Transparency.”
- You can also adjust the noise cancellation or transparency mode volume using the provided sliders.
- When you’re done adjusting, close Control Center and enjoy your noise-canceled listening experience!
Using Control Center offers a more direct way to control noise-cancellation on AirPods without interacting with Siri or pressing and holding your earbuds themselves. So give it a try!
Use The Airpods Pro Button To Turn On Noise Cancelling
If you own AirPods Pro, you can also
activate noise cancelling by using a dedicated button on the earbuds.
Here are the steps to follow:
- Put both AirPods Pro in your ears.
- Locate the small, oval-shaped button on the stem of one of the earbuds.
- Press and hold the button until you hear a chime indicating that noise cancellation has been activated.
- Repeat on the other earbud if you want to use noise cancelling on both AirPods Pro.
Remember that when noise cancelling is enabled, you may experience some pressure or discomfort in your ears due to the seal created for noise reduction.
If this occurs, try adjusting the fit or taking breaks from wearing your AirPods Pro for extended periods.
Additionally, using noise cancelling on
AirPods Pro can affect battery
life depending on usage and settings.
Adjust settings such as Auto-Off Timer and Noise Control to preserve battery life while enjoying high-quality audio with active noise cancellation.
Tips For Using Noise Cancelling On Airpods
Adjusting settings for different environments, preserving battery life while using noise cancelling, and finding the right fit with ear tips are just a few of the helpful tips for using noise cancelling on your AirPods.
Adjusting Settings For Different Environments
I always adjust my AirPods Pro settings to match my surroundings.
Here are some tips for adjusting your settings for different environments:
- In a noisy environment, turn on Noise Cancelling to block out external sounds.
- If you need to be aware of your surroundings, turn on Transparency Mode.
- Use the Settings app on your iPhone or iPad to customize the amount of noise reduction or transparency you want.
- Adjust the volume slider to find the right balance between audio quality and ambient noise.
- If you’re using Siri, ask her to adjust the settings based on where you are.
- Try out different-sized ear tips to ensure a comfortable and secure fit.
By adjusting your AirPods Pro settings, you can enjoy optimal audio quality while being aware of your surroundings.
Preserving Battery Life While Using Noise Cancelling
As an AirPods Pro user,
preserving battery life while noise cancelling is essential for a seamless listening experience.
One way to do this is by adjusting the noise control settings based on your environment.
Another option is to use
Transparency mode when appropriate. This feature allows external sounds to be heard while still wearing the earbuds, reducing the need for noise cancellation and conserving battery power.
Several ways exist to preserve battery life while using active noise control on AirPods Pro.
Using Transparency Mode To Hear Your Surroundings
One of the most impressive features of AirPods Pro is the Transparency mode.
This feature lets you hear your surroundings while still wearing your earbuds, making them perfect for situations where you need to stay alert or be aware of your environment.
Whether you’re running outside and need to listen for traffic or conversing with someone in person, Transparency mode makes it easy without removing your earbuds.
To enable Transparency mode, press and hold the Force Sensor on the stem of one of your AirPods Pro until you hear a chime.
Another great thing about Transparency mode is that it works seamlessly alongside Noise Cancellation mode.
With both features enabled, you can experience immersive audio quality while also being able to quickly tune into what’s happening around you as needed.
Finding The Right Fit With Ear Tips
Finding the right fit with your AirPods Pro ear tips is important to ensure
maximum comfort and noise cancellation.
The
ear tips come in three sizes, small, medium, and large, so it’s worth trying each size to see which fits best.
To switch the ear tips on your AirPods Pro, gently pull them off and push on a new pair until they click into place.
Having the correct ear tip size also helps create an
effective seal that further reduces external noise.
Make sure you choose the right size for both ears, as sometimes people require different-sized ones due to differences in anatomy, previous injury, or surgery.
Troubleshooting Tips For AirPods Noise Cancelling
I’ve experienced a few issues with noise cancelling on my AirPods and have found some simple troubleshooting tips to help fix them.
Here are some things to try if you’re having similar problems:
- Make sure your AirPods are clean and free of debris. Earwax or other gunk can block the microphones that detect external noise, causing noise cancelling to work poorly.
- Adjust the fit of your AirPods in your ears. If they aren’t seated properly, they may be unable to create a good seal for noise cancellation.
- Restart your AirPods by placing them back in their case and leaving the lid open for 15 seconds, then closing the lid and waiting another 15 seconds before trying again.
- Check that you’re using the latest version of iOS on your iPhone or iPad, as updates can sometimes fix bugs related to noise cancelling.
- Try resetting your AirPods by holding the setup button on the back of the charging case until the status light starts flashing amber, then letting go and reconnecting them to your device.
- Turn off Bluetooth on nearby devices that could interfere with your AirPods’ connection or cause audio dropouts.
By following these troubleshooting tips, you should be able to get your AirPods’ noise cancelling working properly again in no time!
Conclusion
In conclusion, turning on noise cancelling on your AirPods can enhance your listening experience by
reducing outside distractions.
You can activate this feature using Siri or the Control Center on your Apple device with a few easy steps.
Don’t forget to adjust the settings for different environments and
preserve battery life with transparency mode when necessary.
With the
right fit and troubleshooting tips, you’ll enjoy immersive audio in no time.