Keeping your AirPods up-to-date ensures you get the
best audio experience, connectivity, and battery life from your wireless earbuds.
However, navigating through updates can be a confusing process for some users. In this blog post, we’ll walk you through everything you need to know about Update Airpods firmware – from checking for new iOS or Mac/PC versions to
troubleshooting common problems that may arise during the update process.
Quick Summary
- Regularly updating your AirPods firmware is crucial for optimal performance and seamless integration with other Apple devices.
- To update your AirPods via an iPhone or iPad, go to Bluetooth settings, tap the “i” icon next to the AirPods name, check for updates and install if any are available.
- Updating through a Mac or PC involves connecting the device to iTunes, putting your AirPods in their case, checking for updates and installing if any are available.
- Troubleshoot common issues, such as connectivity problems, by resetting your AirPods or contacting Apple Support for further assistance.
The Importance to Update Airpods
Updating your AirPods is crucial to ensure they continue working seamlessly with your other Apple devices, improve their battery life and performance, and receive the latest bug fixes and features.
Understanding Firmware Updates
Firmware updates are crucial to your AirPods’ performance and overall functionality. These updates contain essential improvements for various aspects, such as connectivity, battery life, and sound quality.
To give an example of how firmware updates can make a difference: one recent update significantly fixed bugs and enhanced
Bluetooth connectivity speed between AirPods Pro and iOS devices.
Without this update installed, users were facing frequent connection drops or sluggish pairing with their devices – not ideal when you’re on the go with your favourite tunes!
Regularly updating your AirPods’ firmware allows you to integrate these audio accessories and all compatible Apple devices seamlessly.
Benefits Of Updating AirPods
As an avid AirPods user, I cannot stress enough the importance of regularly updating your wireless earbuds.
Here are some of the benefits you can enjoy:
- Improved Connectivity: Updating your AirPods firmware can enhance Bluetooth connectivity with your Apple devices, ensuring a smoother audio experience.
- Longer Battery Life: Firmware updates can also optimize power usage, giving you longer listening time on a single charge.
- New Features: The latest firmware versions often come with new features and bug fixes that improve the overall performance of your AirPods.
- Better Audio Quality: Updating your AirPods firmware can improve sound quality, making your favourite tunes even better.
- Enhanced User Experience: Keeping your devices up to date allows you to enjoy the latest improvements and fixes for common issues easily.
So, why not take advantage of these benefits? Make it a habit to check for updates regularly by following the simple steps outlined above. Stay updated and enjoy a seamless wireless audio experience!
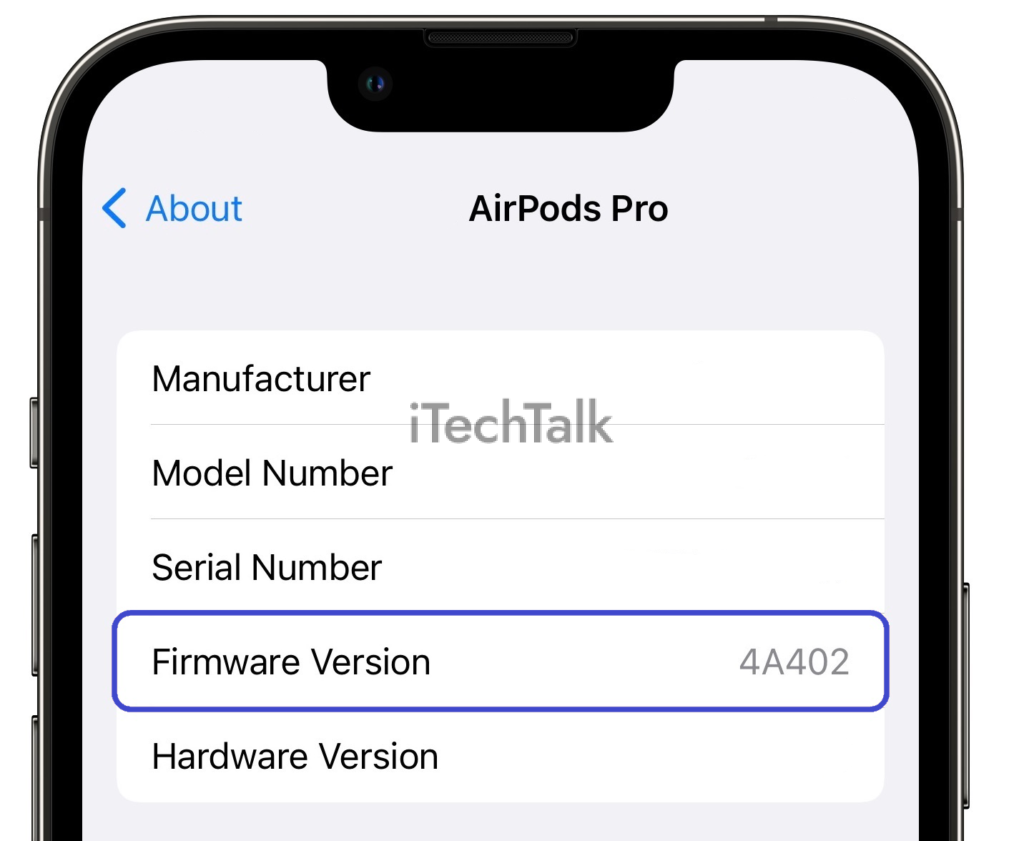
How To Check For AirPods Updates
To
check for AirPods updates, go to the Bluetooth settings on your iOS device, tap the “i” button next to your AirPods name, and scroll down to view the firmware version; continue reading to learn how easy it is to install updates quickly and troubleshoot common issues.
Using An iPhone Or iPad
Updating your AirPods using an iPhone or iPad is a straightforward process.
Here’s how to do it:
- Ensure your iOS device is connected to the internet and has Bluetooth turned on.
- Place both of your AirPods in their charging case and ensure it has power.
- Open the Settings app on your iPhone or iPad and select “Bluetooth”.
- Find your AirPods in the list of available devices and tap the “i” icon next to them.
- Scroll down to find information about their current firmware version.
- If an update is available, you will see a ” Install ” button. Tap this button to start the update process.
- Keep your AirPods close to your iOS device and wait for the update to complete.
Remember that updating your AirPods can improve their performance, so checking for updates regularly is a good idea.
You can also turn on automatic updates by going to the Bluetooth settings page and toggling the “Automatic Updates” option under your AirPods listing.
Updating Through A Mac Or PC

To update your AirPods through a Mac or PC, follow these steps:
- Ensure your AirPods are connected to your iOS device and their firmware is current.
- Connect your Mac or PC to the internet.
- Open iTunes on your computer.
- Put your AirPods in their case and close the lid.
- Connect your AirPods case to your Mac or PC using a Lightning cable.
- If prompted, enter the passcode for your AirPods case.
- Select your AirPods from the list of devices in iTunes.
- Click “Check for Update” and wait for iTunes to search for the latest firmware version available for your AirPods.
- If an update is available, click on “Download and Install”.
- Keep your AirPods close to your computer with their case closed during the update process.
- Wait for the update to finish installing on your AirPods.
How To Install AirPods Firmware Updates
To install
AirPods firmware updates, place them in their case, connect to a device with internet access, and follow the on-screen instructions.
Putting AirPods In Their Case
To install AirPods firmware updates, users need to put their AirPods in their case. During the update process, the case provides a stable and secure connection between the device and the AirPods.
For best results, it’s recommended that users keep their iOS device (iPhone or iPad) close to their AirPods while updating.
This ensures a
strong Bluetooth connection between devices and reduces any potential interference that could disrupt communications during the firmware update process.
Connecting To A Device With Internet Access
To install the latest AirPods firmware updates, users must connect their devices to the internet. This can be done by ensuring their iOS device, Mac or PC is connected to a Wi-Fi network or has cellular data enabled.
Once connected, users can put their AirPods in their case and keep them close to the device with internet access.
It’s important to note that some users may experience issues during the update process if they have poor connectivity or are in areas with weak signals.
Following On-screen Instructions
As mentioned earlier, updating your AirPods firmware is a straightforward process that can be done without much technical knowledge.
Here’s what you need to do to complete the update process.
- Put your AirPods in their case and ensure they are connected to a power source.
- Ensure your iOS device is connected to the internet and has sufficient battery life.
- Open the Settings app on your iOS device and go to Bluetooth settings.
- Tap the “i” button next to the name of your AirPods device to access its settings.
- Scroll down and tap “Software Version” to see if an update is available.
- If an update is available, follow the on-screen instructions by tapping “Download and Install.”
- Keep your AirPods close to your iOS device until the update process is completed.
- Once the update process is completed, your AirPods will automatically disconnect from your device.
- Return to the Software Version section to verify if the firmware has been updated.
Following these steps will ensure you easily update your AirPods and enjoy their latest features while improving their performance.
Always check for updates regularly, enable automatic updates, and stay aware of new features and bug fixes.
Troubleshooting Common Issues With Updating
If you encounter issues when updating your AirPods, such as the AirPods not connecting, an update not being available, or an incomplete update, try resetting the AirPods and reconnecting them to your device.
AirPods Not Connecting
There may be a few reasons if you’re having trouble connecting your AirPods.
Here are some
troubleshooting tips to help you get them connected:
- Make sure your AirPods are charged and in their case before attempting to connect.
- Check that Bluetooth is turned on for the device you want to connect your AirPods.
- If your AirPods are already paired with another device, disconnect them from that device first.
- Reset your AirPods by holding the button on the back of the case for about 15 seconds or until the LED light starts flashing amber.
- Try forgetting and re-pairing your AirPods with your device. To forget your AirPods, go to Bluetooth settings and tap the “i” next to their name, then select “Forget This Device.”
- If none of these steps works, contact Apple Support for further assistance.
Update Not Available
Sometimes, you may experience some issues when trying to update your AirPods. One is the error message that says “No Update Available”.
Here are some possible reasons why it might happen:
- Your AirPods are already running the latest firmware version
- The new firmware update is not yet available for your specific model or region
- Your iOS device is not compatible with the latest firmware version
If you encounter this issue, there are a few things you can do to troubleshoot:
- Check the firmware version of your AirPods in the Bluetooth settings of your iOS device to confirm if you indeed have the latest version installed.
- If there’s an ongoing issue with the AirPods firmware update, Apple usually releases an official statement or fix on their support page. You can check it to see if there’s any information about a known problem.
- Resetting your AirPods to factory settings might help fix any connectivity issues preventing you from updating them.
If none of these solutions works, it’s best to contact Apple Support for further assistance.
Incomplete Update
If an
incomplete AirPods firmware update occurs, it is important to
troubleshoot the issue by following these steps:
- Try resetting the AirPods and attempting the update again.
- Check for any error messages during the update process and search for solutions online or contact Apple support for assistance.
- Ensure that both AirPods are properly seated in their case, and that there is a stable internet connection throughout the process.
- Ensure that the iOS device being used to update the AirPods has enough battery life remaining and is up to date with the latest software.
- Try updating through a different iOS device or computer if all else fails.
Remember that incomplete updates can lead to
issues with connectivity and performance, so it’s crucial to address them as soon as possible.
Tips For Keeping Your AirPods Up To Date
– To ensure your AirPods are always up to date, turn on automatic updates in the Settings app.
– Check for updates regularly by going to the About section in the General settings of your iOS device.
– Stay aware of new features and bug fixes that come with each firmware update by reading product notifications from Apple.
– If you encounter any issues while updating, refer to the user manual or contact tech support for assistance.
– Keep your AirPods within Bluetooth range of an internet-connected device during installation.
– Keep your mobile and other devices compatible with AirPods’ wireless technology to maintain connectivity.
Turning On Automatic Updates
I highly recommend turning on
automatic updates for your AirPods to ensure you always have the
latest firmware version.
To turn on this feature, go to the Bluetooth settings on your iOS device and tap the “i” button next to your AirPods’ name.
By turning on automatic updates, you can keep up with
bug fixes and performance improvements without manually checking for updates regularly.
You’ll also enjoy
new features as soon as they become available! For example, a recent firmware update for AirPods Pro added support for
Spatial Audio and Automatic Head Detection.
Checking For Updates Regularly
I make it a habit to check for AirPods updates regularly, as it ensures that my wireless earbuds are running on the
latest firmware version with all the newest features.
Checking for updates is easy and can be done through your iOS device or Mac/PC. By going to the Bluetooth settings in your iOS device’s Settings app, you can see if there are any available updates for your AirPods under the “i” button next to their name.
Regularly checking for updates also means that any issues or bugs with previous firmware versions are fixed promptly with the latest update.
Apple often releases firmware updates to address connectivity problems and improve battery life.
Staying Aware Of New Features And Bug Fixes
As an avid AirPods user, staying up-to-date on the latest
firmware updates is crucial to accessing new features and bug fixes.
Apple regularly releases firmware updates that can
improve your AirPods’ connectivity, battery life, and overall performance.
For example, a recent firmware update for AirPods Pro added
support for spatial audio, allowing users to enjoy immersive surround sound experiences when watching movies or listening to music.
Additionally, software upgrades can
fix common issues like connection problems or short battery life.
Conclusion
Updating your AirPods is essential for ensuring the best possible performance and experience with your wireless earbuds. By
understanding firmware updates,
checking for updates regularly, and
troubleshooting common issues, you can keep your AirPods up to date effortlessly.
With simple steps such as putting your AirPods in their case and connecting them to a device with internet access, anyone can install firmware upgrades without technical expertise.
Remember to
turn on automatic updates and stay aware of new features or bug fixes to make the most out of Apple’s ecosystem of products. For any assistance or support needs, reach out to Apple Support or refer to user manuals and online resources available.