To Uninstall MacOS Ventura Beta uninstall the MacOS Ventura beta profile, back up your Mac data, wipe your hard drive, and reinstall macOS Monterey.
Are you tired of the
macOS Ventura Beta version and want to
revert to the stable
MacOS Monterey? You’re not alone – many Mac users like yourself are finding difficulties with this new
beta software.
This comprehensive guide will walk you through every step to uninstall
MacOS Ventura Beta safely
without losing precious data. Let’s get your Mac back on track in no time!
Quick Summary
- To uninstall MacOS Ventura Beta and downgrade to MacOS Monterey, delete the beta profile, back up your data, erase your Mac hard drive, and reinstall Monterey or the original MacOS.
- Creating a bootable installer is recommended for a smooth reinstallation process.
- Restoring from a Time Machine backup can also be done if you have one available before installing Ventura Beta.
Steps to Uninstall MacOS Ventura Beta and Downgrade to MacOS Monterey
To uninstall MacOS Ventura Beta and downgrade to MacOS Monterey, follow these steps: delete the MacOS Ventura beta profile, back up your data on your Mac, restore from a
Time Machine backup (optional), erase your Mac hard drive and reinstall macOS Monterey or the original MacOS, and create a macOS bootable installer.
Delete the MacOS Ventura Beta Profile
Diving into the first step of uninstalling MacOS Ventura Beta requires you to
delete the beta profile from your device.
Here’s a simple guide on how to get it done:
- Click on the Apple Icon at your screen’s top left corner.
- Scroll down and tap on “System Preferences.”
- Look for and click on “Software Update.”
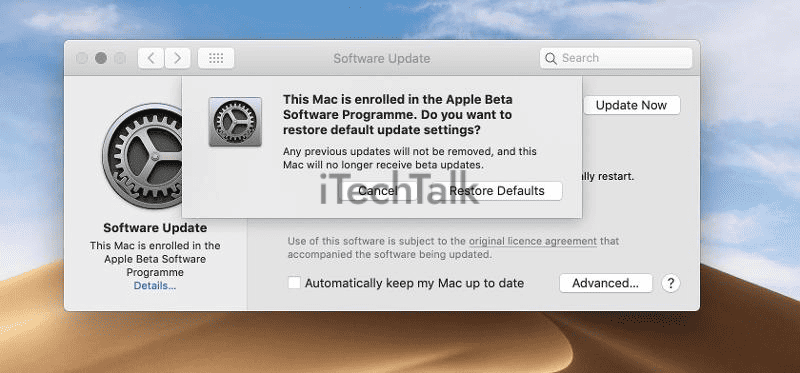
- If you’re part of the Beta Software Program, you’ll see “[beta] – This Mac is enrolled in the Apple Developer Seed Program or Apple Beta Software Program.”
- Underneath this statement will be a blue link saying “Details.” Click on it.
- A pop-up window will appear with information about your enrollment in the beta program.
- ‘ Restore Defaults’ is in this window’s bottom right corner. Click on it.
Back-Up Data On Your Mac
Before uninstalling MacOS Ventura Beta and downgrading to MacOS Monterey, it is crucial to
back up your data on your Mac. This ensures you don’t lose any important files or information during the process.
Here’s how you can do it:
- Connect an external storage device to your Mac, such as an external hard drive or USB flash drive.
- Open the Finder app by clicking on the Finder icon in the Dock.
- Locate the files and folders that you want to back up. You can select multiple items by holding down the Command key and clicking on each item.
- Once you have selected all the files and folders you want to back up, right-click (or Control-click) on one.
- Choose “Copy [number of items] from the contextual menu that appears.”
- Now, navigate to your external storage device in the Finder app.
- Right-click (or Control-click) on a space within the external storage device’s window.
- Choose “Paste [number of items] from the contextual menu that appears.”
- Wait for the files and folders to be copied to your external storage device. The time it takes will depend on the size of your data.
- Once the copy process is complete, safely eject your external storage device by dragging its icon from the desktop or sidebar into the Trash bin in the Dock.
- Finally, click on “Empty Trash” from within the Trash bin to completely remove any copies of your files from your Mac’s internal storage.
Restore From A Time Machine Backup (optional)
If you have a
Time Machine backup of your Mac, you can restore your system to the previous macOS version.
Here’s how:
- Connect your Time Machine backup drive to your Mac.
- Restart your Mac and hold down the Option key.
- Select the “Restore from Time Machine Backup” option.
- Choose the time and date of the backup you want to restore from.
- Follow the on-screen instructions to complete the restoration process.
Erase Your Mac Hard Drive And Reinstall macOS Monterey or the Original MacOS
To completely uninstall macOS Ventura Beta and revert to either MacOS Monterey or the original MacOS, you must
erase your Mac’s hard drive and perform a
fresh installation.

Follow these steps:
- Make sure you have backed up all your important data. This is crucial as erasing the hard drive will delete all files and applications.
- Shut down your Mac completely.
- Start your Mac by holding down the Command and R keys simultaneously until the Apple logo appears to enter Recovery Mode.
- Select “Disk Utility” from the menu in Recovery Mode and click “Continue.”
- Choose your Mac’s internal hard drive from the list of available drives and click “Erase.”
- Give a new name to your hard drive (e.g., “Macintosh HD”) and select APFS or macOS Extended (Journaled) as the format.
- Click “Erase” to confirm and wait for the process to complete.
- Once the erasure is finished, exit Disk Utility by selecting “Disk Utility” in the top-left corner of the screen and then choosing “Quit Disk Utility.”
- Select “Reinstall macOS” or “Install macOS Monterey from Recovery Mode.” Follow the on-screen instructions to proceed with the installation.
- After the installation, your Mac will restart with either MacOS Monterey or the original MacOS installed.
Create a MacOS Bootable Installer
To successfully uninstall the MacOS Ventura beta and downgrade to MacOS Monterey, you can create a
MacOS bootable installer. This will allow you to reinstall the original MacOS or Monterey on your Mac.
Here’s how:
- Download the macOS Monterey or the original MacOS installer from the App Store.
- Connect a USB flash drive with at least 16GB of storage to your Mac.
- Open Disk Utility from the Applications/Utilities folder.
- Select the USB flash drive in the sidebar and click the “Erase” button.
- Choose a name for the drive and select “Mac OS Extended (Journaled)” as the format.
- Click on “Erase” to format the USB flash drive.
- Once formatting is complete, open Terminal from the Utilities folder.
- In Terminal, type in the following command: sudo /Applications/Install\ macOS\ [Monterey/Original].app/Contents/Resources/create install media –volume /Volumes/[USB Flash Drive Name] –no interaction
- Replace “[Monterey/Original]” with either Monterey or the original MacOS, depending on which one you want to install.
- Replace “[USB Flash Drive Name]” with the name you chose for your USB flash drive in step 5.
- Press Enter and enter your administrator password when prompted.
- The Terminal will display progress information as it creates the bootable installer on your USB flash drive.
Troubleshooting: What to Do If Your Mac Won’t Download MacOS Monterey
If you’re experiencing issues with downloading MacOS Monterey on your Mac, don’t worry. There are a few troubleshooting steps you can take to resolve the problem.
First, make sure that your
internet connection is stable and strong.
A weak or unstable connection can cause download failures or interruptions.
Next, check if your
Mac meets the system requirements for MacOS Monterey. Ensure your device has
enough storage space and satisfies the minimum hardware specifications.
If you’re still having trouble, try restarting your Mac and attempting the download again. Sometimes a simple reboot can fix minor software glitches.
Another option is to
reset the NVRAM (nonvolatile random-access memory) on your Mac. This can help resolve issues related to settings and preferences that may interfere with the download process.
Lastly, if none of these solutions work, it’s recommended to contact Apple Support for further assistance. They have trained professionals who can provide personalized guidance based on your specific issue.
Remember to always back up your important data before attempting any troubleshooting steps in case anything goes wrong.
Alternative Method: Uninstall MacOS Ventura Beta on Apple Silicon Macs
If you own an Apple Silicon Mac and want to uninstall MacOS Ventura Beta, there is an
alternative method you can follow.
Here’s how:
- Go to “System Preferences” on your Mac.
- Click on “Software Update.”
- In the lower-left corner, click on “Details.”
- You will see the installed beta version of MacOS Ventura listed. Click on “Restore Defaults.”
- Confirm the action by clicking “Restore Defaults” once again.
- Your Mac will now download and install the latest stable version of MacOS Monterey.
Conclusion
In conclusion, following the steps outlined in this guide, you can easily
uninstall macOS Ventura beta and
downgrade to macOS Monterey on your Mac. Remember to back up
your data before proceeding, and consider creating a bootable installer for Monterey.
These precautions will ensure a smooth transition back to the stable macOS version without data loss or issues. Start enjoying the stability and features of macOS Monterey today!