Facing trouble Reset MacBook To Factory Settings Without Disc? You’re not alone. It’s entirely possible to achieve this using the built-in Recovery Mode on your Apple device.
This blog post will guide you through the
step-by-step process of
erasing and reinstalling macOS efficiently using
easily accessible tools and methods. Keep reading for illuminating insights that make this daunting task a walk in the park!
Quick Summary
- Resetting a MacBook to factory settings without a disc is possible using the built-in Recovery Mode.
- You can use the Command + R keys to reset a MacBook without a disc to enter Recovery Mode during startup.
- In Recovery Mode, you can use Disk Utility to erase your Mac’s hard drive and restore it to factory settings.
- It is important to note that resetting a MacBook to factory settings will remove all data and settings, so it should be done cautiously.
Steps to Reset MacBook to Factory Settings Without Disc
To
reset your MacBook to factory settings without a disc, follow these steps: backup your data, restart your MacBook into Recovery Mode, use Disk Utility to erase the hard drive, and reinstall macOS.
Backup Before Proceeding
Venturing into a
factory reset means wiping all data from your MacBook, so it’s crucial to
safeguard important files first.
Begin by
backing up documents, photos, and software you can’t live without.
Apple’s Time Machine is an efficient tool that makes this process stress-free; connect an
external storage device, then choose it as your backup disk via the Time Machine preferences menu.
There are also cloud platforms like iCloud, Dropbox or Google Drive capable of perpetually storing large amounts of data.
Ensuring proper backup will allow for easy restoration once your MacBook is reset, ultimately providing you peace of mind.
Restart MacBook into Recovery Mode
To reset your MacBook to factory settings without a disc, you’ll need to restart it in Recovery Mode.
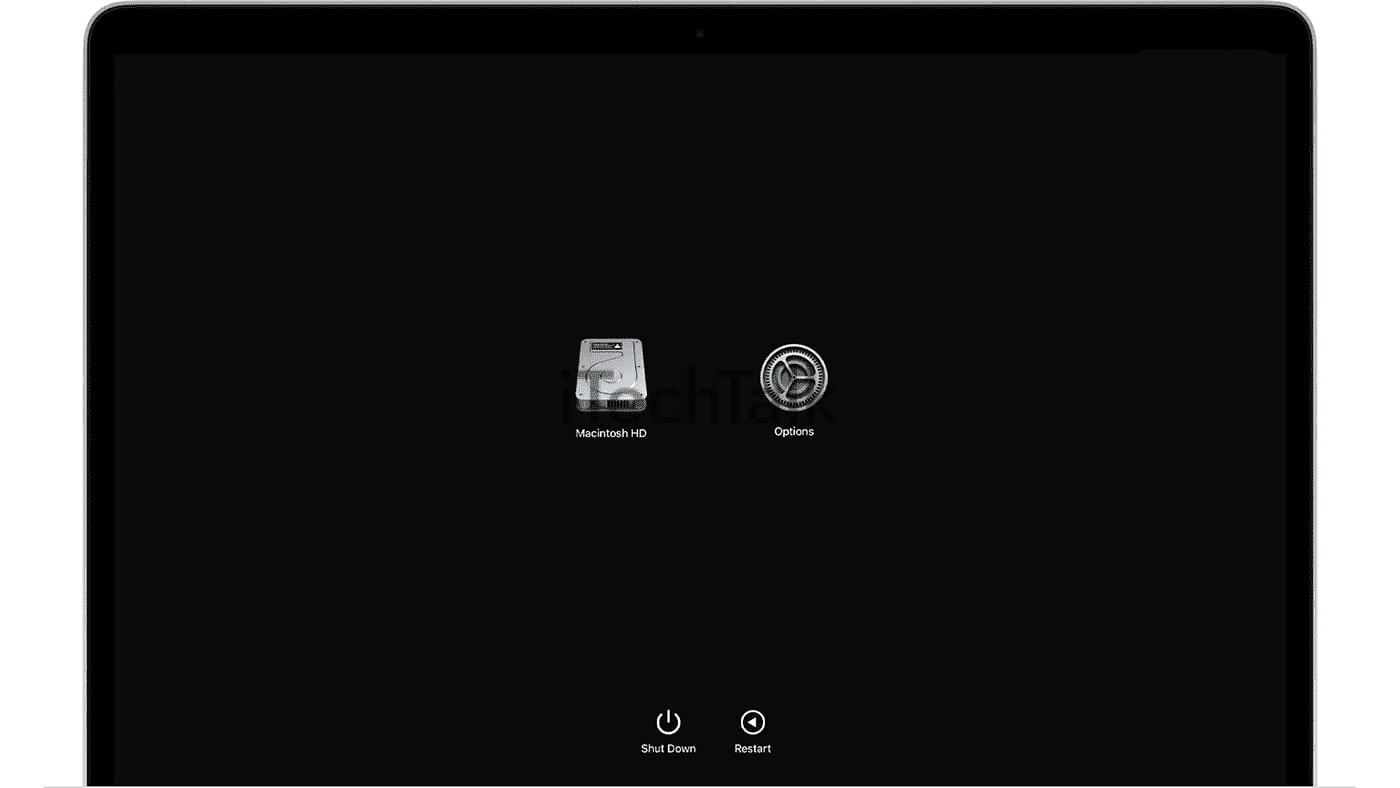
Follow these steps:
- Press and hold the power button on your MacBook until it shuts down completely.
- Once your MacBook is turned off, press the power button again to turn it back on.
- Immediately press and hold the Command + R keys on your keyboard.
- Keep holding the keys until you see the Apple logo or a spinning globe appear on the screen.
- Release the keys when you see either the Apple logo or a loading bar indicating that your Mac is starting up in Recovery Mode.
Use Disk Utility to Erase Mac Hard Drive
To reset your MacBook to factory settings without a disc, you can use the
Disk Utility tool to erase your Mac’s hard drive.
Here’s how:
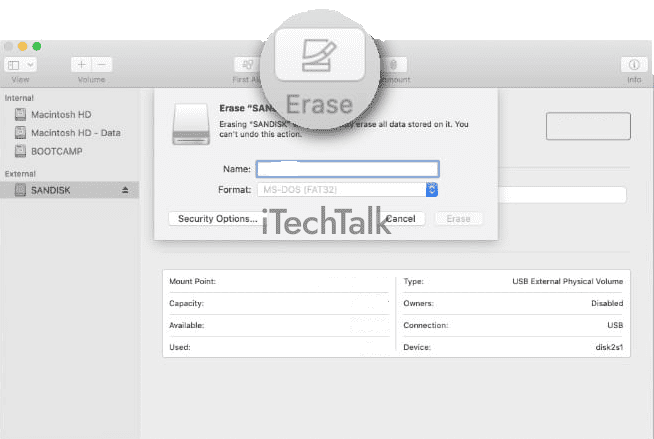
- Open Disk Utility: Once you’ve entered Recovery Mode (as mentioned in Step 2), click “Disk Utility” in the macOS Utilities window.
- Select your Mac’s hard drive: In Disk Utility, you’ll see a list of available drives and volumes. Choose the main Macintosh HD or SSD volume that you want to erase.
- Erase the selected drive: Click the “Erase” button at the top of the Disk Utility window. A dialogue box will appear asking for confirmation.
- Set up erasing options: In the dialogue box, choose the format for erasing your hard drive (usually Mac OS Extended) and enter a name for the new erased volume (e.g., “Macintosh HD”).
- Begin erasing process: Click on “Erase” to start the process. Disk Utility will overwrite all data on the selected drive, wiping it clean.
- Wait for erasing to complete: The time required to erase your hard drive may vary depending on its size and speed. Be patient and avoid interrupting the process.
- Close Disk Utility: After the erasing process, close Disk Utility by clicking “Disk Utility” in the top menu bar and selecting “Quit Disk Utility.”
Reinstall macOS
To reinstall macOS on your MacBook without a disc, follow these steps:
- Restart your MacBook and hold down the Command + R keys during startup.
- This will boot your MacBook into Recovery Mode, where you can access various utilities.
- In the macOS Utilities window, select “Reinstall macOS” and click “Continue.”
- Follow the on-screen instructions to proceed with the reinstallation.
- You may be prompted to choose a disk on which to install macOS. Select your Mac’s internal hard drive.
- Click “Install” and wait for the reinstallation process to complete.
- Once the installation is finished, your MacBook will restart and present you with the initial setup screen.
Important Precautions Before Resetting MacBook
Before resetting your MacBook, it’s essential to take some precautions to ensure a smooth process. Sign out of all your accounts, unpair Bluetooth devices, and reset the NVRAM. These steps will help avoid any complications and ensure a successful factory reset.
To learn more about these precautions and troubleshoot common issues, continue reading.
Sign out of Accounts
Before resetting your MacBook to factory settings, signing out of all your accounts is essential. This ensures that your personal information is
securely removed from the device and prevents anyone else from accessing your accounts.
To sign out of accounts on your MacBook, go to the Apple menu and select “System Preferences.” From there, choose the relevant account (such as iCloud or iTunes) and click the “Sign Out” button.
Ensure you follow this step for all accounts associated with your MacBook, including email, social media, and messaging apps.
By signing out of accounts before resetting your MacBook, you
safeguard your privacy and prevent any potential issues when setting up the device again. Protecting sensitive data and ensuring a smooth transition during the reset process is crucial.
Remember that resettings will
erase all data from your MacBook, so backing up important files before proceeding is highly recommended. Take these precautions seriously to have a hassle-free experience when resetting your device.
Unpair Bluetooth devices
Before resetting your MacBook to factory settings, it’s important to unpair any Bluetooth
devices that are connected to your computer. This will ensure a
smooth reset process and prevent complications when setting up your device again.
To
unpair Bluetooth devices, go to the “Bluetooth” section in your
System Preferences and
click on the device you want to disconnect.
Then, click the
“X” button next to the device name to
remove it from your Mac’s list of paired devices.
By taking this step, you’ll be ready to reset your MacBook without any unnecessary hurdles.
Reset NVRAM
To ensure a smooth reset process on your MacBook, it is important to
reset the NVRAM (
non-volatile random-access memory). NVRAM stores settings such as audio volume, display resolution, and network preferences.
You can clear any issues or conflicts affecting your device’s performance by resetting the NVRAM.
To reset the NVRAM on your MacBook without using a disc, follow these steps:
- Shut down your MacBook.
- Press the power button to turn it back on.
- Immediately press and hold the Command + Option + P + R keys simultaneously.
- Keep holding these keys until you hear the startup chime sound twice or see the Apple logo appear and disappear for a second time.
- Release the keys and allow your MacBook to continue starting up normally.
Resetting the NVRAM won’t affect your files or data but will
restore various system settings to their default values.
This can help resolve issues like incorrect screen resolution, audio problems, or network connectivity glitches.
Troubleshooting Common Issues
If you encounter the error code -8062 while attempting to transfer files from your MacBook to a USB drive, try restarting your computer and reconnecting the USB drive before attempting the transfer again.
Can’t transfer files from MacBook to USB: error code -8062
If you’re encountering the frustrating
error code -8062 when trying to transfer files from your MacBook to a USB drive, don’t worry, there are steps you can take to resolve this issue.
This error typically occurs when the file or folder you’re trying to copy already exists on the destination device with the same name.
To overcome this problem, try
renaming the file before copying it to your USB drive. Simply right-click on the file, select “Rename,” and give it a different name. Then attempt transferring it again.
If that doesn’t work, try restarting your MacBook and reattempting the transfer.
Another potential solution is to check for any
hidden system files or folders within your source file location that might be causing conflicts.
To do this, navigate to the top-level directory of your source files, click on “View” in Finder’s menu bar, and select “Show Hidden Files.”.
If these steps don’t resolve the issue, there may be an underlying problem with either your USB drive or your MacBook’s storage device. Try using a different USB port or USB drive altogether in such cases.
Additionally, ensure both devices have adequate storage capacity available.
Boot Camp option missing at startup after installing Paragon NTFS for Mac
If you’re experiencing the issue of the
Boot Camp option missing at startup on your MacBook after installing
Paragon NTFS for Mac, don’t worry. This problem can be resolved with a simple solution.
First, it’s important to understand that Paragon NTFS for Mac is
software that allows you to read and write files on NTFS-formatted drives on your macOS system.
To
restore the Boot Camp option, follow these steps.
Open Finder and
navigate to the Applications folder. Locate the ParagonNTFS application and move it to the Trash bin. Next,
restart your MacBook.
Once restarted, go to System Preferences and click on Startup Disk. You should now see the Boot Camp partition as an available startup option again.
MacBook boots to a bricked ( x ) icon
If your MacBook boots up to a bricked ( x ) icon, it usually indicates a
problem with the startup disk. This can happen for various reasons, such as
corrupted system files or
hardware issues.
You can try a few troubleshooting steps to
fix this issue and get your MacBook back up and running.
First, restart your MacBook while holding down the Command + R keys. This will boot your device into
Recovery Mode.
From there, you can use
Disk Utility to repair any disk errors causing the bricked icon to appear.
Simply select Disk Utility from the macOS Utilities menu and choose your Mac’s startup disk. Then click “First Aid” and follow the prompts to run a scan and fix any issues.
If repairing the disk doesn’t solve the problem, you may need to
reinstall macOS from Recovery Mode.
Select “Reinstall macOS” from the utility menu and follow the instructions on-screen to perform a
fresh installation.
Solution for using NTFS drives on MacBook M1
To use NTFS drives on your MacBook M1, you can utilize
third-party software solutions such as
Paragon NTFS for Mac. This software allows seamless read and write access to NTFS-formatted drives on your MacBook.
However, some users have reported encountering issues with the
Boot Camp option missing at startup after installing Paragon NTFS for Mac.
If you’re experiencing this problem, there is a simple solution. You can restart your MacBook M1 and hold down the Command + R keys to enter
Recovery Mode.
Select “Startup Disk” from the Utilities menu and choose your
macOS volume as the startup disk.
Once you’ve done this, restart your MacBook normally, and the Boot Camp option should be available again at startup. This will allow you to switch between macOS and Windows partitions without any complications easily.
MacBook is not turning on
If your MacBook is not turning on, it can be a frustrating experience. There are several reasons why this might happen, including a
drained battery or a
software issue.
To
troubleshoot this problem, connect your MacBook to a
power source and make sure the
charger is working properly.
If the battery is completely drained, it may take time for the MacBook to turn on.
In some cases, holding down the power button for about 10 seconds can help
reset the SMC (System Management Controller) and get your MacBook up and running again.
If these steps don’t work, it’s recommended to seek professional assistance, as there could be a
hardware issue causing the problem.
Alternatively, another reason your MacBook may not turn on could be due to a software issue. In such cases, you can try booting into
Safe Mode by holding down the Shift key while starting your MacBook.
This will disable third-party extensions or processes that may interfere with the startup process. If your MacBook starts up successfully in Safe Mode, you can investigate further by checking for any recently installed apps or system updates that could be causing conflicts.
Ejected drives still running on MacBook
If you’ve ever experienced the
frustration of ejecting a drive from your MacBook only to find that it’s
still running in the background, don’t worry – you’re not alone. This common issue can be easily resolved.
One possible solution is to
open the Activity Monitor app on your MacBook and
force quit any processes or applications associated with the ejected drive. Another option is restarting your MacBook, effectively terminating
any lingering processes.
By taking these simple steps, you can ensure that an ejected drive doesn’t continue to run on your MacBook and
conserve system resources for
other tasks.
Conclusion
In conclusion, resetting your MacBook to factory settings
without a disc is a simple and effective way to start fresh or prepare your device for sale. Following the steps outlined in this guide, you can
erase all data and settings on your Mac and
restore it to its original state.
Remember to
back up important files before proceeding, and be cautious as resetting will remove everything from your Mac. With these instructions at hand, you can confidently reset your MacBook without the need for a disc.
FAQs
1. Can I reset my MacBook to factory settings without a disc?
You can reset your MacBook to factory settings without a disc by using the built-in macOS Recovery feature. This allows you to reinstall the operating system and erase all personal data on your device.
2. How do I access the macOS Recovery feature?
To access macOS Recovery, restart your MacBook and hold down the Command (⌘) and R keys simultaneously until the Apple logo or a spinning globe appears. This will boot your MacBook into recovery mode.
3. What precautions should I take before resetting my MacBook?
Before resetting your MacBook, it is important to back up any important files or documents as they will be permanently erased. You can use
Time Machine or manually transfer files to an external storage device.
4. Will resetting my MacBook remove all installed applications?
Resetting your MacBook to factory settings will remove all installed applications, personal data, and settings. However, you can download and reinstall any previously purchased apps from the App Store using your Apple ID.