Nothing is more frustrating than connecting on Zoom for a crucial meeting only to have
technical issues. This
common challenge affects many
MacBook users like you.
Our comprehensive guide dives into the depths of troubleshooting the most frequent hitches, such as
Zoom freezing or
connection problems on your MacBook.
Ready for
seamless virtual meetings? Let’s dive into Troubleshooting Zoom On MacBook!
Quick Summary
- Check your internet connection and ensure it is strong and stable
- Close other apps that could be using the camera or microphone to prevent conflicts with Zoom
- Restart your Mac as a simple solution to resolve temporary glitches or conflicts
- Consider disabling firewall security temporarily if it is causing issues with Zoom’s functionality
- Temporarily disable antivirus software to check if it is interfering with Zoom’s access to necessary resources
- Set permissions for Zoom in “System Preferences” to ensure proper access to the camera and microphone
- If experiencing Wi-Fi issues, troubleshoot by checking signal strength, restarting Wi-Fi, resetting network settings, updating macOS, and minimizing interference from other devices.
- Close other programs on your Mac that use a lot of CPU power to free up resources for smooth Zoom performance.
Basic Steps to Troubleshooting Zoom On MacBook
To troubleshoot Zoom connection problems on your Mac, check your internet connection, close other apps that might be using the camera or microphone, and restart your Mac.
Check your internet connection
Ensuring a
strong and stable internet connection is the first step in troubleshooting Zoom issues on your MacBook. After all, video conferencing services like Zoom heavily rely on internet speed for efficient functioning.
Follow this simple check –
navigate to an online speed test site or use the Network Utility tool pre-installed with MacOS. It could be behind your recent Zoom troubles if you notice slow speeds or dropped connectivity.
Consider moving closer to your Wi-Fi router, temporarily disconnecting other devices from your network, or contacting your service provider for a boost if needed.
This basic yet crucial step has resolved countless Mac users’ concerns about Zoom’s performance on their laptops.
Close other apps that could be using the camera or microphone
To
troubleshoot Zoom connection problems on your Mac, one of the basic steps you can take is to close any other apps that may be
using the camera or microphone.
This is because having multiple apps accessing these functionalities simultaneously can create
conflicts and prevent Zoom from working properly.
Closing unnecessary apps running in the background gives Zoom exclusive access to your camera and microphone, ensuring a smoother experience.
It’s important to note that some apps might continue running even when not actively used. So, it’s worth checking your taskbar and force-quitting applications while still utilizing your camera or microphone.
Doing so eliminates potential conflicts and improves Zoom’s performance on your Macbook.
Restart your Mac
To fix
Zoom connection problems on your Mac, one of the
basic troubleshooting steps you can try is simply
restarting your Mac.
This might seem simple, but it can often resolve
temporary glitches or conflicts affecting
Zoom’s performance.
By restarting your Mac, you give it a fresh start and clear out any background processes or software issues that could be causing trouble with Zoom.
So if you’re experiencing
connectivity issues or
encountering error messages while using Zoom on your MacBook, give it a quick restart and see if that solves the problem.
It’s a simple step that can go a long way in resolving common Zoom issues on your Mac.
Disable firewall security on your Mac
To
troubleshoot Zoom connection problems on your Mac, one of the steps you can take is to
disable firewall security.
This is because sometimes the
firewall settings on your Mac may be
blocking certain connections required by Zoom, causing issues with its functionality.
By
temporarily turning off the firewall, you can determine if it’s the cause of the problem and allow Zoom to establish a successful connection.
However, it’s important to remember that disabling your firewall leaves your computer more vulnerable to potential threats, so
re-enable it once you’ve resolved the Zoom issue.
This simple step can help ensure a seamless experience when using Zoom on your Macbook.
Disable your antivirus software
One essential step to troubleshooting Zoom connection problems on your Mac is temporarily disabling your antivirus software.
Although antivirus programs are designed to protect your computer from potential threats, they can sometimes
interfere with certain applications like Zoom.

By disabling your antivirus software temporarily, you can
determine if it’s causing any conflicts or blocking Zoom’s access to necessary resources.
This simple step can help
resolve issues like Zoom not opening or connection problems on your MacBook.
Remember to
re-enable the antivirus software once you’ve identified and resolved the Zoom issue to maintain ongoing protection for your Macbook.
How to Fix Zoom Stuck on Connecting
To fix the Zoom “Connecting..” issue on your Mac, try setting Zoom permissions, closing and reopening the app, troubleshooting any Wi-Fi issues, and closing other programs using a lot of CPU power.
Set Zoom permissions
To ensure that Zoom works seamlessly on your Macbook, it’s important to grant the necessary permissions to the app. This step is crucial, allowing Zoom access to your camera and microphone.
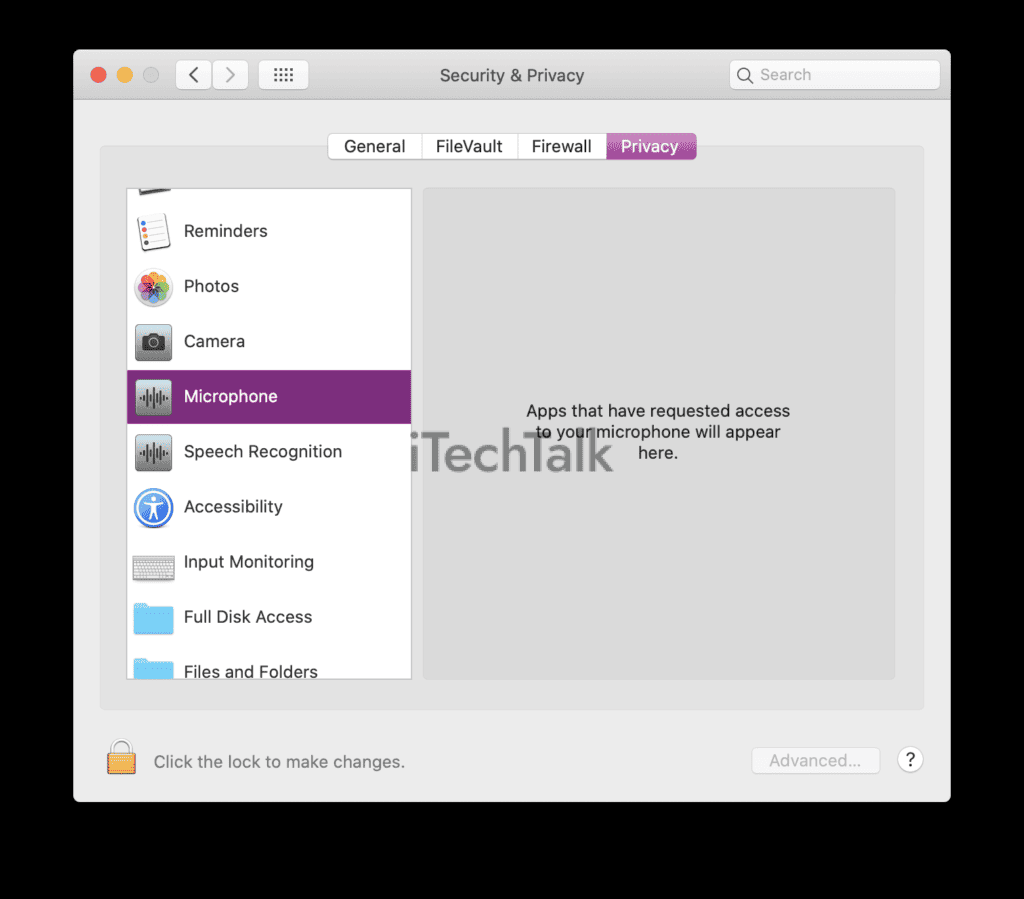
To set Zoom permissions, go to the “
System Preferences” on your Macbook and click “Security & Privacy.”
Here, you’ll find an option for “Camera” and “Microphone.” Ensure that Zoom is checked in both sections, allowing the app to use these essential features.
Doing this will give Zoom the necessary access to function properly on your Macbook without interruptions or issues.
Setting these permissions can greatly improve your Zoom experience for online meetings or video calls.
Close Zoom and try again
If you’re experiencing issues with Zoom on your Macbook, one of the simple
troubleshooting steps you can try is to
close the Zoom app and try again. This can help resolve any
temporary glitches or conflicts causing the problem.
Here’s how to do it:
- Close the Zoom app: Click on the “Zoom” icon in your Mac’s dock, go to the “Applications” folder, and locate the Zoom app. Right-click the Zoom icon and select “Quit” from the drop-down menu. Alternatively, you can press Command + Q to quit Zoom.
- Wait for a few seconds: After closing the Zoom app, wait 10-15 seconds before reopening it. This allows time for Zoom’s background processes or resources to halt fully.
- Reopen Zoom: Once you’ve waited, click the “Zoom” icon in your dock or return to the “Applications” folder and relaunch the Zoom app.
If there’s a Wi-Fi issue on your Mac, troubleshoot it
Is your Zoom connection on your Mac experiencing issues due to a Wi-Fi problem? Don’t worry; we’ve got you covered.
Follow these steps to troubleshoot and resolve any Wi-Fi-related issues:
- Check your Wi-Fi signal: Ensure your Mac is connected to a stable and reliable network. If the signal strength is weak, try moving closer to the router or restarting the router to improve the connection.
- Restart your Wi-Fi: Restarting your Wi-Fi can sometimes fix minor connectivity issues. Turn off the Wi-Fi on your Mac for a few seconds, then turn it back on again.
- Reset network settings: If restarting doesn’t help, you can reset your network settings by going to “System Preferences” > “Network” > “Wi-Fi” > “Advanced” > “TCP/IP.” Click “Renew DHCP Lease” or “Renew DHCP Lease,” then restart your Mac.
- Update macOS: Keeping your operating system up to date is essential for smooth functioning. Check if there are any available updates for macOS by going to “System Preferences” > “Software Update.”
- Disable interfering devices: Make sure there are no other devices near your Mac that could be causing interference with the Wi-Fi signal, such as cordless phones or microwave ovens.
- Temporary Ethernet connection: If all else fails, connect your Mac directly to the router using an Ethernet cable instead of relying on Wi-Fi.
Close other programs on your Mac using a lot of CPU power
If you’re experiencing
Zoom connection issues on your Macbook, one possible solution is to
close other programs using a lot of CPU power.
This can help free up system resources and
improve the overall performance of Zoom.
It’s common for resource-intensive applications to slow down or cause conflicts with other software, leading to connectivity problems.
By closing these programs, you allow Zoom to utilize more of your Mac’s processing power for smooth video calls and uninterrupted connections.
You can easily identify which apps consume a lot of CPU power by opening the Activity Monitor on your Mac.
From there, you can close any unnecessary programs and keep only the essentials running in the background while using Zoom.
This step can resolve lagging video, audio disruptions, or sudden disconnections during online meetings or classes.
By optimizing your computer’s resources and prioritizing Zoom over other demanding applications, you’ll ensure a seamless experience when using the platform on your Macbook.
How to Fix Zoom Not Working on Mac Due to Camera or Microphone In Use
To fix Zoom not working on your Mac because the camera or microphone is in use, try closing the Zoom app and reopening it.
Grant Zoom the necessary permissions and ensure no other apps use your Mac’s camera and microphone.
For detailed step-by-step instructions, read more here. Don’t let technical glitches ruin your video calls – follow these troubleshooting steps to get Zoom running smoothly on your MacBook.
Close the Zoom app and reopen it
If you’re
experiencing issues with Zoom on your Macbook, a simple yet effective troubleshooting step is to
close the Zoom app and reopen it.
Sometimes, the application may encounter
temporary glitches or
conflicts that can be easily resolved by closing and reopening.
This allows the app to
refresh its settings and establish a fresh connection with your Mac’s camera and microphone.
Doing so gives Zoom a chance to start afresh without any lingering issues that may have been causing problems before.
So, if you’re encountering difficulties with Zoom on your Macbook, try closing the app completely and reopening it to see if that resolves the issue.
Grant Zoom the necessary permissions
To fix Zoom not working on your Macbook, one of the important steps is to grant Zoom the necessary permissions. Sometimes, if you haven’t given Zoom
access to your camera or microphone, it can cause
issues with video and audio during meetings.
To grant these permissions, go to your Mac’s System Preferences and select “Security & Privacy.” From there, navigate to the “Privacy” tab and click on “Camera” or “Microphone” in the left sidebar.
Ensure that Zoom is checked in the list of apps allowed to access these devices. Granting these necessary permissions will ensure that Zoom can properly utilize your camera and microphone for seamless video conferencing experiences.
Close other apps that are using Mac’s camera and microphone
If you’re experiencing issues with Zoom on your Macbook, one of the possible reasons could be that
other apps are using your camera and microphone.
To fix this problem, follow these steps:
- Close any other applications utilizing your Mac’s camera and microphone. You can do this by clicking on the app’s name in the top menu bar and selecting “Quit [App Name].”
- Ensure to check for apps that might also be running in the background. To do this, go to the Apple menu, select “Force Quit,” and choose any applications using the camera or microphone.
- If you’re unsure which apps access your camera or microphone, you can open your Mac’s Activity Monitor. To do this, go to the “Utilities” folder within “Applications” and then double-click on “Activity Monitor.” Look for any processes that mention camera or microphone usage and close them.
Conclusion
In conclusion, troubleshooting Zoom on your Macbook doesn’t have to be daunting. By following the basic steps outlined in this guide and utilizing the specific fixes mentioned, you can easily resolve any
connectivity, camera, or microphone issues that may arise.
Remember to update your Zoom app and ensure
proper permissions are granted for a seamless experience. Now you can enjoy
uninterrupted Zoom meetings and connect with others effortlessly on your Macbook.