Are you an
Apple MacBook owner concerned about
potential viruses lurking on your device? You are not alone; many users underestimate that
Macs can fall prey to malware too.
This comprehensive guide will walk you through the Scan Drive For Viruses On Mac process, ensuring
optimal security for your Mac.
Don’t let a
virus turn your Apple into a rotten experience – read on!
Quick Summary
- Mac users should not underestimate the risk of viruses and malware, as Macs can still be vulnerable. Regularly scanning drives for viruses is essential for maintaining optimal security.
- Download a reliable antivirus app for Mac systems to ensure robust protection against potential threats.
- When connecting external drives to your Mac, install an antivirus app beforehand to detect and eradicate any potential threats immediately. Scan the external drive before accessing its contents.
- Consider running multiple scans using different antivirus software for better accuracy in detecting and removing viruses.
How to Scan Drive For Viruses On Mac
Download and install an antivirus app designed for Mac systems to scan a drive for viruses on your Mac.
Download and install an antivirus app for Mac
Before you scan your drive for viruses on Mac, ensure that
reliable antivirus software is at play. Consider
trusted virus protection tools like
Norton, McAfee, or MacKeeper that offer robust security solutions tailored to Mac users’ needs.
The first step in protecting your Apple MacBook involves
downloading and installing an antivirus app from a
credible source–typically the product’s
official website or App Store for maximum authenticity and security.
After acquiring the preferred antivirus program, install it by following the instructions on-screen, which usually entails dragging and dropping it into your Applications folder.
Now you have an essential tool designed to scan and
eliminate potential threats lurking within your Mac system and external drives attached to it.
Plug the external drive into the USB port on Mac
Plug
the external drive into the USB port to scan your drive for viruses on your Mac. This will establish a connection between your Mac and the drive, allowing you to access its contents and
run a thorough scan.
It’s important to note that viruses can easily spread from infected drives to your Mac if not properly addressed, so running
regular scans is crucial in maintaining your computer’s security.
Remember, before connecting any external drives or devices to your Mac, it’s always advisable to have an
antivirus app installed. This ensures that potential threats are immediately detected and eradicated.
This simple step can significantly
reduce the risk of malware or viruses infiltrating your system through external sources.
Additionally, remember that while some antivirus apps offer real-time protection for all
devices connected to your Mac, others may require manual initiation of scans for individual drives.
By plugging in the external drive directly into the USB port on your Mac, you’ll be ready to proceed with a
comprehensive scan using either built-in tools or specialized antivirus software specifically designed for Mac users.
Point the antivirus to the external drive and run a scan
To ensure the safety of your Apple MacBook, it is important to scan your external drives for viruses regularly.
Here’s how you can do it:
- Download and install a reliable antivirus app for your Mac. Look for one that specifically offers protection against malware and viruses.
- Connect the external drive to the USB port on your Mac.
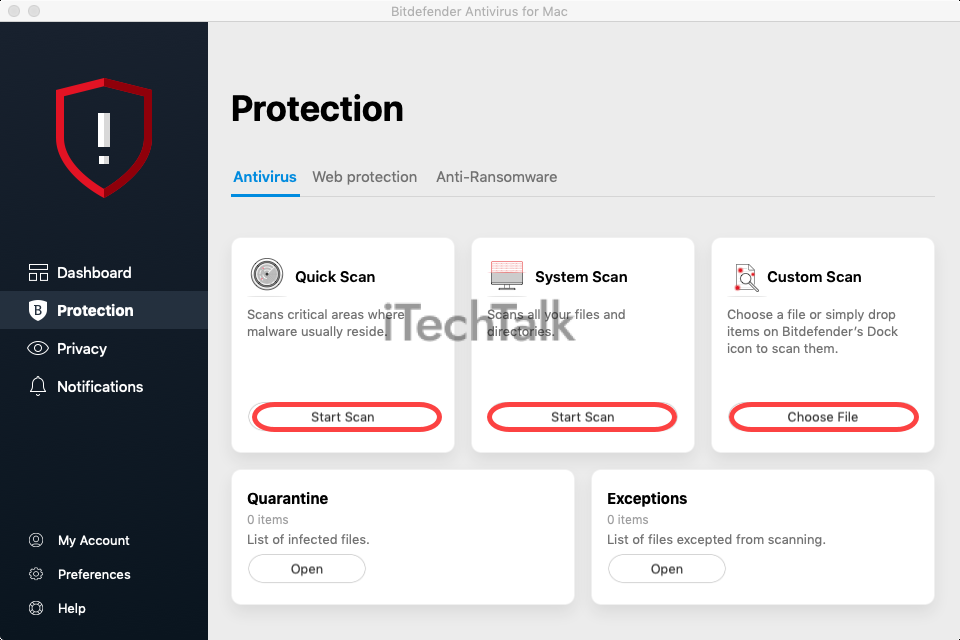
- Open the antivirus software and navigate to the scanning options. Choose to scan external drives or select the drive you want to scan from a drop-down menu.
- Click on the “Start Scan” button to initiate the virus scan on the external drive.
- The antivirus will begin scanning the drive for potential threats or malicious files. This process may take some time, depending on the size of the drive and its contents.
- Once the scan is complete, review the results provided by the antivirus software. It will indicate whether viruses or malware were detected on the external drive.
- If any threats are found, follow the recommended actions provided by your antivirus software to quarantine or remove them from the drive.
Rerun the scan a second time
After performing an
initial scan on your Mac to check for viruses, it’s highly recommended that you
rerun the scan a second time. Why? Well, sometimes
malware or viruses can be
missed during the first run.
By rerunning the scan, you increase your chances of
detecting any lingering threats that may have been overlooked initially.
This extra step adds an
extra layer of security and ensures that your Mac is thoroughly protected against potential threats.
So don’t forget to double-check by rerunning the scan, to be on the safe side. Your peace of mind is worth it!
Consider using a different antivirus for better results
It might be worth considering using different antivirus software to ensure the best possible protection against viruses on your Mac.
While many excellent options are available, each antivirus program has
strengths and weaknesses in detecting and removing viruses.
You can find one that suits your needs and provides better virus detection and removal results by trying out different antivirus programs.
Not all antivirus software is created equal, so taking the time to
research and test different options can significantly enhance your Mac’s security.
Regular
updates are crucial for antivirus software to protect
against emerging threats.
Erase the drive if its contents are not important
If you’ve scanned your external drive and discovered it’s
infected with viruses or malware, taking action is crucial to protect your Mac. One option is to
erase the drive if its contents are not important.
By doing so, you can ensure that any
traces of malicious software are completely removed from your system. This step is especially recommended if the files on the drive are expendable or easily replaceable.
Remember, erasing the drive should only be considered if you’re certain you won’t lose valuable data. It’s important to
back up any important files before proceeding.
Once you’ve ensured nothing essential will be lost,
format the drive using Disk Utility or another tool available on your Mac.
By erasing an infected drive without critical contents, you’ll eliminate potential threats lurking within it and minimize the risk of infecting other devices connected to your Mac.
Built-in Tools for Virus Scanning on Mac
To further enhance your Mac’s virus protection, there are several built-in tools you can utilize, including updating your software regularly, utilizing Mac’s built-in protection features, examining your Disk Utility, cleaning up your drive, checking for compromised email accounts, encrypting your Mac for added security and optimizing it with just one click.
Update your software
To protect your Mac from viruses, one of the most important steps is to update your software regularly. Software updates often include
security patches that can help safeguard your system against new threats.
By keeping your software up to date, including macOS and any other applications installed on your Mac, you can greatly
reduce the risk of malware and other malicious attacks.
Remember that
outdated software can be a vulnerability for cybercriminals to exploit, so check for updates frequently and install them as soon as they become available.
Utilize Mac’s built-in protection
To ensure your Mac stays protected from viruses and malware, use the built-in protection features already available. By regularly updating your software, you can take advantage of the latest security patches and enhancements.
Additionally,
enable Mac’s built-in firewall to add an extra layer of defence against potential threats. Utilize Disk Utility to check for any errors or issues with your drive, as this can help detect and prevent malware from spreading.
Clean up your drive by removing unnecessary files and applications, which can sometimes harbour malicious software.
It’s also important to check if your email has been compromised using Apple’s Mail app, which includes a robust spam filter and phishing detection tools.
Examine your Disk Utility
One of the built-in tools that can help you check for viruses on your Mac is the
Disk Utility. This utility allows you to manage and repair your disks and has a feature that allows you to scan for potential malware or viruses.
By examining your Disk Utility, you can get a better understanding of the health and security of your Mac.
To access the Disk Utility on your Mac, go to “Applications” in your Finder and then navigate to “Utilities.” Once there, open up the Disk Utility application. You can select the drive or partition you want to examine from here.
The Disk Utility will provide various options for managing and troubleshooting your disks. To check for viruses specifically, click on the “First Aid” tab at the top of the window.
This tool will scan your selected drive or partition for errors or issues.
If any problems are found during this process, such as malicious files or directories that may contain viruses, Disk Utility will attempt to repair them automatically.
It’s important to note that this built-in tool may not catch all types of malware or viruses, so it’s always advisable to have additional antivirus software installed.
Clean up your drive
To ensure your Mac is free from viruses and running at optimal speed, it’s important to
clean up your drive regularly. Removing unnecessary
files and organizing your data can improve performance and reduce the risk of malware infection.
Delete any unwanted documents, photos, or videos taking up valuable space on your drive. Use the built-in Disk Utility tool to locate and delete large files or duplicate items no longer needed.
Additionally,
emptying your trash bin will help reclaim storage space. Keeping a clutter-free drive enhances system performance and minimizes the chances of viruses hiding in unused or outdated files.
Check if your email has been compromised
To ensure the security of your Mac, it’s important to check if your
email has been compromised. Cybercriminals often target email accounts to access personal information and
spread malware.
By regularly checking for any signs of compromise, you can take immediate action and protect yourself from potential threats.
Watch for suspicious activities such as unrecognized login attempts or unexpected emails from your account.
Additionally, consider enabling two-factor authentication for an extra layer of security. Keeping a close watch on your email can help you stay one step ahead in the battle against cybercrime.
Encrypt your Mac
To better
protect your Mac against viruses and unauthorized access, it’s crucial to
encrypt your device.
Encryption ensures that all the data on your Mac is
securely encoded, making it nearly impossible for anyone to read or tamper with it without the proper authorization.
Encrypting your Mac adds an
extra layer of security that keeps
would-be hackers and malware at bay. Also, if your Mac gets stolen or lost, encryption
prevents others from accessing your sensitive information.
This step further safeguards your personal and financial data while providing peace of mind that outsiders won’t be able to access its contents even if something happens to your device.
Optimize and protect your Mac in one click
You can use various tools and features built into macOS to optimise and protect your Mac in just one click. Keeping your Mac running smoothly while safeguarding it from viruses and malware is essential for optimal performance.
Regularly optimizing and protecting your Mac can ensure a secure computing experience.
One way to achieve this is by updating your software regularly. This includes macOS and all the applications installed on your Mac.
Updates often include security patches that help protect against new viruses and vulnerabilities.
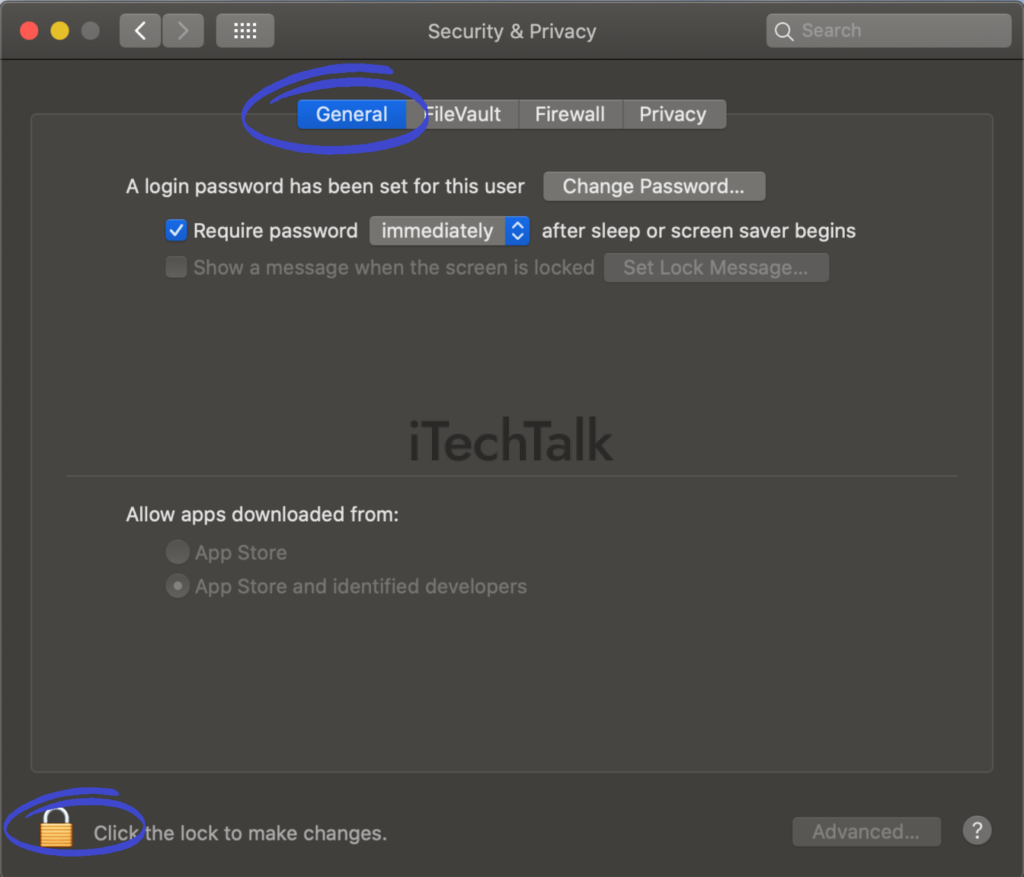
Utilizing the built-in protection provided by macOS is another effective way to optimize and protect your Mac. Features like Gatekeeper help prevent the installation of malicious software by only allowing apps from trusted developers or the
App Store to run on your system.
Taking advantage of Disk Utility allows you to examine and repair any issues with your drive’s file structure, ensuring smooth operation without any corrupted files or errors.
Cleaning up unnecessary files from your drive helps improve performance and reduce the risk of malware hiding in cluttered areas. Removing unused applications, clearing caches, and deleting duplicate files are ways to free up space on your Mac.
Regularly checking if your email has been compromised is crucial for maintaining a secure online presence. Breaches in email security can lead to sensitive information being exposed or used maliciously.
Encrypting data on your Mac protects against unauthorized access, especially if you handle sensitive information or use shared devices frequently.
How to Check for Viruses Using Built-In Tools in macOS
- Keep your software up to date. Regularly updating your macOS is crucial for staying protected against the latest threats.
- Utilize Mac’s built-in protection. macOS has an integrated security feature called Gatekeeper that helps protect your Mac from malicious software.
- Examine your Disk Utility. This tool can help you diagnose and repair disk-related issues and scan for malware on your Mac.
- Clean up your drive. Removing unnecessary files and applications from your Mac can help reduce the risk of malware infection.
- Check if your email has been compromised. The Mail app on macOS includes a built-in tool that scans for known malware in email attachments.
- Encrypt your Mac. Enabling FileVault on your Mac can provide an extra layer of security by encrypting the data on your hard drive.
- Optimize and protect your Mac in one click. Use software like CleanMyMac X to scan viruses, malware, and other threats comprehensively.
Remember that checking for viruses using built-in tools in macOS is essential in keeping your Mac secure.
Regular updates, utilizing Gatekeeper, examining Disk Utility, cleaning up drives, checking emails for compromise, encrypting data, and using optimization software like CleanMyMac X are all effective ways to protect against potential threats without relying solely on external antivirus programs.
Conclusion
In conclusion, Mac users must
regularly scan their drives for viruses to ensure the
security and performance of their devices. By following simple steps such as
downloading antivirus software,
running scans on external drives, and
utilizing built-in tools like XProtect, you can protect your Mac from malware and keep it running smoothly.
Remember to update your software regularly and consider using
reputable antivirus options for Mac users. Safeguarding your Mac against viruses is essential in maintaining its longevity and safeguarding your data.