To delete screenshots on your MacBook, you can drag them to the trash bin or right-click on the screenshot file and select Move to Trash.
Are you perplexed by the
pile of screenshots cluttering your MacBook’s desktop? You’re not alone. This common computer woe can lead to
wasted space and a
messy workspace.
But fear not; our
step-by-step guide offers simple strategies to Delete Screenshots On MacBook, from
manual deletion to
handy keyboard shortcuts.
Let’s dive in and declutter your Mac together!
Quick Summary
- Keyboard shortcuts like Command + Delete and Option + Command + Delete can quickly delete screenshots on a MacBook.
- Screenshots taken on a MacBook are typically stored on the desktop, making it easy to access and manage.
- Deleting unnecessary screenshots helps declutter your workspace and free up storage space for other files and applications.
- It’s important to regularly empty the Trash folder to delete screenshots from your MacBook permanently.
How to Delete Screenshots On MacBook
To delete screenshots on your MacBook, you can drag and drop them into the Trash or use keyboard shortcuts for quick deletion. Find out more about managing and deleting screenshots on your Macbook in this helpful guide.
Manual deletion from the desktop
To manually delete screenshots from your MacBook, follow these simple steps:
- Locate the screenshot you want to delete on your desktop.
- Click on the screenshot once to select it.
- Press the “Delete” key on your keyboard or right-click on the selected screenshot and choose “Move to Trash” from the drop-down menu.
- The screenshot will be moved to the Trash folder located in your Dock.
Moving screenshots to the Trash
To delete screenshots on your MacBook, you can easily move them to the Trash.

Here’s how:
- Click on the Stack on the Desktop to view all the screenshots.
- Drag the desired screenshot(s) to the Trash.
- Alternatively, you can right-click on a screenshot and choose “Move to Trash” from the drop-down menu.
Deleting screenshots permanently
To delete screenshots permanently on your MacBook, follow these steps:
- Click on the “Stack” on your desktop to view all the screenshots you have taken.
- Select the screenshot(s) you want to delete permanently.
- Press the keyboard shortcut Option + Command + Delete to immediately delete the selected screenshot(s), bypassing the Trash.
- Confirm the deletion when prompted.
- The selected screenshots will be permanently removed from your MacBook and cannot be recovered.
Tips for Managing Screenshots on Mac
To manage your screenshots on Mac effectively, consider organizing them into folders based on their content or purpose. This will make it easier for you to find specific screenshots later on.
Additionally, you can explore
third-party screenshot management tools that offer advanced features like tagging and annotation options.
Automating the deletion of old screenshots using scripts or apps can also help you keep your storage space clear.
Regularly clearing out unnecessary screenshots is crucial for a clutter-free system and optimal performance.
Organize screenshots into folders
One effective way to
manage your screenshots on a MacBook is by
organizing them into folders. This helps you keep track of your captured images and makes it easier to find specific screenshots when needed.
Here are some tips for organizing your screenshots:
- Create specific folders: Create separate folders based on categories or topics that make sense to you. For example, you can have folders for work-related screenshots, personal images, or specific projects.
- Use descriptive names: Give each folder a name that accurately describes its contents. Avoid generic names like “Screenshots” and opt for more specific labels such as “Work Presentations” or “Vacation Memories.”
- Sort screenshots chronologically: Arrange the screenshots within each folder chronologically, with the most recent captures at the top. This makes it easier to locate a screenshot from a particular period.
- Subdivide larger folders: If a folder becomes too large to navigate efficiently, consider creating subfolders within it. For instance, if you have a folder for work-related screenshots, you can divide it into subfolders for different projects or clients.
- Regularly declutter: Periodically review your screenshot folders and delete any unnecessary or outdated images. This helps free up storage space on your MacBook and keeps your screenshot collection organized.
- Utilize tags or labels: If the default organizational structure doesn’t suit your needs, you can use tags or labels to categorize your screenshots further. These metadata markers make searching for specific types of images easier across multiple folders.
Use third-party screenshot management tools
Third-party screenshot management tools can greatly enhance your ability to delete and manage screenshots on your MacBook.
These tools provide additional features and functionalities that can make the process much more efficient.
Here are some popular third-party screenshot management tools you can consider:
- CleanMyMac X: This powerful tool helps delete screenshots and offers a wide range of optimization and cleaning features for your Mac. With CleanMyMac X, you can easily identify and remove unnecessary screenshots, freeing up valuable storage space on your MacBook.
- Hazel: Hazel is an automation tool that allows you to set up rules for managing files on your Mac. You can create custom rules to automatically identify and delete screenshots based on specific criteria such as file type, size, or date taken. This makes it easier to keep your screenshot folder organized and clutter-free.
- ImageOptim: Although primarily designed for image optimization, ImageOptim also provides a handy feature for managing screenshots. You can drag and drop your screenshots into the app, which will automatically compress and delete them if desired.
- Screenshot Hero: Screenshot Hero is a cloud-based service that offers advanced screenshot organization and management features. It lets you easily capture, annotate, search, and delete screenshots from any device. Its intuitive interface and powerful search capabilities make finding and deleting unwanted screenshots a breeze.
- Monosnap: Monosnap is a screenshot tool with robust organizational features for managing your captures effectively. You can organize your screenshots into folders, tag them for easy retrieval, and quickly delete unwanted ones with just a few clicks.
- ShotBox: ShotBox is another popular tool for managing screenshots on Macs. It provides an intuitive user interface that lets you preview all your captured images in one place before deciding which ones you want to keep or delete.
Automate screenshot deletion with scripts or apps
Automating screenshot deletion on your MacBook can save you time and effort, especially if you take a lot of screenshots.
Here are some ways to automate this process:
- Use Automator: macOS has a built-in app called Automator that allows you to create custom automation workflows. You can create a workflow that automatically deletes screenshots by selecting the “Files & Folders” action and choosing the “Move Finder Items to Trash” option. Set the workflow to run whenever new files are added to a specific folder, such as the default screenshot storage location.
- Use Hazel: Hazel is a powerful third-party app that automates file organization on your Mac. With Hazel, you can set up rules to automatically delete screenshots based on specific criteria, such as file name or creation date. For example, you can create a rule that deletes all screenshots older than 30 days or delete screenshots with specific keywords in their file names.
- Write AppleScripts: If you’re comfortable with scripting, you can write AppleScripts to automate screenshot deletion. AppleScript is a scripting language provided by Apple for automating tasks on macOS. By writing a simple script, you can specify which folder(s) to monitor and delete any new screenshots that appear within them.
- Use dedicated apps: Several apps are available in the Mac App Store specifically designed for managing and deleting screenshots. These apps offer features like automatic detection and deletion of screenshots, bulk selection and deletion options, and even intelligent sorting and categorization of screenshots.
Clearing up storage space by deleting old screenshots
Clearing up
storage space on your MacBook is crucial for maintaining
optimal performance. By deleting old screenshots, you can free up valuable storage capacity.
Here are some effective ways to clear up space by deleting old screenshots:
- Sort screenshots by date: Begin by sorting your screenshots by date to identify the older ones you no longer need.
- Select and delete: Once you’ve identified the older screenshots, select them and press Command + Delete to send them directly to the Trash.
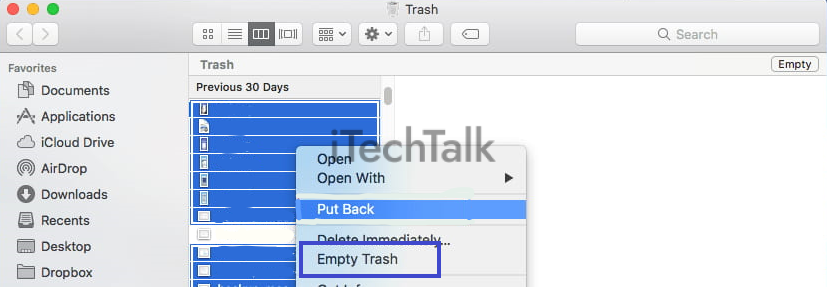
- Empty the Trash: To permanently delete the screenshots and free up storage space, remember to empty the Trash. You can do this by right-clicking on the Trash icon in your Dock and selecting “Empty Trash.” Alternatively, you can instantly press Command + Shift + Delete to empty the Trash without any confirmation prompts.
- Use automation tools: To simplify deleting old screenshots, consider using automation tools like Cleaner-App mentioned earlier. These tools can help you identify and delete outdated or unnecessary files with just a few clicks.
- Regularly review and delete: Make it a habit to review your screenshots folder and delete any unneeded captures regularly. This approach will help prevent clutter from building up over time.
Conclusion
In conclusion,
deleting screenshots on your MacBook is a simple and important task for
managing storage space and keeping your files organized.
Whether you manually delete them from the desktop or use
third-party tools like Cleaner-App, clearing out unnecessary screenshots regularly is vital.
Remember, using
keyboard shortcuts or
dragging screenshots to the Trash can make the process even quicker. With these easy steps, you’ll have a clean and clutter-free Mac in no time!
FAQs
1. How do I delete screenshots on my Macbook?
To delete screenshots on your Macbook, you can locate the screenshot files in the “Desktop” or “Downloads” folder and drag them to the trash bin. Alternatively, you can right-click on the screenshot file and select “Move to Trash.”
2. Can I recover deleted screenshots on my Macbook?
If you have recently deleted a screenshot and it’s still in the trash bin, you can easily
restore it by right-clicking on the file and selecting “Put Back.” However, once you empty your trash bin or use third-party data recovery software, it may become challenging to recover deleted screenshots.
3. Is there a keyboard shortcut to delete screenshots on a Macbook?
Yes! To quickly delete a selected screenshot without moving it to the trash bin, press the Command + Delete keys together. This shortcut will instantly remove the screenshot from your Macbook.
4. Are there any other methods to manage multiple screenshots at once?
Certainly! You can use tools like Preview or third-party applications specifically designed for organizing and managing images to batch-delete multiple screenshots simultaneously. These tools offer additional features like image editing and categorization options for efficiently managing screenshot collection.