Have you upgraded your Apple MacBook to macOS Ventura and now wish to revert to Monterey? You’re not alone. Many users find certain software or hardware incompatible with new updates, causing various issues, from performance slowdowns to application crashes.
This guide will walk you through the step-by-step process to safely Downgrade Ventura To Monterey without losing crucial data. Are you ready for a smoother computing experience? Let’s get started!
Quick Summary
- Many users choose to downgrade from macOS Ventura to Monterey due to compatibility issues with certain software or hardware, performance issues, or a preference for the previous macOS version.
- There are three main options for downgrading: using a Time Machine backup, utilizing macOS Recovery Mode, or creating a bootable installer.
- Before beginning the downgrade process, it is essential to back up all important data using Time Machine or other backup methods.
- The steps for each downgrading method should be followed carefully to ensure a smooth transition without losing vital data.
Reasons To Downgrade Ventura To Monterey
You might want to downgrade from Ventura to Monterey for various reasons, including incompatibility with certain software or hardware, performance issues or device slowdown, and a preference for a previous macOS version.
Incompatibility with certain software or hardware
Downgrading from macOS Ventura to Monterey can resolve problems linked with hardware and software compatibility.
Newly introduced operating systems often cause certain older programs and devices to malfunction or become completely unusable due to incompatibility issues.
These hindrances in performance may disrupt your workflow and rob you of valuable time needed for efficiency.
Switching back to a prior version like Monterey – a well-tested and stable platform – ensures continued full functionality, enabling an undisturbed user experience on your Apple MacBook.
Remember that the downgrade process can be done using several methods, such as Time Machine backup or macOS Recovery Mode.
Performance issues or device slowdown
If you’ve experienced performance issues or device slowdown since upgrading to macOS Ventura, it may be time to consider downgrading to Monterey.
Sluggish response times and decreased system performance can significantly impact productivity and overall user experience.
By reverting to Monterey, you can regain the speed and smooth operation you enjoyed before the upgrade.
With multiple downgrade options, such as a Time Machine backup or macOS Recovery Mode, it’s easy to take control of your Mac’s performance and ensure a seamless computing experience without any unnecessary hiccups.
Don’t let poor performance hold you back – switch from Ventura to Monterey and get your Apple MacBook running at its best once again.
Preference for a previous macOS version
If you’re an Apple MacBook owner, preferring a previous macOS version is not uncommon.
Perhaps you found that certain software or hardware didn’t work as smoothly on Ventura as in Monterey, or you experienced performance issues or device slowdown after the update.
Whatever the reason may be, downgrading from Ventura to Monterey can help restore your preferred macOS experience. Luckily, there are several methods available to make this transition hassle-free.
You can utilize Time Machine backup, macOS Recovery Mode, or even create a bootable installer for Monterey.
Following these steps and selecting the appropriate downgrade method for your specific needs, you can switch back to Monterey and enjoy all its features without losing important data.
Downgrading Options
Three downgrading options for macOS Ventura to Monterey are Time Machine backup, macOS Recovery Mode, and a bootable installer.
Time Machine backup
To downgrade macOS Ventura to Monterey, one of the options available is using a Time Machine backup. This method lets you restore your Mac to a previous version without losing important data.

Simply insert the drive containing the Time Machine backup, restart your Mac, and select the Time Machine backup file as the installation source. This will initiate the downgrade process, preserving your files and settings.
It’s a reliable way to switch back to Monterey and regain compatibility or performance if Ventura isn’t meeting your needs. Remember, having a recent Time Machine backup is essential for this method to work seamlessly.
macOS Recovery Mode
You can utilise the macOS Recovery Mode to initiate the downgrade from macOS Ventura to Monterey. This option allows you to reinstall an earlier version of the operating system.
To access macOS Recovery Mode, restart your Mac and hold down the Command + R keys until you see the Apple logo on your screen.
Once in Recovery Mode, you’ll be presented with a few options. Choose “Reinstall macOS” to proceed with downgrading to Monterey.
Remember that this process will erase all data on your Mac, so it’s essential to back up important files beforehand.
By using macOS Recovery Mode, you can easily revert to Monterey without any complicated steps or additional tools.
It’s a straightforward solution for those who prefer a previous version of macOS or are experiencing compatibility issues with software or hardware under Ventura.
Bootable installer
Another option to downgrade macOS Ventura to Monterey is a bootable installer.
A bootable installer allows you to create a USB drive with the Monterey installation files, which can then be used as a startup source for your Mac.
This method can be especially useful if you can’t access Time Machine backups or want more control over the downgrade process.
Simply insert the USB drive into your Mac, restart it while holding down the Option key, and select the USB drive as the startup disk.
From there, follow the on-screen instructions to install Monterey and complete the downgrade. It’s an efficient and straightforward way to switch back to Monterey without hassle or compatibility issues.
Steps to Downgrade from Ventura to Monterey
To successfully downgrade from Ventura to Monterey, follow these simple steps. Don’t miss the detailed instructions and tips in this informative blog post!
Backing up important data
Before you begin downgrading from Ventura to Monterey, it is crucial to back up all your important data. This step ensures you won’t lose valuable files or information during the transition.
You can easily perform a backup by utilizing Time Machine, which allows you to create a snapshot of your entire system, including documents, photos, and settings.
Simply insert an external hard drive or connect to a network storage device and initiate the backup process.
Backing up your data is essential as it provides peace of mind and safeguards against any unforeseen issues arising during the downgrade process.
By taking this precautionary step, you can confidently proceed with downgrading without worrying about losing any vital files or data.
Selecting the appropriate downgrade method
To successfully downgrade your macOS Ventura to Monterey, selecting the appropriate method that suits your needs is important. There are a few options available, depending on your specific situation.
If you have a Time Machine backup of Monterey, you can easily restore your Mac using that backup file. Simply insert the backup drive, restart your Mac, and choose the Time Machine backup as the installation source.
Alternatively, if you don’t have a Time Machine backup but still want to downgrade without losing data, you can access System Settings on your Mac and select iCloud.
From there, scroll down until you find the toggle for “Keep a copy of your iCloud data on this Mac.” Enabling this option will preserve your iCloud data during the downgrade process.
You can use macOS Recovery Mode for those who prefer a clean installation of Monterey or don’t have access to a Time Machine backup or iCloud storage.
Restarting your Mac and holding down the Command + R keys during startup, you’ll enter Recovery Mode, where you can reinstall an earlier version of macOS like Monterey.
Following the specific steps for each method
To downgrade your macOS Ventura to Monterey, here are the specific steps you need to follow:
- Using Time Machine Backup:
- Insert the backup drive.
- Restart your Mac and hold down the Command + R keys until the Apple logo appears.
- Select “Restore From Time Machine Backup” and then click Continue.
- Choose the Time Machine backup file that contains your Monterey installation and click Continue.
- Via macOS Recovery Mode:
- Shut down your Mac and then press and hold the Power button.
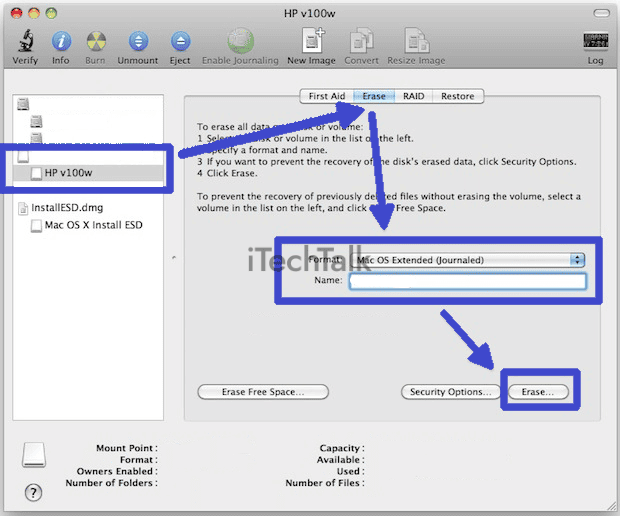
- When the startup options appear, select “Disk Utility” and click Continue.
- Select your startup disk, go to the Erase tab, choose APFS or Mac OS Extended (Journaled) format, and then click Erase.
- Exit Disk Utility and select “Reinstall macOS” from the Utilities window.
- Using a Bootable Installer:
- Create a bootable installer of Monterey using a USB drive or external storage device.
- Connect the bootable installer to your Mac.
- Restart your Mac while holding down the Option key until you see the Startup Manager screen.
- Select the bootable installer as your startup disk and proceed with installing Monterey.
Conclusion
In conclusion, downgrading from Ventura to Monterey can be straightforward using various methods such as Time Machine backup, Recovery Mode, and bootable installers. Whether it’s due to software incompatibility or personal preference, there are options available for Apple MacBook owners to switch back to the previous macOS version.
Simply follow the steps outlined in this guide and enjoy a seamless transition back to Monterey for a smoother Mac experience.