Are you tired of your messages constantly popping up on your iPad when they’re meant for your iPhone? It’s a
common issue Apple users face and can cause confusion, clutter, and even privacy concerns.
Fortunately, there is a solution! In this blog post, we’ll explore various methods to Stop Messages From Going To iPad and keep them solely on the device they were intended for.
Quick Summary
Key Takeaways:
- Messages can go to your iPad due to iCloud syncing, shared Apple ID, and Wi-Fi network connections.
- Turning off iMessage on your iPad, disabling message forwarding, signing out of iCloud, or using a different Apple ID can stop messages from going to your iPad.
- Restarting devices regularly, updating software, resetting network settings, and unpairing devices are helpful troubleshooting tips for any issues that may arise with message syncing.
- Using a different messaging app or customizing notification settings can also help manage messages on your iPad.
Understanding Why Messages Go To Your iPad
Messages go to your iPad because of
syncing with iCloud,
shared Apple ID, and
Wi-Fi network connection.
Syncing With iCloud
One common reason behind messages appearing on your iPad is syncing with iCloud. This feature allows Apple users to seamlessly
access their data on multiple devices by keeping everything in sync, including photos, contacts, notes, and even iMessages.
For instance, let’s say you’re out running errands and get a text from a friend regarding your weekend plans. If both your
iPhone and iPad are synced through iCloud, that message will pop up not only on your phone but also when you open up Messages on the iPad back at home.
While this can be convenient for some users who desire greater connectivity across their devices, others may find it irritating or cluttered.
Shared Apple ID
If you’re sharing an Apple ID with someone else, it can cause messages to go to both devices. This is because the two devices are receiving the same set of information and syncing up with each other.
Users should have their
unique Apple ID to manage their messages independently. If multiple people use a single iPad but want separate messaging accounts, they can create multiple Apple IDs and sign in/out as needed.
Wi-Fi Network Connection
A
Wi-Fi network connection is great for browsing, streaming, and staying connected. However, it can also lead to
messages going to your iPad when they’re meant for your iPhone.
This happens because both devices are connected to the same Wi-Fi network and share
Apple ID credentials.
You can turn off iMessage or message forwarding on your iPad to prevent this. Alternatively, you can use
different Apple IDs for each device or
sign out of iCloud on your iPad altogether.
How To Stop Messages From Going To iPad
To stop messages from going to your iPad, you can turn off iMessage on the device by going to Settings > Messages and toggling off iMessage.

Turn Off iMessage On iPad
Turning off iMessage is a simple yet effective way to stop messages from going to iPad.
Here are the steps:
- Open “Settings” on your iPad.
- Tap “Messages.”
- Find the toggle switch for “iMessage” and turn it off.
Doing this will disable the iPad’s ability to receive iMessages, ensuring they only appear on your iPhone or other designated device.
This can also help prevent messages from being delivered to both devices simultaneously, reducing clutter and confusion.
Disable Message Forwarding
Disabling message forwarding is one way to stop messages from going to your iPad.
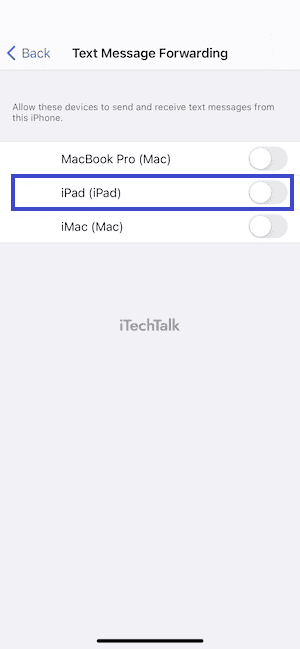
Here’s how:
- On your iPhone, go to Settings > Messages.
- Tap Text Message Forwarding.
- Turn off the toggle next to your iPad.
This will prevent messages from being forwarded to your iPad and ensure they only appear on the designated device.
It’s a quick and easy solution for those who want to declutter their iPad inbox and streamline their messaging experience.
Remember that disabling message forwarding will also prevent you from sending messages from your iPad using your iPhone number or email address, so make sure this is a tradeoff you’re willing to make before proceeding with this step.
Sign Out Of iCloud On iPad
One of the reasons why messages might be going to your iPad is because it’s
synced with iCloud.
To prevent this, you can
sign out of iCloud on your iPad by following these steps:
- Go to Settings on your iPad.
- Tap on your name at the top of the screen.
- Scroll down and click “Sign Out.”
- Enter your Apple ID password when prompted.
- Tap “Turn Off” for each service you want to turn off (such as Photos or Contacts).
- Select “Sign Out” again when prompted.
Signing out of iCloud on your iPad’ll cut off its connection with other devices, including your iPhone. This means
messages will only go to the designated device and no longer appear on your iPad.
Use A Different Apple ID
Sharing the same Apple ID with someone else can cause messages to go to both devices. Consider using a separate Apple ID for each device to prevent this.
Here’s how:
- Create a new Apple ID for your iPad by going to appleid.apple.com and clicking “Create Your Apple ID.”
- Enter the required information and create a new password.
- On your iPad, go to Settings > Messages > Send & Receive.
- Tap on your Apple ID and then tap Sign Out.
- Sign in with your new Apple ID and enable or disable any email addresses or phone numbers you want to be associated with iMessage.
Using different Apple IDs for each device ensures that messages are only sent to the intended recipient without any confusion or mix-ups.
Disable The Handoff Feature
Disabling the Handoff feature is another way to stop messages from going to the iPad.
Here’s how:
- Open Settings on your iPhone.
- Tap General and then Handoff.
- Turn off the toggle for Handoff.
This will
prevent messages from being sent to your iPad through Handoff, which allows you to continue working on one device when you switch to another.
Disabling this feature will ensure that your
messages only appear on your designated device and not on any other iCloud-connected device.
Troubleshooting Tips
Restart your devices regularly to resolve common issues with message syncing and connectivity.
Restart Your Devices
One troubleshooting tip that can help
stop messages from going to your iPad is to restart your devices.
Here’s how:
- Press and hold the power button on your iPad until you see the “Slide to Power Off” option.
- Slide the power off slider to shut down your iPad.
- After a minute, press and hold the power button again until you see the Apple logo.
- Release the power button and wait for your iPad to restart.
- Repeat these steps on your iPhone or other devices if necessary.
Restarting your devices can help clear any temporary glitches or bugs causing messages to keep going to your iPad, ensuring they only appear on the designated device.
Update Software
You may need to update the software to ensure your devices run optimally.
Here’s how to do it:
- On your iPhone or iPad, go to Settings.
- Tap General.
- Tap Software Update.
- If there is an available update, tap Download and Install.
- Follow the prompts to complete the installation.
Updating your software can also help fix
bugs or glitches causing messages to go to your iPad when they shouldn’t.
Reset Network Settings
If you still have issues with messages on your iPad,
resetting network settings could help
fix the problem.
Here’s how to do it:
- Go to Settings on your iPad.
- Tap General and then Reset.
- Select Reset Network Settings from the options.
- Enter your passcode if prompted.
- Confirm that you want to reset network settings.
After the reset, your iPad will restart, and your network settings will be restored to their default state. This can help resolve any Wi-Fi or cellular data connectivity issues that may have been causing messages to go to your iPad.
However, resetting network settings will also erase saved Wi-Fi passwords and VPN configurations, so be sure to have those handy after the reset.
Unpair Your Devices
If you still have trouble stopping messages from going to your iPad, you can try
unpairing your devices.
Here’s how to do it:
- Go to the Settings app on both your iPad and iPhone.
- On your iPhone, tap on your Apple ID at the top of the screen and then select “iCloud.”
- Scroll down and toggle off “Messages.”
- A pop-up message will appear asking if you want to keep a copy of your messages on this iPhone. Choose “Keep on My iPhone” if you don’t want to lose any messages.
By doing this, you’ll
stop syncing iMessage with iCloud, which should also prevent them from appearing on your iPad.
Enjoy A Clutter-Free iPad With These Tips
Organize and archive your messages, set up notifications, and create filters for a more streamlined iPad experience. With these helpful tips, you can enjoy a clutter-free device that only displays the messages you want to read.
Use A Different Messaging App
If you are still experiencing issues with messages going to your iPad even after following the previous steps,
consider using a different messaging app.
Here are some popular options:
- WhatsApp: A cross-platform messaging app that allows you to send and receive messages, calls, photos, videos, and voice messages.
- Telegram: This app offers end-to-end encryption for added privacy and security. You can send text messages, voice notes, photos, videos, files, and stickers.
- Signal: Another secure messaging app that supports encrypted messaging and voice and video calls.
- Facebook Messenger: If you prefer to stick with a more familiar option, Facebook Messenger works well on both iPhone and iPad devices.
- Google Hangouts: A free messaging app that lets you make voice or video calls and send text messages.
Remember that using a third-party messaging app means you may not have access to certain features that come with iMessage or traditional text messaging apps.
However, it can be a useful workaround if you continue to experience issues with your iPad receiving messages from your iPhone or other Apple devices.
Set Up Notifications
I like to stay on top of my messages without the clutter on my iPad.
Here’s how I
set up notifications:
- Open Settings and tap Notifications.
- Scroll down to Messages and tap it.
- Turn on Allow Notifications.
- Customize your notification settings by choosing a sound, selecting the alert style, and enabling previews.
- If you don’t want notifications to the group, turn off the toggle for Group by Thread.
- Enable the Critical Alerts toggle to ensure that only important messages push through.
- You can customize notifications for specific contacts by returning to Settings > Notifications > Messages and selecting a contact from there.
Setting up notifications allows me to prioritize which messages are worth checking on my iPad without being bombarded with unnecessary alerts.
Create Message Filters
Another useful tip is to create message filters to keep your iPad clutter-free.
Message filters allow you to
sort messages as they arrive and send them directly to a designated folder or label without cluttering your inbox.
Here’s how you can create message filters on your iPad:
- Open the Mail app on your iPad.
- Tap on the mailbox or account where you want to set up the filter.
- In the top-right corner of the screen, tap “Edit.”
- Tap “Add Filter” at the bottom of the screen.
- Select which filter criteria you want to set by tapping “From,” “To,” “Subject,” or “Body” and enter any relevant keywords or addresses.
For example, if you want to automatically move all emails from a particular sender to a specific folder, select “From” and enter their email address.
- Choose what action you want the filter to take by tapping “Move Message” or “Flag Message.”
- Select which mailbox or folder you want messages that match your criteria to be moved to.
- Tap “Save” in the top-right corner.
These simple steps will help you create message filters that can save time and enhance your productivity while using your iPad for messaging purposes.
Organize And Archive Messages
A cluttered message inbox can be overwhelming and make it difficult to find important information.
Here are some tips for organizing and archiving messages on your iPad:
- Create folders: Organize messages by creating different folders or labels based on their content, sender, or priority.
- Use the search: Utilize the search feature on your iPad to locate specific messages or contacts quickly.
- Archive old messages: Archive old messages that you no longer need by swiping left and selecting “Archive” or tapping the trash bin icon.
- Mark as unread: Mark important messages so you can easily find them later.
- Prioritize VIPs: Add important contacts to your VIP list in the Mail app so their messages appear in a separate folder.
- Delete unnecessary conversations: Keep your inbox clean by deleting unnecessary conversations regularly.
Following these tips lets you stay organized and easily access important information without sifting through a cluttered message inbox.
Backup Your Messages Regularly
Backing up your messages regularly is important to ensure you
don’t lose any important conversations.
Follow these steps to backup your messages on your iPad:
- Open the Settings app on your iPad.
- Tap on your Apple ID at the top of the screen.
- Scroll down and tap iCloud.
- Ensure that Messages are turned on and wait for the messages to upload.
- To access your backup, go back to Settings > [Your Name] > iCloud > Manage Storage > Messages.
By backing up your messages regularly, you’ll have peace of mind knowing that you won’t lose any important conversations if something happens to your device.
Conclusion
In conclusion, receiving messages on multiple devices can be overwhelming and confusing. However, with the steps outlined above, you can easily stop messages from going to your iPad and have more control over where they appear.
Turning off iMessage on your iPad or disabling message forwarding can declutter your device and ensure that important messages only appear on the intended device.
Don’t forget to troubleshoot
any issues by restarting or updating your devices and customizing notification settings.