Has your iPad suddenly displayed the dreaded “iPad is Disabled Connect to iTunes” message? If so, don’t panic. This common issue occurs when you enter an
incorrect passcode too many times, effectively locking you out of your device.
However, there are several methods available to unlock a disabled iPad and regain access without losing all your data.
In this blog post, we’ll guide you through the process step-by-step and share some valuable tips on how to prevent future iPad disablement.
Quick Summary
- “iPad is Disabled Connect to iTunes” occurs when an incorrect passcode is entered too many times.
- Methods to fix a disabled iPad include restoring it through iTunes, using iCloud to remotely erase and restore the device, or entering recovery mode.
- To prevent future iPad disablement, set a strong passcode, regularly back up your device, keep software updates current, avoid unauthorized modifications and enable Find My iPad.
Understanding iPad Disablement
– iPad disablement occurs when you enter an incorrect passcode multiple times, causing the device to lock and show the message “
iPad is disabled, connect to iTunes.”
Common Causes Of iPad Disablement
As a proficient iPad user, I have encountered various scenarios that can lead to iPad disablement.
Some of the common causes include:
- Multiple unsuccessful attempts at entering the correct passcode, causing the device to become temporarily or permanently disabled.
- Using an outdated or incompatible iOS version on the iPad, which may lead to unforeseen glitches and system errors.
- Unauthorized modifications to the iPad’s software, such as jailbreaking, increasing vulnerability to security risks that may cause disablement.
- Physical damage to the device affecting its functionality and potentially leading it to become disabled.
- Malware or viruses infecting your iPad’s system can corrupt essential files and render your device unusable.
By being aware of these common causes of disablement, we can take precautions and avoid facing a situation where our iPads become disabled and require restoration via iTunes.
Indications Of A Disabled iPad
If your iPad is disabled, you may notice several indications that something is wrong. The most obvious sign will be the message on the screen that says “
iPad is disabled, connect to iTunes“.
You may also see a screen with a red slider and the option to power off the device.
Another indication of a disabled iPad could be multiple failed attempts at entering your passcode. If you enter an incorrect passcode too many times, your device may become temporarily or permanently locked out for security reasons.
You may notice that there is a
countdown timer on the lock screen indicating how long until you can try again or until the device becomes permanently disabled.
To avoid this situation in the future, ensure that you remember your passcode or use alternative methods such as
Touch ID or Face ID if they are available on your device.
How To Fix “iPad Is Disabled Connect To iTunes” Error
To fix the “iPad Is Disabled Connect to iTunes” error, there are several methods you can try including using iTunes to restore the iPad, remotely erasing and restoring it through iCloud, or using recovery mode; read on for step-by-step instructions and tips.
Using iTunes To Restore The iPad
I have found that
using iTunes to restore the iPad is one of the most common methods to fix a disabled iPad.

To do this, you’ll need to connect your iPad to your computer and follow these steps:
- Open iTunes on your computer.
- Connect your disabled iPad to the computer using a USB cable.
- When prompted for a passcode, enter it if possible.
- Select your iPad in iTunes under “Devices” and click the “Restore” button.
- Follow the on – screen instructions to complete the restore process.
It’s important to note that restoring your iPad using iTunes will erase all data and settings on your device, including any passcode you may have forgotten. Therefore, it’s crucial that you have recently backed up your iPad before going through with this process.
Once the restore process is complete, you should be able to set up your iPad as new or restore from an iCloud or iTunes backup.
This method may take longer than using recovery mode or iCloud, but it’s effective in fixing more complex software issues that could be causing the disablement of your iPad.
Using iCloud To Remotely Erase And Restore The iPad
If you have enabled
Find My iPad on your device and have a Wi-Fi or cellular connection, you can use iCloud to
remotely erase and restore your disabled iPad.
Here’s how to do it:
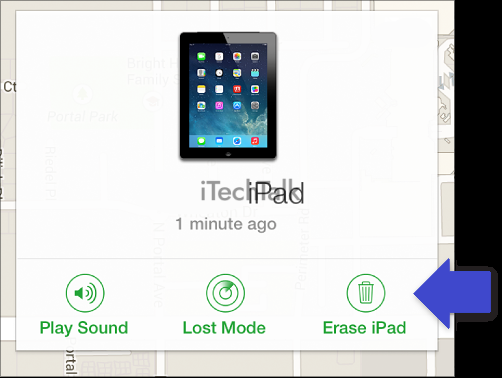
- Go to the Find My app on another iOS device or visit iCloud.com/find on a computer.
- Sign in with your Apple ID and password that is linked to your disabled iPad.
- Select the disabled iPad from the list of devices.
- Click on “Erase iPad” to wipe all data from the device, including the passcode.
- Once erased, click “Restore from Backup” to download and restore your iPad from an iCloud backup.
- If you don’t have a backup stored in iCloud, you will need to connect your iPad to iTunes and restore it using recovery mode instead.
- After restoring, set up the device as new or using a previous backup.
Using iCloud to remotely erase and restore an iPad can be convenient if you don’t have access to a computer with iTunes or if you want to quickly wipe all data from your disabled device without having physical access to it.
However, make sure that you have backed up important data before erasing the device as this process cannot be undone.
Using Recovery Mode To Restore The iPad
If you can’t
unlock a disabled iPad by using iTunes or iCloud, you may need to enter Recovery Mode and restore the device to its factory settings.
Here’s how to do it:
- Connect the iPad to a computer with iTunes installed.
- Press and hold the Top button and Volume Up or Down button at the same time until the power – off slider appears.
- Drag the slider to turn off the iPad.
- Keep holding down both buttons while plugging the USB cable into your computer.
- Release the buttons when you see an iTunes logo and a message that says “Connect to iTunes.”
- Follow the prompts in iTunes to restore your iPad to its original factory settings.
- Wait for the process to complete, and then set up your iPad as new or restore from a backup.
Note: Recovery Mode erases everything on your iPad, so make sure you have a backup of your data before restoring it.
Also, if your iPad has an
activation lock enabled by Find My, you will need to enter your Apple ID and password during recovery mode to disable it before proceeding with the restore.
Other Ways To Fix A Disabled iPad
In addition to using iTunes or iCloud, there are other ways to fix a disabled iPad such as utilizing third-party software or taking it to an Apple Store for professional assistance – keep reading to discover more!
Using Third-Party Software
If you have tried all the methods above to fix a disabled iPad but still couldn’t unlock it, you can consider using
third-party software to recover your device.
Here are some of the best options available:
- Tenorshare 4uKey: This software lets you unlock an iPad without knowing the passcode or iTunes password. You can reset factory settings, remove screen time passcode, and bypass MDM activation lock.
- iMyFone LockWiper: This tool allows you to remove various types of screen locks without a passcode, such as Face ID, Touch ID, numeric code, and custom alphanumeric code.
- Aiseesoft iPhone Unlocker: With this application, you can easily unlock a disabled iPad by wiping out the passcode and removing Apple ID or iCloud account from your device.
- Joyoshare iPasscode Unlocker: This program enables you to bypass any iOS passcode including 4-digit/6-digit code, Touch ID and Face ID in minutes.
Note that using third-party software may involve some risks such as data loss or privacy breach if not handled properly. Therefore it is recommended that you use them with caution and only as a last resort after exhausting other options.
Taking Your iPad To An Apple Store
If you’re unsure about fixing your disabled iPad on your own, or if the solutions mentioned earlier don’t work for you,
taking your iPad to an Apple Store could be a good option.
At the store, a
technician can diagnose and fix any issues with your device. They may also
restore it to factory settings if needed.
Apple Stores offer support services called “
Genius Bar” where
qualified technicians provide free diagnosis and repair of Apple products such as iPads. The technicians are trained professionals who can troubleshoot complex technical issues.
Tips To Avoid Future iPad Disablement
– Set a strong and unique passcode that you can easily remember, but others cannot guess.
– Regularly back up your iPad to prevent data loss if it becomes disabled or lost.
– Keep your iPad updated with the latest software to ensure it has the latest security patches and bug fixes.
– Avoid unauthorized software modifications that could potentially disable your iPad or compromise its security.
– Enable
Find My iPad as an extra layer of protection against theft or loss.
Setting A Strong And Unique Passcode
One of the best ways to avoid iPad disablement is by setting a
strong and unique passcode. Your passcode acts as a safeguard against unauthorized access, which can lead to data theft or infiltration.
It’s important to use a
combination of uppercase and lowercase letters, numbers, and special characters in your password. Avoid using common passwords like “1234” or “password,” as these are easy for hackers to guess.
By setting up
Touch ID or Face ID on newer iPad models, you can also add an extra layer of security that makes it more difficult for someone else to access your device without permission.
Remember that keeping your iPad safe goes beyond just creating a strong passcode. Be sure to also enable Find My iPad so that if it becomes lost or stolen, you can track its location remotely using iCloud.com.
Regularly Backing Up The iPad
Backing up your iPad is an
essential task that should not be overlooked. It ensures that all your
valuable data, files and settings are safe and can be restored in case of any eventualities like a damaged or lost device.
Whenever you back up the iPad, it creates a copy of everything on the device, including contacts, messages, photos, documents and apps.
iTunes usually performs
automatic backups every time you connect your iPad to a computer with iTunes running. However, it’s always advisable to manually make periodic backups regularly just to have an
extra layer of protection against unforeseen circumstances.
Regularly backing up your iPad gives peace of mind knowing that if anything happens to your device; all important data is safeguarded and can easily be recovered from the backup file.
Keeping The iPad Updated With Latest Software
I always make sure to keep my iPad updated with the latest software, as it can help prevent issues like disablement.
Regular updates fix bugs and improve overall performance, making the device more reliable and secure.
To check for updates on an iPad, simply go to Settings > General > Software Update.
I remember one time when I delayed updating my iPad due to my busy schedule. Unfortunately, it caused some apps to malfunction and even crash frequently. It was frustrating because I had important work that needed completing on those specific apps.
Avoiding Unauthorized Software Modifications
Conclusion
In conclusion, getting the “iPad is disabled, connect to iTunes” message can be frustrating. Luckily, there are several ways to fix this issue, including restoring your device through iTunes or using recovery mode.
It’s important to remember to set a strong passcode and regularly back up your iPad to avoid future disablement. If all else fails, consider taking it to an Apple store for further assistance.