Struggling to share files with a computer that lacks an optical drive? Remote Disk on Macbook comes to your rescue, offering a smart technology built into the macOS.
This blog will guide you through its capabilities, from setting up disk-sharing between devices to accessing those all-important documents or media files remotely.
Brace yourself for a deep dive into this unsung gem of Apple’s suite – the Remote Disk feature!
Quick Summary
- Remote Disk on a MacBook is a built-in technology that allows users to connect their computer to another Mac or PC to share files and access data from other devices.
- By enabling sharing on your Mac or Windows PC, you can easily access the remote disc through Finder or File Explorer and view its contents just like you would with a local disc.
- This feature is especially useful for MacBook models without a built-in optical drive, as it allows users to conveniently tap into the resources of another computer’s optical drive without physically being there.
- With Remote Disk, users can access important files, install software, watch movies, and even burn CDs directly from another computer’s optical drive. It provides seamless connectivity and enhances file management for Apple MacBook owners.
What is Remote Disk on MacBook?
Remote Disk on a MacBook is a built-in technology that allows you to connect your computer to another Mac or PC to share files, making it easy and convenient to access data from other devices.
Definition And Purpose
The Remote Disk on a MacBook is an innovative feature powered by Apple’s technological expertise. It enables your MacBook to connect seamlessly with another computer, either Mac or PC, for accessing and sharing files stored on the other machine’s optical drive.
This technology built into the operating system has been designed keeping optimum convenience in mind, especially for those MacBook models that lack a built-in optical drive.
Using this feature, you can effortlessly access files from CDs/DVDs across networks without requiring any physical transfer of discs.
Everything becomes easier with the Remote Disk on your MacBook, whether installing software via a disc or transferring large media files.
Connecting To Another Mac or PC
To connect your MacBook to another Mac or PC using the Remote Disk feature, follow these steps:
- Open Finder on your MacBook.
- In the sidebar, under the “Devices” section, you should see the Remote Disc icon.
- Click the Remote Disc icon to view available remote machines with optical drives.
- Select the Mac or PC you want to connect to from the list.
- If prompted, enter the username and password for that remote machine.
- Once connected, you can see and access files stored on the remote optical drive.
How to Use Remote Disk on a MacBook
To use Remote Disk on a MacBook, follow these steps: enable sharing on your Mac or Windows PC, access the remote disc through the Finder, and utilize the files from another computer’s optical drive.
Steps To Enable Sharing On A Mac
To enable sharing on your Mac and start using Remote Disk, follow these simple steps:
- Open System Preferences by clicking on the Apple menu in the top-left corner of your screen and selecting “System Preferences” from the drop-down menu.
- In the System Preferences window, click “Sharing, ” represented by an icon with a blue folder.
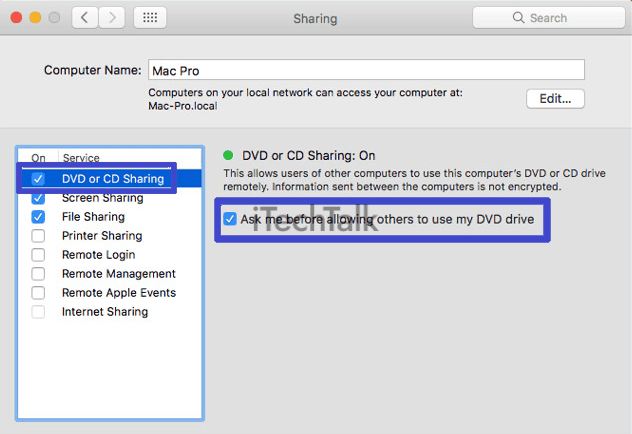
- In the Sharing settings, ensure the checkbox next to “DVD or CD Sharing” is ticked. This will enable your Mac to share its optical drive with other computers on the network.
- You can customize your sharing settings further by clicking “Options…”. Here you can choose whether you want to require a password for DVD or CD access and who has permission to access your shared disk.
- Once you have enabled DVD or CD sharing, insert a disc into your Mac’s optical drive if you haven’t already done so.
- On another Mac or PC connected to the same network, open Finder (on a Mac) or File Explorer (on a PC) and look for your Mac’s name under the Shared section of the sidebar. Click on it to access your remote disc and view its contents.
Steps To Enable Sharing On A Windows PC

To enable sharing on a Windows PC and access the remote disk on your MacBook, follow these steps:
- Open the Control Panel by clicking on the Start menu and selecting “Control Panel.”
- In the Control Panel window, click “Network and Internet” and “Network and Sharing Center.”
- Under “Change your networking settings,” click on “Change advanced sharing settings.”
- Scroll down to the “File and printer sharing” section and expand it.
- Select the option that says “Turn on file and printer sharing” to enable sharing resources on your Windows PC.
- If you want to customize specific options for file sharing, click on the arrow next to “Turn on file and printer sharing” to expand the options.
- You can select which network profiles you want to enable file sharing for, such as private or public networks.
- Once you have made your desired changes, click “Save changes” to apply the settings.
- Your Windows PC is now ready for remote disk sharing with your MacBook.
Accessing And Using The Remote Disc
To access and use the remote disc on your MacBook, follow these simple steps:
- Enable sharing on your Mac:
- Open System Preferences from the Apple menu.
- Click on Sharing.
- Check the box next to “DVD or CD Sharing” to enable it.
- Enable sharing on your Windows PC:
- Open Control Panel.
- Click on Network and Internet, then select Network and Sharing Center.
- Click on Change advanced sharing settings.
- Expand the “All Networks” section.
- Select “Turn off password-protected sharing” (optional but recommended).
- Save the changes.
- Accessing the remote disc:
- On your MacBook, open Finder.
- Look for the Remote Disc icon in the sidebar under “Devices.”
- Click on it to see a list of shared discs from other computers on your network.
- Using the remote disc:
- Double-click on the shared disc you want to access.
- Browse through its contents just like you would with a local disc.
- You can copy files from the remote disc to your MacBook or even run the software directly.
Benefits of Remote Disk
Remote Disk on a MacBook offers several benefits, including accessing files from another computer’s optical drive, convenient usage for Macs without built-in optical drives, and the ability to share resources between devices.
Accessing Files From Another Computer’s Optical Drive
If you have a MacBook without an optical drive but need to access files from another computer’s optical drive, the Remote Disk feature is here to save the day.
With this built-in technology, you can easily connect to another Mac or PC and view and manage files on its optical drive right from your MacBook.
Whether it’s sharing documents, accessing software installation discs, or even watching movies, Remote Disk allows you to conveniently tap into the resources of another computer without physically being there.
And this feature becomes even more valuable if you don’t have access to an external optical drive like the Apple SuperDrive. So say goodbye to limitations and embrace the power of remote file access on your MacBook!
Convenient For Macs Without Built-in Optical Drives
The Remote Disk feature will be incredibly convenient if you own a MacBook without a built-in optical drive. With remote disk sharing, you can access files from your MacBook from another computer’s optical drive.
This means that even if your MacBook doesn’t have a CD or DVD drive, you can still enjoy the benefits of accessing and using optical discs.
Whether installing software, watching movies, or burning CDs, the Remote Disk feature ensures nothing stands in your way.
So don’t worry about missing out on important functionalities – with Remote Disk on your Macbook, you’re all set!
Sharing Resources Between Devices
Sharing resources between devices is one of the key benefits of using a Remote Disk on a MacBook. This feature lets you easily access files from another computer’s optical drive, whether a Mac or a Windows PC.
This means that you can leverage the resources available on other devices and seamlessly transfer files without any hassle.
For example, let’s say you have a MacBook without a built-in optical drive and need to access some files stored on a CD or DVD.
Instead of transferring those files to a USB drive or an external hard drive, you can connect your MacBook to another Mac or PC with an optical drive enabled for sharing.
By doing so, you gain instant access to the files and can use them as if they were directly stored on your device.
This resource-sharing capability makes it incredibly convenient for MacBook owners who may not have access to traditional physical media drives but still require occasional use of CDs or DVDs.
It opens up new possibilities for collaboration and file sharing between different devices within your network without the need for complex configurations or additional hardware.
Conclusion
In conclusion, Remote Disk on a MacBook is a valuable feature that allows users to access files from another computer’s optical drive. Whether you need to share resources between devices or want the convenience of accessing files on Macs without built-in optical drives, Remote Disk provides a seamless solution.
With easy set-up steps and the ability to connect to Mac and Windows PCs, this technology enhances your remote file access experience. Say goodbye to compatibility issues with alternatives like Apple SuperDrive and embrace the simplicity of Remote Disk on your MacBook.