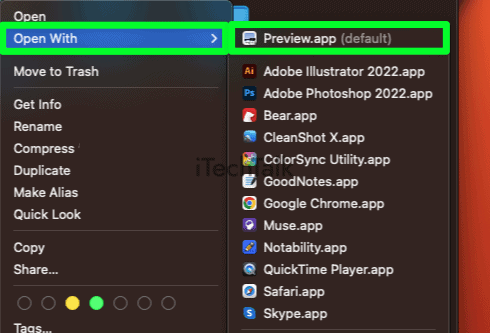
If you have a modern Mac, you can easily open a HEIC file with the Preview App. Just locate your HEIC on your computer, then right-click it. In the menu, choose, Open with Preview. If your Mac is an older mac that hasn’t been updated, you can upload your HEIC to a cloud storage service like Google Drive, then open Google Drive in your favorite browser to view the HEIC file.
Do you have an iPhone?
Do you like to share photos online?
Do you sometimes try to open the images on your Mac, only to be presented with an unknown file format called HEIC? This is a very common occurrence with some users, so don’t feel bad.
This article will show you how to easily open these files, as well as how to convert them into something more universal. Plus, by the end of this article, you’ll learn how to stop your iPhone from taking HEIC pictures ever again.
How To Open A HEIC File On Mac With The Preview App
If all you want to do is simply view your HEIC file, then the
Preview App is the best and easiest option.
Using the Preview App will prevent the image from being added to your library as well.
To open a HEIC file on MAC with Preview:
- Open a Finder window and locate your HEIC file.
- Right-click on the image, or hold down Control and then click on it.
- In the menu that pops up, choose Open With Preview.
- Your HEIC file will now be viewed in the Preview app.
 Related Reading
How To Convert HEIC To JPG Using The Preview App
If you want to make things easier for you later, you can always convert your HEIC file into a JPG. This will make it simple to open the file later and make it easier for others to open it if you plan on sharing the file.
Here’s how to convert HEIC to a JPG:
- Open up a Finder window and locate your HEIC file.
- Right-click on the file and choose Open With Preview.
- In the Menu Bar, select Edit, then click Select All. You will now see a dashed line moving around the perimeter of your image.

- Select File, and then choose Export.

- You will now have a list of options:
- Export As – Name your file, or leave it alone to stick with the file’s current name.
- Where – Choose the destination you wish to send your file after you hit Save.
- Format – This is the most important part. Choose JPEG out of the list, or save your file in a different format that you are familiar with. Use the Quality slider to determine the file size of your file.

- Click Save when you are finished. You have now converted your HEIC to a much more universal format.
Use The Photos App To Add Your HEIC To Your Library
If you wish to do more than just view your HEIC file and add it to your Library, you can do so with the Photos app. To do so:
- Open up the Photos app.
- Select File in the Menu Bar, then click Import.

- Navigate to the HEIC image you wish to import, then double-click it.
- Your image is now part of your Photos library.
How To Open An HEIC Using Dropbox or Google Drive
If you’re still using macOS Sierra or an even older version, and you don’t want to update, then you won’t be able to open a HEIC file through Preview or Photos.
Don’t worry, you can still open your HEIC using a cloud-based storage service. Not only do most major cloud services now support HEIC pictures, but you can also upload them to Google Drive or Dropbox for later access from your Mac.
My example below will be for Google Drive, but you can apply the same principles to any of the big named cloud-based storage services:
- On your iPhone, locate the HEIC you wish to open on your Mac.
- To share this document, tap the Share button, then select Google Drive. Then, click Upload.
- On your Mac, open your favorite browser and go to the Google Drive website.
- Sign into your Google Drive account.
- Locate the HEIC image and double-click it to open it up on your Mac.
How To Change Your iPhone Settings To Take JPGs By Default
Are you annoyed that your iPhone keeps taking HEIC images? Your iPhone will take these images by default, but you can change this in your settings.
You can change your settings for your iPhone to only take JPGs, but keep in mind that these images will take up more space on your phone. If you don’t care about the extra space being lost, then here is how to change the setting:
- On your iPhone, open up the Settings app.
- Scroll down and tap on Camera.

- At the top of the screen, choose Formats.

- Change the setting from High Efficiency to Most Compatible. Now your camera will take JPGs instead of HEICs by default.

I hope you enjoyed reading about how to open HEIC files on your Mac.
If you know anyone wondering the same question, or if you know anyone who would like to change the settings on their phone to take JPGs by default, please send them this article.
 Related Reading


