In order to restore your unavailable iPad, you will need to erase the device clean. The quickest way to do this is to go to iCloud.com and click on Find My iPhone/iPad. Select your iPad from the list, then click Erase iPad. You will need to enter your Apple ID twice, and then your iPad will be wiped clean and available to use.
There is nothing more annoying or scary than getting the “iPad Unavailable” message on your iPad. This can happen if you enter the wrong password too many times in a row.
Sometimes your iPad will let you input the correct password, but if you fail too many times, you might not get a chance to do so and get locked out of your iPad forever. You will have to wipe your iPad clean.
This isn’t as complicated as it may sound. In this article, I will explain all the ways you can wipe your device so that your iPad becomes available again.
Related Reading
How To Back Up Your Data To iCloud
Before getting into how to restore your unavailable iPad, it’s important for you to understand how to back up your data to iCloud. Restoring an unavailable iPad involves wiping the device clean, so you will want to have a reliable backup, so you don’t have lose years of data.
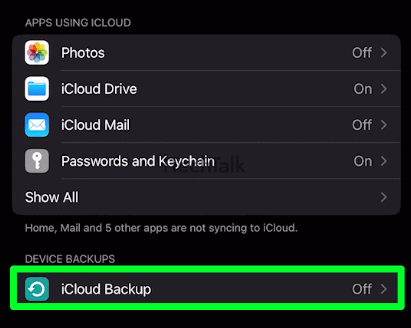
To ensure all of your data is securely stored in the cloud, you’ll need to enable
iCloud Backups on your iPad:
- Open the Settings app on your iPad and tap your name at the top of the page.
- Select iCloud from the menu that appears.

- Scroll down to find iCloud Backup and make sure it is toggled on, which allows for automatic backups when your device is locked, connected to Wi-Fi, and plugged into a power source.
- Once this is enabled, select Back Up Now and wait for the backup process to complete.

- A notification will appear when backing up has been successful.
Use iTunes To Restore Unavailable iPad
One of the best ways to restore an Unavailable iPad is with iTunes. This will involve plugging your iPad into your computer. So you will need a computer with iTunes installed.
The process of restoring your unavailable iPad will be a little different depending on what iPad you currently have:
If you have an
iPad with Face ID, then hold down the
Top button and one of the
Volume buttons until the
power off slider pops up. Drag the slider to turn off your device.
While holding down the
Top button, connect your iPad to your computer. Keep holding down the Top button until the recovery mode screen pops up.
If you have an
iPad with a Home button, then hold down the
Side button (or
Top button, depending on your device) until the
power off slider pops up. Turn off your iPad by dragging the slider.
While holding down the
Home button, connect your iPad to your computer. Keep the home button held down until you see the recovery mode screen pop up.
Once your iPad (Face ID version or Home button version) successfully enters recovery mode, you can now click on the Restore option that pops up on iTunes.
It will take a few minutes for iTunes to restore your device. By the end of the process, your iPad will be wiped clean and have the latest iOS downloaded.
You can now retrieve your data from your iCloud backup.
Fix iPad Unavailable Message Using Find My iPad
Before restoring your iPad using Find My iPad, you need to ensure that the option is turned on. You may not be able to do this if you can’t get into your iPad, but here is how to enable this option in the future:
- Open the Settings app on your iPad.
- Tap Your Name at the top of the page.
- Tap Find My iPhone/iPad. Make sure that it is turned to the On position.

Once your iPad has
Find My iPad toggled on:
- Go to iCloud.com on another device and sign into your iCloud account.
- Click the icon for Find My iPhone (or iPad) and select your iPad from the list that appears.
- Select Erase iPad, then confirm twice when prompted to do so by entering your Apple ID password both times to complete the process and delete all data from your iPad remotely.
Use The Built-in Erase Option To Unlock Unavailable iPad
If you want to restore your iPad without connecting it to your computer, you can do so using the built-in erase feature.
- To start this process, try to enter your passcode repeatedly until the “iPad Unavailable” message pops up. Keep trying to enter your passcode, and you will eventually see the Erase iPad option at the bottom center of your screen.
- Tap Erase iPad, then confirm your action by tapping Erase iPad again.
- To remove the Activation Lock on your iPad, enter your Apple ID.
- Finally, tap Erase iPad to erase everything on your iPad.
- After a few minutes, your iPad will reboot as a fresh device. You can then follow the onscreen instructions to restore your data from your iCloud account.
This built-in erase option may not be on by default with some iPads. To make sure this option is turned on:
- Open up your Settings app.
- Tap ID & Passcode. Enter your passcode when prompted.
- Scroll all the way down and tap Erase Data. Now your iPad will be erased completely after ten failed attempts.

I hope this article helped you restore your unavailable iPad. Please share this post with anyone you know who is going through the same problem.