After ensuring you have the right cable/adapter for your projector setup, you can connect both devices with said cable/adapter. After both devices are connected, go into your System Settings on your Macbook and select Displays. Set the projector as your main screen, then click Detect Displays.
A few decades ago it would take a team of tech-nerds to connect a computer to a projector. Not anymore! Connecting a Macbook to a projector is easier than you might think!
With just a few steps, you can easily mirror your Macbook and all its content onto your projector. Whether you need to present for work or school, or you just want to watch a movie with your friends, simply follow these instructions to get started in no time.
Check Your Connections, Ports & Adapters
Before getting into how to connect your Macbook to a projector, you first need a basic understanding of all the different ports, cables, and adapters required to connect both devices.
Because every projector and Macbook is different, I can’t give you a blanket answer as to which cable you will need for this job. However, with the help of this section, you should be able to identify what cable or adapter you need pretty easily.
Related Reading
HDMI Port
If you’ve ever hooked up a Blu-ray Player, DVD Player, or Gaming Console, this port will be very familiar to you.
Some Macbooks will have an HDMI port built-in, allowing you to use the projector’s HDMI cable to connect directly without an adapter. Most projectors support HDMI input, and the HDMI cord is likely included.
Many Macbooks will not have an HDMI port. If that’s the case, you can get an
HDMI to USB-C adapter.
Just plug the USB-C end of the adapter into your Macbook, then run the HDMI cable from the other end of the adapter to your projector.
Thunderbolt Port
A Thunderbolt port (sometimes known as a mini-display port) is a relatively small port that is found on more modern computers, laptops, and Apple devices. It looks similar to a USB port but is significantly smaller and more square-shaped.
The Thunderbolt port has replaced the much larger VGA and DVI ports to provide higher quality video output at a lower cost and size. It typically supports 1080p or 4K resolution output with little or no latency.
If both your Macbook and projector have Thunderbolt ports, then all you need is a Thunderbolt cable. If not, you will need an
HDMI to Thunderbolt adapter, plus an HDMI cable.
For this setup, plug the Thunderbolt end of the adapter into your Macbook, then run the HDMI cable from the other end of the adapter to your projector.
VGA Por
A VGA port (video graphics array) is a type of connection found in older computers and devices. It is typically a 15-pin connector used to connect computers to external monitors or projectors.
VGA is an older technology that your Macbook most likely doesn’t have. However, your projector may only have a VGA port available. Especially if your projector is an older LCD-based model.
If this is the case, you will need a
USB-C to VGA adapter, and a
VGA cable (which may have come with your projector). Plug the USB-C side of the adapter into your Macbook, then run the VGA cable from the other side of the adapter to your projector.
How To Connect A Macbook To A Projector (Step by Step)
The following section assumes that you’ve figured out which cable and adapters you need for your setup and you’ve already purchased them.
- Make sure that both your Macbook and your projector are turned on.
- Connect the appropriate cable to your Macbook’s video output port.
- Connect the other end of the cable to the projector’s video input port.
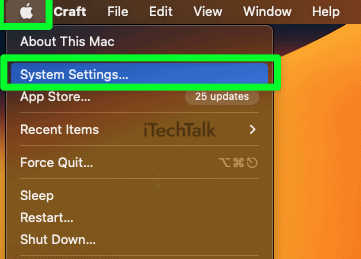
- On your Macbook, click the Apple logo in the top left corner of the screen and select System Settings.
- Select Displays. Here you will be able to identify which display is your laptop and which is the projector. Make sure that the correct display is set as your main screen.
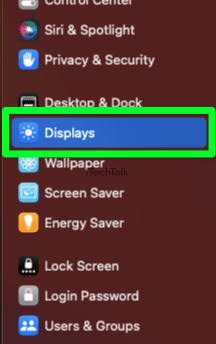
- Click on Detect Displays. Now your Macbook should detect the projector and switch your output to that device.
Note: Some newer Macbooks will automatically detect your projector. For these Macs, you simply need to make your connections and then you are good to go.
How To Mirror Your Macbook To A Projector Wirelessly
If your projector is capable of using a wireless connection, you can use Apple’s AirPlay feature to connect your Macbook and mirror its display on the projector.
First, check that your projector is compatible with AirPlay. If it is, select
AirPlay in the menu bar at the top of your screen and make sure
Show Mirroring Options is selected.
Also, make sure that both your projector and your Macbook are connected to the same Wi-Fi network.
Use your Macbook to establish a wireless connection between both devices:
- In the right-hand corner of your screen, click the Control Center Icon.
- Click Screen Mirroring.

- In the list that pops up, your projector’s name should appear. Click on it and the connection between both devices will be established. Your Macbook’s screen will now be mirrored to your projector.
Conclusion
Making a connection between your Macbook and your projector is not a difficult process, but you do need to make sure you have the appropriate cables and adapter for the job.
Of course, if you’re lucky enough to have a projector with wireless capability, then you don’t have to worry about cables at all.