To Find Any File On Mac, just type in some keywords or the name of a file into the desktop’s top-right search box.
Are you
struggling to locate a
specific file on your Mac? Considering the
thousands of files and folders stored, it’s no surprise that even the most organized person can lose track.
This blog post is here to help, offering
practical tips to Find Any File On Mac quickly and efficiently.
Stick around; we promise you’ll discover something new today!
Quick Summary
- Use the Finder search bar to quickly locate files on your Mac by typing keywords or file names.
- Filter search results by file type, date, and other criteria to narrow your search.
- Use smart folders to gather files based on specific criteria for easy access automatically.
- Access Spotlight search by clicking on the magnifying glass icon in the top-right corner of your desktop or using the shortcut Command + Spacebar.
- Customize Spotlight preferences to personalize your file search experience on your Mac.
- Take advantage of search operators in Spotlight for more precise searches.
- Discover hidden files and folders on your Mac through various methods such as checking Recent Items, searching in the Downloads folder, or using Terminal commands.
How to Find Any File On Mac
To find files on Mac using Finder, use the search bar at your desktop’s top-right corner and enter keywords or file names to initiate a search.
Use the Finder search bar
One of the simplest and most effective ways to locate files swiftly on your Mac is to use the
Finder search bar.

Here’s how:
- Launch Finder from your Dock, use the shortcut Command + Space, and then type “Finder”.
- You’ll see a search bar at the top of the Finder window; click it or use Command + F to focus on it.
- Start typing the name or part of the file name you’re looking for in this search bar.
- As you type, Finder shows real-time results that match your query. File names which contain your input will appear no matter where they are on your Mac.
- To narrow down results even more, use additional details like file type or date modified if you know them.
Filter search results by file type, date, etc.
To make your file search on Mac even more efficient, you can
filter the search results based on specific criteria such as
file type,
date, and more.
Here’s how:
- Use the Finder search bar: Open Finder and click on the magnifying glass icon in the top-right corner of your desktop to activate the search function. Enter your search query in the search bar and press Enter.
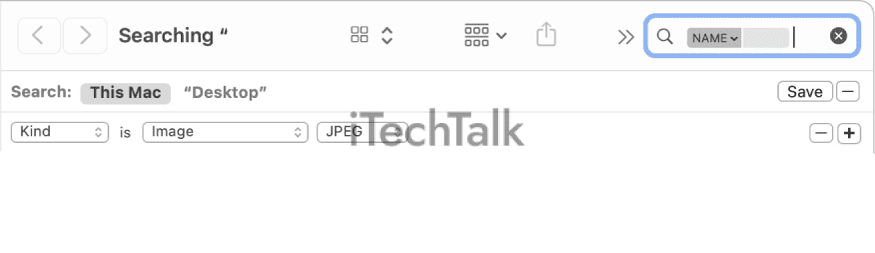
- Filter by file type: To narrow your search to a specific file type, click the “Kind” drop-down menu in the Finder search bar. You’ll see a list of common file types such as document, image, audio, video, etc. Select the desired file type to filter the results accordingly.
- Filter by date: If you know the file you’re looking for was created or modified within a certain timeframe, you can filter the search results by date. Click on the “+” button at the top-right corner of the Finder window and select “Date Last Opened” or “Date Created.” Specify a range or choose predefined periods like “Today,” “Yesterday,” or “Last 7 days” to limit the results.
- Utilize advanced options: To refine your search further, click the “+” button again and explore additional options such as file size, name matches, and location matches. This allows you to narrow down your search even more precisely.
Utilize smart folders
Smart folders are a
handy feature on your Mac that can
save you time and make it easier to find files. They
automatically gather files based on certain criteria you set, so you don’t have to search for them manually every time.
Here’s how to make the most of smart folders:
- Create a smart folder: To create a smart folder, open Finder and go to File > New Smart Folder. A new window will open where you can set up your criteria for the folder.
- Set search criteria: In the smart folder window, click the ‘+’ button in the top right corner and choose your desired criteria. For example, you can search by file type, date modified, or keywords. You can add multiple criteria to narrow down your search even further.
- Save the smart folder: Once you’ve set up your search criteria, click the ‘Save’ button in the top right corner of the smart folder window. Give it a name and choose where you want to save it.
- Access your smart folder: Your newly created smart folder will now appear in the sidebar of Finder under ‘Favorites.’ Simply click on it whenever you want to access those specific files without having to search for them individually.
How to Find Files on Mac Using Spotlight
To find files on Mac using Spotlight, access the search function by clicking on the magnifying glass icon in the top-right corner of your desktop.
Access Spotlight search
Spotlight search is a
powerful tool that can help you
quickly locate any file on your Mac.
Here’s how you can access and use Spotlight search effectively:
- Click on the magnifying glass icon in your desktop’s top-right corner.
- Alternatively, you can use the keyboard shortcut by pressing Command + Spacebar to open Spotlight search.
- Once Spotlight search is open, a search bar will appear at the centre of your screen.
- Simply start typing the name or keywords related to the file you are looking for in the search bar.
- As you type, Spotlight will display results in real-time, narrowing down the options as you go.
- To open a file from the search results, click on it, and it will open in its respective application.
- You can also use additional search operators to refine your search further. For example, you can use “kind: pdf” to only display PDF files or “date: yesterday” to show files modified yesterday.
- To customize Spotlight preferences, go to System Preferences > Spotlight and select/deselect categories like Documents, Applications, etc., based on your preferences.
- Additionally, you can change the keyboard shortcut for accessing Spotlight by going to System Preferences > Keyboard > Shortcuts > Spotlight and modifying it accordingly.
- With these steps, accessing and using Spotlight search becomes a breeze! It’s an efficient way to find any file on your Mac without wasting time manually searching through folders or applications.
Utilize search operators for more precise results
You can use search operators to make your file searches on Mac more accurate and efficient. These operators allow you to refine your search queries and find exactly what you want.
Here are some search operators you can use:
- Use quotation marks (“”) to search for an exact phrase. For example, if you’re looking for a file with the phrase “marketing strategy” in its name, enter “marketing strategy” in the search bar.
- Use the OR operator (|) to search for files that contain one term or another. For example, if you want to find files related to either “budget report” or “financial statement,” enter “budget report | financial statement.”
- Use the NOT operator (-) to exclude certain terms from your search results. For example, if you want to find files about project management but do not want any results related to software development, enter “project management -software development.”
- Use the asterisk (*) as a wildcard character to represent unknown words or characters in a search query. For example, if you’re searching for a file with a specific keyword but are unsure of the exact wording, enter “*strategy*” to find files containing any word that includes “strategy.”
- Use the filetype operator (filetype:) to specify the type of file you’re looking for. For example, to find only PDF documents related to marketing reports, enter “filetype: pdf marketing report.”
Customize Spotlight preferences
Customizing your Spotlight preferences can enhance your file search experience on your Mac.
Here are some tips to help you customize Spotlight according to your preferences:
- Access Spotlight preferences: Open System Preferences from the Apple menu and click “Spotlight.” Alternatively, you can open Spotlight by clicking on the magnifying glass icon at the top-right corner of your desktop and selecting “Preferences.”
- Customize search categories: In the Spotlight preferences window, you’ll see a list of categories such as Applications, Documents, Folders, etc. All categories are selected by default, but you can uncheck any category you don’t want to include in your search results.
- Reorder search results: You can reorder the search results based on your preference. Drag and drop the categories in the order you prefer them to appear in your search results.
- Manage privacy settings: If there are specific folders or files you don’t want Spotlight to index or include in its search results, you can add them to the Privacy tab within the Spotlight preferences window. Click the “+” button and select the folder or file you want to exclude.
- Customize keyboard shortcuts: If you prefer using keyboard shortcuts for accessing different features of Spotlight, you can set custom shortcuts under the “Keyboard Shortcuts” tab in the Spotlight preferences window.
- Enable/disable web searches: Spotlight includes local file searches by default. If you want to disable web searches or configure which search engine it uses, go to the Search Results tab in Spotlight preferences and uncheck “Allow Spotlight Suggestions in Look up.”
- Configure other options: Additional customisation options are available under each category in the Spotlight preferences window. For example, you can show previews of files and documents or enable calculations for mathematical queries.
How to Find Hidden Files and Folders on Mac
To find hidden files and folders on your Mac, check the Recent Items list for any documents you might have accidentally hidden. You can also search for deleted files in the Downloads or Trash.
Additionally, if you’re comfortable using Terminal commands, you can search for files and folders that are not visible through other methods.
Discover all these effective strategies to uncover hidden files on your Mac and take control of your file management system!
Use Recent Items to find documents
Recent Items is a handy feature on your Mac that
allows you to quickly access your most recently opened files. If you’re looking for a document that you were working on recently.
Here’s how you can use Recent Items to find it:
- Click on the Apple menu in your screen’s top-left corner.
- Scroll down and select “Recent Items.”
Check the Downloads folder
The
Downloads folder is a common place where files you download from the internet are automatically saved on your Mac.
To find files in this folder, follow these steps:
- Open a Finder window by clicking on the Finder icon in your dock.
- In the sidebar, click “Downloads” to open the folder.
- You will see a list of files and folders you downloaded online.
- If you know the file name you’re looking for, type it into the search bar at the top-right corner of the Finder window to quickly find it.
- You can also sort the files by date added or modified by clicking on the appropriate column header at the top of the Finder window.
- To open a file, double-click on it.
Search in the Trash for deleted files
Have you accidentally deleted an important file on your Mac? Don’t worry; there’s still a chance to recover it! One of the first places you should check is the
Trash folder.
Here’s how to search for deleted files in the Trash on your Mac:
- Open the Trash folder by clicking on its icon in the Dock.
- You’ll find a search bar in the top-right corner of the Trash window. Click on it to activate the search function.
- Type keywords related to the file you’re looking for, such as its name or type.
- As you type, the Trash will automatically filter out files that don’t match your search terms.
- If you see a file that matches your search criteria, click on it to select it.
- To restore the selected file, right-click on it and choose “Put Back” from the contextual menu.
- The file will be moved back to its original location before being sent to the Trash.
Use Terminal to search for files and folders
Looking for a more advanced way to find files and folders on your Mac? Look no further than Terminal. The Terminal allows you to search for files and folders using
specific commands.
Here’s how you can do it:
- Open Terminal: To open Terminal, go to Launchpad, type “Terminal” in the search bar, and click on the Terminal application.
- Navigate to the directory: Use the ‘cd’ command followed by the path of the directory you want to search. For example, if you want to search the Documents folder, type “cd Documents” and press Enter.
- Search for a file by name: Use the ‘find’ command followed by the file name you’re looking for. For example, if you’re searching for a file called “report.docx,” type “find . -name report.docx” and press Enter. This will search for the file within the current directory (indicated by ‘.’) and its subdirectories.
- Search for files with specific criteria: You can narrow your search by specifying criteria such as file size or modification date. For example, if you want to find all files larger than 1MB in size, type “find . -size +1M” and press Enter.
- Search for folders: If you’re looking for folders instead of files, use the ‘-type d’ option with the ‘find’ command. For example, to search for all folders within the current directory and its subdirectories, type “find . -type d”, and press Enter.
- Save results to a text file: If you want to save your search results to a text file, use the ‘>’ operator followed by the filename and extension. For example, if you want to save the results in a file called “search_results.txt,” type “find . -name report.docx > search_results.txt” and press Enter.
Tips for Efficiently Finding Files on Mac
Organizing your files into folders helps you quickly locate them on your Mac. Additionally, tags and labels can make searching for specific files easier.
Consider using
third-party file management tools for a more streamlined file search experience, and don’t forget to regularly clean up and declutter your Mac to optimize search efficiency.
Organize files into folders
Organizing your files into folders is crucial in efficiently finding them on your Mac.
Here are some tips to help you stay organized:
- Create specific folders for different categories of files, such as work documents, personal photos, or project files.
- Use descriptive names for your folders to identify the content they hold easily.
- Arrange subfolders within each main folder to further categorize your files.
- Group related files together within each folder for easy access and retrieval.
- Consider adding dates or version numbers to file names to keep track of updates or revisions.
Utilize tags and labels
Tags and labels are powerful tools that help you easily organize and locate files on your Mac.
Here’s how to make the most of them:
- Assign descriptive tags to your files: Tags act as keywords that describe the content or category of a file. For example, you can tag a document as “Work,” “Personal,” or “Important.” To assign tags, right-click on a file, select Tags, and choose or create the appropriate ones.
- Use coloured labels for visual cues: Labels provide a visual way to identify and sort files quickly. You can assign different colours to different types of files, such as red for urgent files or green for completed projects. To apply a label, right-click on a file, select Tags, and choose the desired colour.
- Filter files by tags or labels: Once you’ve assigned tags and labels to your files, you can easily filter them using Finder’s search bar. Click on the magnifying glass icon in the top-right corner of your screen, enter a tag or label name in the search bar, and press Enter. This will display only the files that match your search criteria.
- Create smart folders based on tags or labels: Smart folders are dynamic folders that automatically update themselves based on certain criteria. You can create smart folders to group related files together based on specific tags or labels. Right-click in a space within Finder, select New Smart Folder, click on the “+” button in the top-right corner of the window, choose Tags or Labels from the first dropdown menu, select Contains from the second dropdown menu, enter the desired tag or label name in the text field, and click Save.
- Easily access tagged or labelled files: To quickly access tagged or labelled files without using Finder’s search bar every time, create shortcuts in your sidebar. Drag and drop tagged or labelled items onto Favorites in Finder’s sidebar for easy access.
Use third-party file management tools
Using third-party file management tools can significantly boost your productivity in managing and finding files on your Mac.
Many tools have useful features such as
advanced search functions,
bulk renaming, or
duplicate file removal.
Below is a list of some of the popular third-party file management tools that you can consider using to help you find any file on your Mac more efficiently:
| Tool Name |
Description |
Key Features |
| Path Finder |
Path Finder is a powerful, award-winning file browser and management application for Mac. |
Dual-pane browser, tabbed file browsing, file filtering, and quick look functionality. |
| ForkLift |
A robust and elegant Finder replacement that makes file management easy, fast, and efficient. |
Offers two file panels, advanced search, sync and compare functions, and supports numerous connections like FTP, SFTP, WebDAV, and more. |
| Commander One |
A versatile file manager with a dual-pane interface and various powerful features. |
Supports FTP connections, has an integrated Terminal emulator, can open and edit files, and allows setting up hotkeys for any action. |
| Disk Drill |
Not only a file management tool, but it also helps in data recovery, making it an excellent tool if you’re trying to find deleted or lost files. |
Provides a quick and deep scan and finds and recovers deleted files from many storage devices. |
Each tool has unique features, so select the one that best suits your needs. Using a third-party tool for file management can streamline your workflow, saving you precious time and effort.
Regularly clean up and declutter your Mac
To keep your Mac running smoothly and efficiently, cleaning up and declutter your system regularly is important.
Here are some tips for maintaining a clutter-free Mac:
- Delete unnecessary files: Remove any files that you no longer need or use. This includes old documents, videos, music, and photos that are taking up space on your hard drive.
- Clear cache files: Temporary files and cache can accumulate over time and take up valuable storage space. Use a tool like CleanMyMac or CCleaner to scan for and remove these unnecessary files.
- Organize your desktop: A cluttered desktop makes it difficult to find files and can slow down your Mac’s performance. Create folders to organize your files and move them off the desktop.
- Empty the trash: Remember to empty the Trash regularly to delete any deleted files from your system permanently.
- Uninstall unused applications: If there are apps on your Mac that you no longer use, uninstall them to free up disk space.
- Manage startup items: Check which apps launch automatically when you start up your Mac. Disable any unnecessary startup items to improve boot times.
- Optimize storage: Mac OS has a built-in “Optimize Storage” feature that can help you manage storage more effectively by automatically storing certain files in iCloud and removing unneeded content.
- Update software: Keeping your operating system and applications up to date ensures you have the latest bug fixes and performance improvements.
Conclusion
In conclusion, finding any file on Mac may seem daunting at first, but it can be a breeze with the right knowledge and tools. You can easily locate files based on keywords, file types, or even the date created by utilising the Finder search function or Spotlight search.
Don’t forget to explore hidden files using Recent Items or check your Downloads folder. With these tips and tricks, you can efficiently navigate your Mac’s system and easily find any file.
Happy searching!