Stumped on how to Resize Mac Partitions? Adjusting disk partitions is a
common need for many Mac users– whether to make room for a new operating system, allocate space for specific tasks or organize data more effectively.
This
comprehensive guide will walk you through
resizing your Mac partitions using Disk Utility and even provide
tips without losing valuable content. Ready to find out more? Let’s dive in!
Quick Summary
- Resizing Mac partitions using Disk Utility is a straightforward process that allows you to easily adjust the size of your partitions without losing data.
- Third-party partition management software like iPartition, Paragon Partition Manager, and EaseUS Partition Master provides additional flexibility and advanced features for resizing Mac partitions.
- It is crucial to create a backup of your Mac before resizing any partitions to ensure the safety of your files in case anything goes wrong during the process.
- Resizing Mac partitions can also be done using Terminal commands, but it requires advanced knowledge and should be approached with caution to avoid data loss or system issues .
Understanding Disk Partitions on macOS
Disk partitions on macOS refer to dividing a physical hard drive into multiple sections or volumes, each acting as an independent storage area with its file system.
What are disk partitions?
Disk partitions are essentially
divisions of your Mac’s hard drive that function as
separate, individual drives. These allow users to
organize their files and applications effectively by keeping them in different sections.
Partitions also
help operating systems run smoothly, especially when dealing with
multiple ones on the same hard disk.
Imagine a large office divided into several rooms for distinct purposes – that’s what disk partitioning does for your
computer’s storage space!
Why would you need to resize a partition?
Resizing a partition on your Mac may become necessary for several reasons. One common reason is when you want to
create additional space for a
new operating system, application, or file storage.
You can allocate more disk space to specific tasks by resizing the partition without investing in a new hard drive.
Additionally, resizing partitions allows you to manage your data organization better and
optimize performance by allocating more space to frequently accessed files or applications.
It also provides flexibility in adjusting the size of partitions based on changing computing needs over time.
Whether you need more storage capacity or want to reorganize your disk allocation, understanding how to resize Mac partitions is crucial for optimizing your computer’s efficiency and functionality.
How to Resize Mac Partitions Using Disk Utility
To
resize a Mac partition using Disk Utility, launch the application and select the disk containing the partition you want to modify.
Then, click the Partition button and adjust the partition size by dragging its edges in the pie chart representing disk allocation.
Launching Disk Utility
To resize a Mac partition, you’ll need to use
Disk Utility, the built-in tool on macOS. You can launch Disk Utility by selecting Utilities in your Applications folder. Once open, you will see a list of disks on the left-hand side of the window.
Selecting the disk itself, not just its volume is important to resize partitions successfully. Disk Utility provides an intuitive interface that allows you to easily manage and adjust your partition sizes according to your needs.
It’s worth noting that there may be cases where Disk Utility cannot resize a partition due to specific
constraints or limitations.
Selecting the partition to resize
To resize a partition on your Mac,
select the specific partition you want to adjust. This can be done by launching Disk Utility and navigating to the “Partition” tab.
From there, you will see a list of all the disks connected to your Mac. It’s important to note that when resizing a partition, you should
select the disk rather than just its volume.
By selecting the disk, you ensure that any changes will apply to all volumes on that disk. Once you have selected the correct disk, you can shrink or extend the desired partition based on your needs and
available space according to its specific allocation in the pie chart displayed by Disk Utility.
Shrinking a Mac partition
To shrink a Mac partition, you can easily do it using Disk Utility. First,
launch Disk Utility from your Applications folder or search for it in Spotlight. Once open,
select the disk that contains the partition you want to resize (not the volume).

You’ll see a pie chart displaying the current distribution of partitions on the disk.
To shrink a partition, click on the “Partition” button and then click on the partition you want to resize. From there,
drag the edge of the partition to decrease its size. The pie chart will update dynamically as you make changes.
Remember to
backup your drive before resizing any partitions, as this process can be risky and may result in data loss if not done correctly.
Additionally, remember that rules govern whether resizing a partition is possible.
Extending a Mac partition
To extend a Mac partition, you can easily do so using
Disk Utility. Simply launch Disk Utility from your Applications folder and select the disk that contains the partition you want to extend.
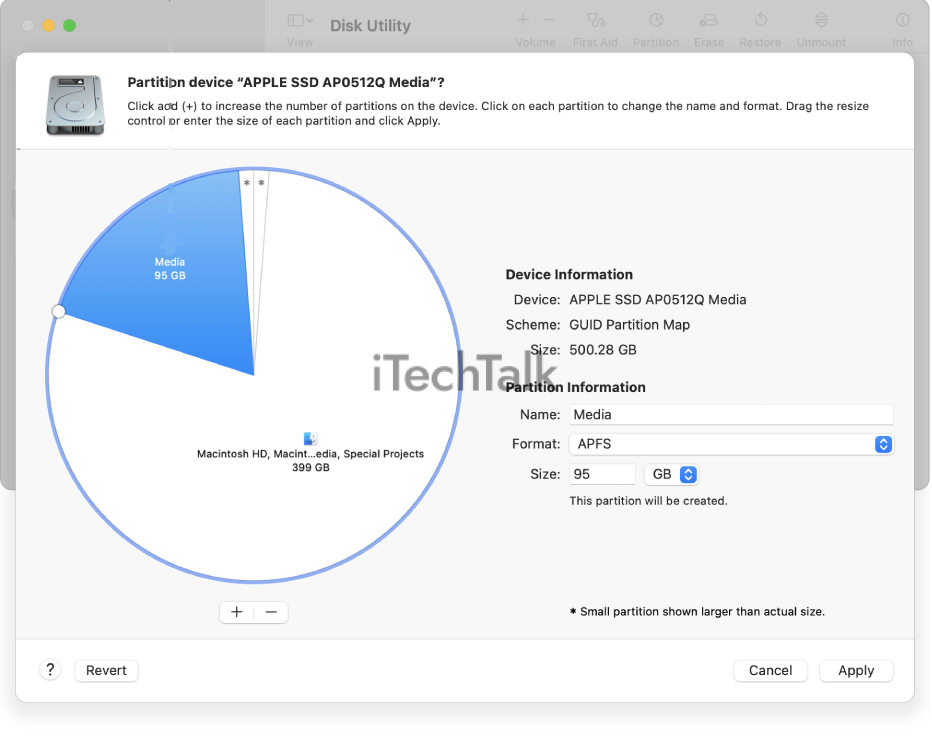
Once selected, click the Partition button at the top of the window. You will then see a pie chart displaying your current
partition allocation.
To
extend a specific partition,
click and drag the edge of that partition in the pie chart to increase its size.
As you resize, keep an eye on the
size indicator next to each partition to ensure accurate adjustments. Once satisfied with your changes, click
Apply and wait for Disk Utility to complete the
resizing process.
How to Resize Mac Partitions Without Losing Data
To resize a Mac partition without
losing data, you can use third-party partition management software or Terminal commands to adjust the size. It is essential to create a
backup before resizing, ensuring the safety of your files.
Want to know more about these methods? Keep reading!
Using third-party partition management software
Using
third-party partition management software can provide
additional flexibility and advanced features when resizing Mac partitions.
Here are some popular options:
- iPartition: This software offers a user-friendly interface and allows you to resize, create, delete, or merge partitions without data loss. It also supports non-destructive repartitioning.
- Paragon Partition Manager: With this tool, you can easily redistribute free space between partitions, convert file systems, and manage multiple operating systems on your Mac.
- EaseUS Partition Master: This software allows you to resize, move, merge, copy, and clone partitions with ease. It also comes with a feature to recover deleted or lost partitions.
- Stellar Partition Manager: This tool lets you resize, create, delete, format, and hide/unhide partitions on your Mac. It ensures data safety during the resizing process.
- Cisdem Winchats: This partition manager provides a straightforward way to resize partitions on your Mac. It supports various file systems and allows you to extend or shrink volumes effortlessly.
Creating a backup before resizing
Creating a backup of your Mac is crucial before resizing any partitions. This step ensures you have a copy of all your important files and data in case anything goes wrong during resizing.
With a backup, you can easily restore your Mac to its previous state without losing valuable information.
Resizing partitions involves changing the structure and allocation of
disk space on your Mac. While Disk Utility and other partition management tools are generally reliable, there is always a
small data loss or corruption risk.
That’s why
taking the precautionary measure of backing up your Mac is highly recommended. It provides peace of mind knowing that even if something unexpected happens, you still have a backup copy that can be easily restored.
Remember, creating a backup doesn’t have to be complicated or time-consuming. You can
use Time Machine or any other reliable backup software to securely save all your files on an
external hard drive or cloud storage service.
Resizing partitions using Terminal commands
To resize a Mac
partition using Terminal commands, follow these steps:
- Open the Terminal application on your Mac .
- Type “diskutil list” and press Enter to view a list of available disks and partitions.
- Identify the disk and partition you want to resize.
- Type “diskutil resizeVolume [partition] size” and press Enter, replacing “[partition]” with the identifier of the partition you want to resize (e.g., disk0s2) and “size” with the desired size for the partition.
- Please wait for the command to complete, as it may take some time, depending on the partition size.
Conclusion
In conclusion,
resizing Mac partitions doesn’t have to be a daunting task. With the help of
Disk Utility or third-party partition management software, you can easily adjust your disk allocation and modify volume sizes without losing data.
Always back up
your drive before making any changes, and be aware that there may be
limitations depending on the specific circumstances. Follow these steps and guidelines to resize your Mac partitions and optimize your storage space efficiently.
FAQs
1. Can I resize my Mac partitions without losing data?
Yes! Using built-in Disk Utility or third-party partitioning software can resize your Mac partitions without losing data. However, it’s always recommended to back up your important files before making any changes to the partitions.
2. What is the best tool to resize Mac partitions?
Several reliable third-party tools are available for resizing Mac partitions, such as EaseUS Partition Master, Paragon Hard Disk Manager, and Stellar Partition Manager. These tools offer advanced features and a user-friendly interface for easy partition resizing.
3. How do I resize a Mac partition using Disk Utility?
To resize a Mac partition using Disk Utility, follow these steps:
- Open Disk Utility from the Applications folder or by searching in Spotlight.
- Select the drive containing the partition you want to resize from the left sidebar.
- Click on the “Partition” tab.
- Click on the partition you want to resize, drag its edges, or input specific values in the size fields.
- Once satisfied with the new sizes, click “Apply” to start resizing.
4. Are there any risks involved in resizing Mac partitions?
Resizing Mac partitions always carries some risk, especially if not done correctly or without proper precautions, such as backing up data beforehand. There is a slight chance of data loss or system instability during the process, so it’s essential to ensure backups are in place and follow instructions carefully when performing any disk
management tasks