Keeping track of and
managing subscriptions on your iPhone can be a daunting task, especially when it comes to
canceling unwanted services.
With
numerous apps and services requiring regular payments, it’s crucial to know how to delete subscriptions effectively. As an iPhone user, you might feel overwhelmed with the various options for handling app subscriptions – worry no more!
Our
comprehensive guide will walk you through how to
delete subscriptions on iPhone in
clear, easy-to-understand steps.
Quick Summary
- To view and manage your subscriptions on iPhone, go to the Settings app and tap “Subscriptions” or access it through the App Store or iTunes.
- To cancel an active subscription on iPhone, use the Settings app, App Store, or iTunes. Follow each step carefully to avoid accidentally deleting an active subscription.
- Use third-party apps like Truebill or Trim to monitor and cancel subscriptions automatically, saving you time and effort managing multiple services.
- Create a list of all your active subscriptions using a spreadsheet or note-taking app to stay organized and avoid unwanted charges. Review this regularly.
Understanding And Managing Subscriptions On iPhone
There are
different subscriptions on iPhone, including in-app purchases, Apple Music, and iCloud storage.
Different Types Of Subscriptions
As a seasoned iPhone user, I’ve come across various subscriptions catering to different preferences and needs. One common type is the
auto-renewal subscription, which automatically renews at the end of each billing cycle unless you cancel it beforehand.
Another popular type of subscription is
non-renewing subscriptions – these are typically
one-time purchases for a set duration or specific content.
Examples include access to an e-book library, premium filters on your favorite
photo editing app, or virtual currency in mobile games.
Some apps also offer
free trials that convert into paid subscriptions after a certain period if not canceled within the trial period.
Where To Find Subscriptions On iPhone
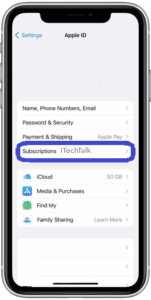
To find subscriptions on your iPhone, open the
Settings app and tap your name. Select “Subscriptions” from here to view a list of all the active subscriptions associated with your Apple ID.
This is also where you can cancel or modify any of these subscriptions. Alternatively, you can open the App Store app, tap on your profile picture at the top right corner of the screen, then select “Subscriptions” to see a similar list of all active subscriptions for any apps enabled.
How To View And Manage Subscriptions
Managing your subscriptions on an iPhone is crucial to maintaining control over your finances. To view and manage subscriptions, open the Settings app, tap your name, and select “Subscriptions.”
Your active subscriptions, prices, and renewal dates are here.
To manage them individually, tap the subscription you want to modify. From there, you’ll have various options depending on the subscription type.
For example, you might be able to select a different subscription plan or turn off auto-renewal for that particular service.
Remember that it’s always best to periodically review these settings as some services may change their pricing or offer new features which make them more appealing while others become less so over time.
How To Cancel Subscriptions On iPhone
Learn how to easily cancel subscriptions on your iPhone using the Settings app, App Store, or iTunes.

Using The Settings App
To delete subscriptions on your iPhone using the
Settings app, follow these steps:
- Open the Settings app on your iPhone.
- Tap on your name at the top of the screen.
- Scroll down and tap on “Subscriptions.”
- Here, you will see a list of all your active subscriptions.
- Tap on the subscription that you want to cancel.
- Tap on “Cancel Subscription.”
- You will be asked to confirm the cancellation; tap “Confirm” if you are sure.
- Your subscription will now be canceled, and you won’t be charged any further fees.
- Remember to check that the canceled subscription is removed from your list of active subscriptions.
Following these steps carefully can help you quickly and easily manage and delete your subscriptions using only the Settings app on your iPhone without going through multiple apps or settings menus.
It’s essential to regularly review and cancel unwanted or expired subscriptions to
avoid unnecessary charges and efficiently track your finances.
Using The App Store
To cancel subscriptions on iPhone via the App Store, follow these steps:
- Open the App Store app.
- Tap on your profile picture in the top right corner.
- Tap on “Subscriptions.”
- Choose the subscription you want to cancel.
- Tap “Cancel Subscription” at the bottom of the screen.
- Confirm that you want to cancel the subscription by tapping “Confirm.”
- If prompted, provide a reason for canceling the subscription.
- Wait for a confirmation message to appear on your screen indicating successful cancellation.
- Remember to check your billing statement to ensure you are no longer being charged for this subscription in future months.
Note: Cancelling a subscription via the App Store may not work for all types of subscriptions, so it’s important also to check other methods for canceling subscriptions mentioned in this article, such as using iTunes or the Settings app.
Using iTunes
To delete subscriptions on iPhone, you can also use iTunes. Here are the
steps to follow:
- Open iTunes on your computer.
- Click on “Account” and then on “View My Account.”
- Enter your Apple ID and password if prompted.
- Scroll to “Settings” and click “Manage” next to Subscriptions.
- Find the subscription you want to cancel and click “Edit.”
- Click “Cancel Subscription” at the bottom of the screen.
- Confirm that you want to cancel the subscription by clicking “Confirm.”
- Once canceled, iTunes will show a message saying your subscription has been canceled.
- Sync your iPhone with iTunes to ensure the changes are reflected on your device.
Remember that this
only works for subscriptions purchased through iTunes or billed through Apple ID balance.
So if you have subscriptions from third-party apps, you must cancel them through those apps or the Settings app on your iPhone.
Tips And Troubleshooting For Canceling Subscriptions
– If you encounter issues canceling a subscription, try contacting the service provider for assistance.
Common Issues And How To Fix Them
I have encountered some common issues when canceling subscriptions on my iPhone. Here are some of the problems and their respective solutions:
- Unable to find the subscription: If you can’t locate the subscription you want to cancel, ensure you’re signed in with the correct Apple ID used to purchase the subscription.
- Subscription is still active after cancellation: This can happen if you cancel your subscription after its renewal date. Contact the app developer or service provider to rectify this and request a refund.
- Subscription not showing up in App Store: Ensure that you have updated to the latest version of iOS and that your payment method is valid.
- Error message while canceling: Restart your device, check your internet connection, or use a different device or browser.
- Inability to turn off auto-renewal for a subscription: Check that you followed all the necessary steps for turning off auto-renewal for subscriptions.
By following these tips, you can avoid these common issues when deleting subscriptions on your iPhone.
Setting Up Alerts And Reminders
To avoid forgetting about subscriptions and being charged unnecessarily, it’s important to
set up alerts and reminders.
This can be done through the iPhone’s built-in
Reminders app or
third-party apps like SubscriptMe or Bobby.
It’s also helpful to note when subscriptions expire so that you can manually cancel them. You can do this by creating a list of all your active subscriptions in a notes app or spreadsheet and including the expiration date for each one.
This way, you won’t forget when it’s time to evaluate whether you still need that specific subscription or if it’s time to cancel it.
Utilizing Third-Party Subscription Management Apps
One helpful option for managing and deleting subscriptions on iPhone is to use
third-party subscription management apps. These apps can help you
keep track of all your subscriptions in one place, including those that are inactive or expired.
Some popular options include
Truebill, Trim, and Bobby.
For example, Truebill offers a
free service that connects directly with your bank accounts and credit cards to monitor your spending and subscriptions.
The app alerts you when a new subscription pops up and allows you to cancel it within the app easily.
Similarly, Trim offers similar services but also helps negotiate bills for internet services or cable television; while Bobby provides an easy-to-use interface that shows all current subscriptions with clear information on how much you’re being charged each month/yearly and reminders before the next payment date so users can decide if they want to continue subscribing or not.
Organizing And Keeping Track Of Subscriptions
Creating a list of subscriptions and utilizing subscription tracking apps are effective ways to keep track of your active subscriptions.
Creating A List Of Subscriptions
One helpful way to
manage your subscriptions on iPhone is by creating a list of all active subscriptions. This helps you keep track of which subscriptions you are currently paying for and
avoid unnecessary charges.
Here are some steps to create a list of subscriptions:
- Open the App Store app on your iPhone.
- Tap on your profile picture in the top right corner of the screen.
- Scroll down to the “Subscriptions” section and tap on it.
- You will see a list of all active subscriptions associated with your Apple ID account. Take note of each subscription and its respective monthly or annual charge.
- Consider using a spreadsheet or note-taking app to create a list that includes each subscription, how much it costs, and when it renews.
- Review this list regularly to ensure you are not paying for unwanted or unnecessary subscriptions.
Creating and maintaining a list of subscriptions allows you to stay organized and avoid unexpected charges on your iPhone account.
Using Subscription Tracking Apps
As mentioned earlier, various third-party subscription management apps are available to help you keep track of your subscriptions.
These apps can provide a consolidated view of all your subscriptions in one place and send you alerts when a subscription is about to renew or expire.
I find these apps particularly helpful because they make it easy to stay on top of my subscriptions without constantly checking each one individually.
Additionally, some subscription tracking apps may even be able to
identify and cancel unwanted or unused subscriptions for you.
A subscription tracking app can manage and organize your iPhone subscriptions more efficiently, avoiding unnecessary charges or fees.
Managing Subscriptions With Family Sharing
Knowing how to manage subscriptions for multiple users on one account is important if you’re part of a family-sharing plan. Family sharing allows up to six people in your family to share purchases from the App Store, iTunes Store, and Apple Books.
To manage subscriptions with
Family Sharing, go to Settings > Your Name > Family Sharing > Subscriptions. From here, you can view all active and expired subscriptions for each member of your family group.
One benefit of managing subscriptions with Family Sharing is that it
helps avoid duplicate payments and overlapping service periods among users.
It’s also a great way to track who can access what services within your household.
Conclusion And Final Tips
Deleting subscriptions on iPhone is an important task for
managing your finances and keeping track of your digital services.
Deleting expired or unwanted subscriptions can be a breeze with the right knowledge and tools.
Remember to check that the subscription has expired before attempting to delete it, and always follow the steps carefully to
avoid accidentally deleting an active subscription.
Periodically reviewing and deleting subscriptions can save you money in the long run, so keep track of them using a list or third-party app.