Struggling with a Brew Command Not Found on Mac? This is a common issue that many MacOS users encounter, indicating Brew isn’t properly installed or recognized by the system.
Our comprehensive guide will walk you through understanding and troubleshooting this frustrating error to restore your system’s functionality.
Ready for some tech wizardry? Let’s dive in!
Quick Summary
- The “brew command not found” error on Mac occurs when the system cannot locate the brew binary in its path, indicating an incomplete or incorrect installation of Homebrew.
- This error can significantly impact your system’s functionality, preventing you from installing or managing software packages using Homebrew and hindering workflow and productivity in Terminal.
- To fix this error, you can try reinstalling Homebrew software, adding brew to the PATH variable, correcting the Homebrew installation, installing the ARM version on M1 Macs, or installing Xcode on your Mac.
Understanding the Brew Command Not Found on Mac
Mac’s “brew command not found” error occurs when the system cannot locate the brew binary in its path.
Cause of the error
With the brew command acting as a backbone of many functions on your Mac, encountering the “brew command not found” error could leave you scratching your head.

This problem typically crops up due to either an incomplete or incorrect installation of Homebrew or that Brew itself isn’t installed.
Another factor might be that the zsh shell cannot locate the brew binary needed to execute commands.
In essence, it implies that your system is stumbling in its search for this important executable file within its PATH environment variable directory list— a critical repository where Unix systems look for such files.
Impact on system functionality
Mac’s “brew command not found” error can significantly impact your system’s functionality. Without the brew command, you won’t be able to install or manage software packages using Homebrew, which is a popular package manager for macOS.
This means installing and updating various applications and tools that rely on Homebrew might encounter difficulties.
Additionally, if you frequently use a Terminal or a command-line interface, this error can hinder your workflow and productivity.
The inability to access the brew command can prevent you from executing specific commands or scripts that rely on Homebrew’s functionality.
To resolve this issue and restore full system functionality, promptly addressing the “brew command not found” error is crucial by following the suggested solutions and troubleshooting steps outlined below.
Common scenarios where the error occurs
The “brew command not found” error can occur in various scenarios on a Mac system.
Here are some common situations where you might encounter this issue:
- Fresh installation: When Homebrew is not installed on your Mac, attempting to use the brew command will result in the “command not found” error.
- Incorrect installation: If Homebrew was not installed properly or its installation got corrupted, the brew binary may not be located in the expected path, leading to the command not being found.
- Using different shells: The error can also occur when you switch between different shells, such as from Bash to zsh, and the new shell cannot find the brew binary in its designated path.
- System updates or upgrades: Upgrading macOS or updating Xcode can sometimes interfere with the existing Homebrew installation or affect its accessibility, resulting in the “command not found” error.
- M1 Mac architecture: On newer M1 Macs with Apple Silicon, running brew commands directly without proper configuration may trigger the “command not found” error due to compatibility issues with the ARM architecture.
- PATH environment variable issues: If the PATH environment variable is misconfigured or does not include the directory where Homebrew is installed, the system cannot locate and execute brew commands, leading to the error message.
Solutions to Fix the “brew command not found” Error
To resolve the “brew command not found” error on Mac, you can try reinstalling Homebrew software, adding brew to the PATH variable, correcting the Homebrew installation, installing the ARM version on M1 Mac, or installing Xcode on your system.
Reinstalling Homebrew software
You can try reinstalling the Homebrew software to fix Mac’s “brew command not found” error.
Here are the steps:
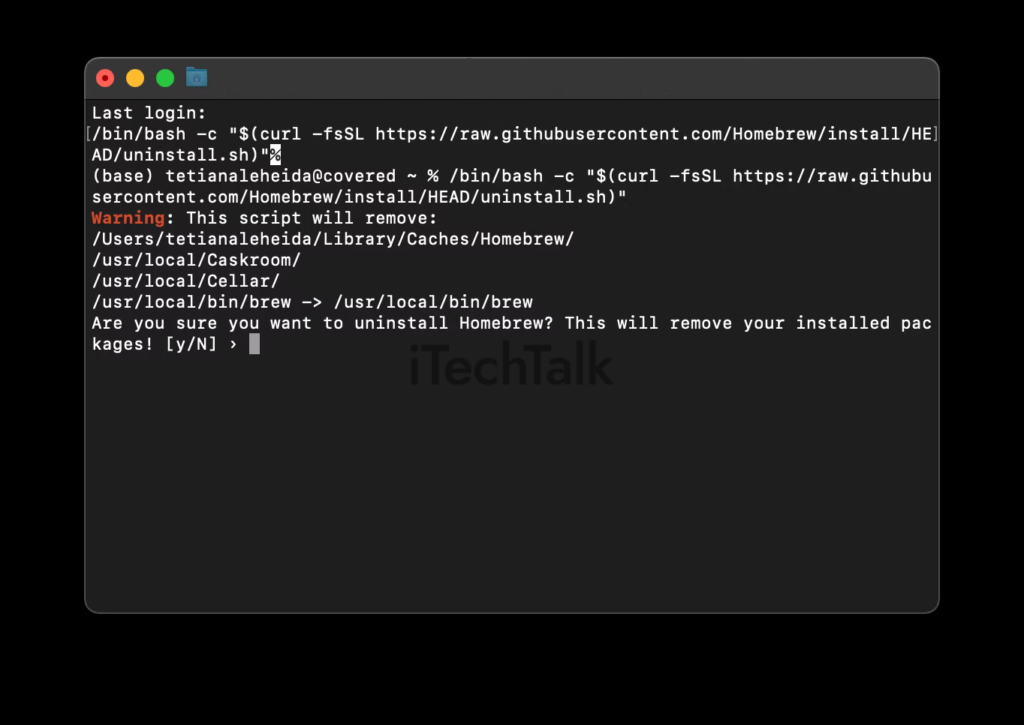
- Uninstall Homebrew by running the following command in the Terminal.
- Once the uninstallation is complete, remove any remaining Homebrew files by running the following command.
- Next, reinstall Homebrew by running the following command in the Terminal
- Follow the instructions prompted in the Terminal for installation.
- After reinstallation, update Homebrew and all its packages to ensure everything is up to date by running
Adding brew to the PATH variable
You can add brew to the PATH variable to fix Mac’s “brew command not found” error. This will ensure the system knows where to find the brew binary when executing commands.
To add brew to the PATH variable, follow these steps:
- Open Terminal on your Mac.
- Type `nano ~/.zshrc` and press Enter. This will open the .zshrc file in the nano text editor.
- Scroll down to the bottom of the file.
- Add the following line to the file: `export PATH=”/usr/local/bin:$PATH”`
- Press Ctrl + X to exit nano.
- Type Y to save changes.
- Press Enter to confirm the filename.
Correcting the Homebrew installation
If you’re encountering the “brew command not found” error on your Mac, it could be due to an issue with your Homebrew installation.
Here are some steps you can take to correct the installation:
- First, make sure that Homebrew is properly installed on your system. You can do this by running the following command in your terminal
- To reinstall Homebrew, open your terminal and run the following command
- After reinstalling Homebrew, you may need to update the PATH variable to include the directory where Homebrew is installed. You can do this by adding the following line to your shell configuration file (e.g., ~/.bash_profile or ~/.zshrc)
- Finally, verify that Homebrew is now correctly installed by running `brew help` again in your terminal. You should see the help documentation without any errors.
Installing the ARM version on M1 Mac
To fix the “brew command not found” error on an M1 Mac, you can try installing the ARM version of Homebrew.
Here are the steps to follow:
- Download and install Rosetta 2: Rosetta 2 is a translation process that allows Intel-based apps to run on M1 Macs. To install Rosetta 2, open Terminal and enter the following command
- Open Terminal: Launch Terminal on your M1 Mac by going to Applications > Utilities > Terminal.
- Install Homebrew using the ARM architecture: In the Terminal, enter the following command
- Follow the installation prompts: The installation process will prompt you for your password. Enter it when prompted and wait for Homebrew to finish installing.
- Update your PATH variable: After installation completes, you may need to update your PATH variable so that your system recognizes the brew command. Add the following line to your shell configuration file (e.g., ~/.zshrc or ~/.bash_profile).
- Close and reopen Terminal: Quit Terminal and relaunch it for the changes to take effect.
Installing Xcode on Mac
To resolve the “brew command not found” error on Mac, one of the solutions is to install Xcode on your Mac.
Xcode is Apple’s integrated development environment (IDE) and contains the necessary tools for software development.
- Open the App Store on your Mac.
- Search for “Xcode” in the search bar.
- Click on the Xcode app from the search results.
- Click the “Get” or “Download” button to download and install Xcode.
- Depending on your internet connection, downloading and installing Xcode may take some time.
- Once the installation is complete, you can find Xcode in your Applications folder.
Troubleshooting Steps for the “brew command not found” Error
To troubleshoot the “brew command not found” error, you can follow these steps:
Checking the system path
To troubleshoot the “brew command not found” error on Mac, you can start by checking the system path. The system path is a list of directories where the operating system searches for executable files.
The command will not be found if the brew binary is not in one of these directories.
Here are the steps to check the system path:
- Open a terminal window on your Mac.
- Type the following command and press Enter.
- Look for directories containing the brew binary, such as `/usr/local/bin` or `/opt/homebrew/bin`. Brew is not included in the system path if these directories are missing from the output.
- Verify if Homebrew is installed on your Mac by running this command.
- If Homebrew is installed but not included in the system path, you must add it manually.
- Using a text editor, open your terminal profile file (e.g., `~/.bash_profile`, `~/.zshrc`).
- Add the following line at the end of the file.
- Save and close the file.
Verifying Homebrew installation
To verify the installation of Homebrew on your Mac, follow these steps:
- Open the Terminal application on your Mac.
- Type the command “brew doctor” and press Enter.
- This command will analyze your Homebrew installation and check for any issues or errors.
- If Homebrew is installed correctly, you will see a message stating that your system is ready to brew.
- If there are any problems with the installation, you will receive error messages or warnings indicating what needs to be fixed.
- Pay attention to specific instructions provided in the output to address the issues.
- If you don’t have Homebrew installed, you can install it by typing the command “/bin/bash -c “$(curl -fsSL https://raw.githubusercontent.com/Homebrew/install/HEAD/install.sh)” && echo ‘eval “$(/opt/homebrew/bin/brew shellenv)”‘ >> /Users/your_username/.zshrc && eval “$(/opt/homebrew/bin/brew shellenv)”‘ >> /Users/your_username/.zshrc” in Terminal and pressing Enter.
- After verifying or reinstalling Homebrew, run “brew doctor” again to ensure everything is set up correctly.
Updating and upgrading Homebrew
To keep your Homebrew installation up to date and ensure you have the latest version of packages, regularly updating and upgrading Homebrew is essential.
Here are the steps to update and upgrade Homebrew on your Mac:
- Open Terminal on your Mac by navigating to Applications > Utilities > Terminal.
- Type the following command and press Enter to update the package lists from Homebrew’s repositories.
- Wait for Homebrew to fetch the latest updates from its repositories.
- Once the package lists are updated, you can upgrade all installed packages by running the following command.
- Homebrew will check for updates for all installed packages and proceed with upgrading them.
- If you want to upgrade a specific package, use the following command instead.
- After executing one of the above commands, Homebrew will download and install any available updates for your packages.
- Once the upgrade completes, you will have an updated version of Homebrew and any upgraded packages on your system.
Checking for conflicting software or plugins
To troubleshoot the “brew command not found” error on Mac, it’s important to check for any conflicting software or plugins that may be causing the issue.
Here are some steps to follow:
- Review recently installed software and plugins: Check if you have recently installed any software or plugins that could potentially conflict with Homebrew. Remove or temporarily disable them to see if the issue persists.
- Disable antivirus or security software: Antivirus or security software can sometimes interfere with Homebrew’s functionality. Temporarily disable them and try rerunning the brew command to see if it resolves the issue.
- Check for conflicting PATH variables: Open your terminal and run the following commands:
- echo $PATH
- which brew
- Resetting PATH variable: If you suspect a conflicting PATH variable, you can try resetting it to its default value by running:
- export PATH=”/usr/local/bin:/usr/bin:/bin:/usr/sbin:/sbin”
- Uninstall conflicting software: If you identify any specific software causing conflicts with Homebrew, uninstalling them completely from your system may resolve the issue.
- Reboot your Mac: A simple system reboot can sometimes help resolve conflicts between different software components.
Conclusion
In conclusion, encountering the “brew command not found” error on Mac can be frustrating, but it is a common issue that can be easily resolved.
Following the solutions and troubleshooting steps provided in this guide, you should be able to fix the problem and get back to using Homebrew without any issues.
Remember to properly install and configure Brew on your system to prevent this error from occurring in the future. Don’t let this minor setback hinder your quest for a seamless brewing experience on your Mac!
FAQs
1. Why am I getting the “Brew command not found” error on my Mac?
The “Brew command not found” error typically occurs when Homebrew, a package manager for macOS, is not installed on your computer or the installation was unsuccessful. It could also happen if the Homebrew executable path is missing from your system’s PATH variable.
2. How can I fix the “Brew command not found” error on my Mac?
To fix this error, you can try reinstalling Homebrew by following the official installation instructions on their website. If Homebrew is already installed, but you still encounter the error, it might be necessary to update your PATH variable to include the correct location of the Homebrew executable.
3. What should I do if reinstalling and updating PATH doesn’t resolve the issue?
If reinstalling Homebrew and updating your PATH variable does not fix the problem, there may be other factors causing this error. It could be due to conflicting installations or configurations on your system interfering with Homebrew’s functionality. In such cases, seeking assistance from online forums or contacting Homebrew’s support community may help troubleshoot and resolve any underlying issues.
4. Is it possible to use alternative package managers instead of Brew?
Yes! Alternative package managers are available for macOS, such as MacPorts and Fink, which serve similar purposes as Homebrew. You can explore these options if you prefer using a different package manager or if you continue encountering difficulties with Homebrew. However, it’s important to note that each package manager has its features and usage methods, so familiarize yourself with them before switching.